Congratulations! You have purchased a stylish piece. We strive to provide fine furniture products, built with quality materials and hand finished details. Please carefully follow the assembly instructions to ensure your furniture is assembled correctly to provide long lasting enjoyment. Our Products are warranted against defects in material and workmanship for a period of 90 days beginning from the date of sale.
Care and Maintenance Instructions Keeping Your Furniture Beautiful Quality furniture is a significant investment expected to last for generations. To maintain its beauty and help it last, furniture needs the right care. No finish is totally indestructible. But with regular care, the finish will last much longer, providing years of enjoyment to you. Tips to Protect and Care for Your Furniture 1. Avoid placing your furniture in direct sunlight, as sunlight causes fading. 2.
Leather Furniture Care: Wipe spills immediately with clean cloth or sponge. For spots or stains and daily cleaning, clean with mild non-detergent soap. Rinse well, gently wipe off, and allow to air dry. Cleaning Butter, Oil or Grease from Leather; Wipe leather with a clean cloth, and leave alone. The oil will be absorbed by the leather. DO NOT APPLY WATER. Also, do not use saddle soap, cleaning solvents, furniture polish, oils, varnish, abrasive cleaners, ammonia or any other type of chemical solution.
again. Pour out a small amount of oil, and rub it into the wood using a cloth or paper towel. As the oil soaks in, add more and continue rubbing and polishing with the grain until the oil is absorbed. The first time you seal your butcher block, it may take several applications before it stops "drinking" oil, but in later cleanings you'll just need to refresh it. Keep adding oil until no more soaks in, remove any excess with a cloth.
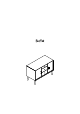
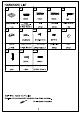
PART LIST Top Panel Side Panel Support Leg Left Dividing Right Dividing Panel Panel 1PC PCS PCS 1PC 1PC Front Rail Bottom Panel Front Leg Frame | Back Leg Frame | Right Back Panel PCS 1PC 1PC 1PC 1PC Left Back Panel | Middle Back Panel| Adjustable Shelf | Left Door Panel | Right Door Panel 1PC 1PC PCS 1PC 1PC Front Left Side Panel | Right Side Panel | Back Panel of Front of Top Drawer of Top Drawer of Top Drawer Top Drawer of Bottom Drawer 1PC 1PC 1PC 1PC PCS Left Side Panel | Right Side Panel Back Panel Bo
HARDWARE LIST ADDITIONAL TOOLS (Not Provided) Note: It is not recommended to use power tools during assembly.
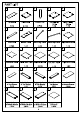
Please do not use tools to assemble this unit unless specifically indicated. Reference the images above any time the instructions state "lock the hardware”. Note: Be sure to check all hardware is locked when completed. Step 1. Attach magnets (part #6) to per-drilled holes of top panel (part A) by using magnet screws (part #7) and fillips head screwdriver.
Step 2. Attach knobs (part #10) to front of top drawer (part P) and front of bottom drawers (part T) by using round head bolts (part #12) and fillips head screwdriver. emp x3 Step 3. Attach handles (part #11) to left door panel (part N) and right door panel (part O) using round head bolts (part #12) and fillips head screwdriver.
Step 4. Attach left side panel of top drawer (part Q) and right side panel of top drawer (part R) to back panel of top drawer (part S) by using wood dowels (part #13) and lock the hardware. Slide bottom panel of drawer (part X) into the grooves of left side panel of top drawer (part Q) and right side panel of top drawer (part R). Attach front of top drawer (part P) to left side panel of top drawer (part Q) and right side panel of top drawer (part R) using wood dowels (part #13) and lock the hardware.
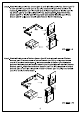
Step 6. Attach back leg frame (part |) to bottom panel (part G} by using large wood dowels (part #2), long bolts (part #4) and Allen wrench (part #5). Step 7. Attach front leg frame (part H) to bottom panel! (part G) by using large wood dowels (part #2), long bolts (part #4) and Allen wrench (part #5).
Step 8. Attach support legs (part C) to bottom panel (part G). Step 9. Carefully tum the assembly over, and secure back leg frame (part I) and front leg frame (part H) to bottom panel (part G) by using bolts (part #3) and Allen wrench (part #5).
Step 10. Attach front rails (part F) to right dividing panel (part E) by using large wood dowels (part #2) and lock the hardware. #2 == x2 Step 11. Attach left dividing panel (part D) to front rails (part F) by using large wood dowels (part #2) and lock the hardware.
Step 12. Attach left dividing panel (part D) and right dividing panel (part E} to bottom panel! (part G) by using large wood dowels (part #2) and lock the hardware. #2 == x4 Step 13. Attach side panel (part B) to bottom panel (part G) by using wood dowels (part #13) and lock the hardware.
Step 14. Attach side panel (part B) to bottom panel (part G) by using wood dowels (part #13) and lock the hardware. #13== x2 Step 15. Attach top panel (part A) to side panels (part B), left dividing panel (part D) and right dividing panel {part E) by using wood dowels (part #13) and large wood dowels (part #2) and lock the hardware.
Step 16. Turning the unit around, attach right back panel (part J) and left back panel (part K) to top panel (part A), side panels (part B) and bottom panel (part G) by using panel screws (part #8) and fillips head screwdriver. #8 =@ x14 Step 17. Attach middle back panel (part L) to top panel (part A), bottom panel (part G), right back panel (part J) and left back panel {part K) by using panel screws {(part #8) and fillips head screwdriver.
Step 18.Insert shelf holders (part #9) into desired position and slide adjustable shelves (part M) into place. #9 cro x8 Step 19. Attach left door panel (part N) and right door panel (part O) to top panel (part A) and bottom panel (part G) by using hinges (per-assembled).
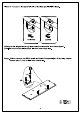
Safety Strap Kit Wall Anchor Washer Short Screw Long Screw Safety Wall Strap 1PC AX1PC Bx2PCS Cx1PC Dx1PC Expect SAFETY STRAP WALL ASSEMBLY INSTRUCTION 1) Insert short screw (part #C) through washer (part #B) and safety wall strap (part #E) and screw it into the top center of top middle back panel (part L). 2) Drill a 11/32" hole where you want to secure your unit. The hole should be at the same height as the hole in the top center of top middle back panel (part L). Tap wall anchor (part #A) into the hole.
Limited Manufactures Warranty Our Products are warranted against defects in material and workmanship for a period of 90 days beginning from the date of sale. Should you experience any damaged, defective, or missing parts, or need help with assembly, please call us directly before contacting the retailer.