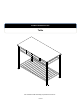
Product Instructions for: Table CONSOLE TABLE CONSOLE TABLE For assistance with assembly or questions contact us.
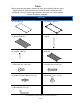
Table Before beginning assembly, separate all parts and carefully study the parts diagrams below. Review all parts and hardware before disposing of any packaging. You may receive extra hardware with your unit. Call Customer Service for missing hardware. Parts List A: Top Panel (1) B: Top Metal Frame (1) C: Bottom Shelf (1) D: Leg (4) E: Support Tube (4) F: Shelf (1) 1. Short Bolt 1/4” x3/4” (26) 2. Long Bolt 1/4” x1-1/8” (4) 3. Double Threaded Bolt 1/4” x1” (4) 4. Adjustable Foot 1” x1” (4) 5.
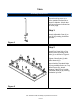
Table Assembly Instructions Unpack and lay parts on a clean, padded surface like a carpet or blanket. Check that you have all parts indicated on the front page. Step 1 Attach Adjustable Feet (4) to Leg (D) by rotating clockwise by hand. Figure 1 Step 2 Attach Top Panel (A) to Top Metal Frame (B) using Short Bolts (1) as shown in Figure 2. Tighten Short Bolts (1) with Allen Wrench (5). Insert Double Threaded Bolts (3) into predrilled holes on Top Metal Frame (B).
Step 3 Attach Shelf (F) to unit from Figure 2 using Long Bolts (2) as shown in Figure 3. Tighten Long Bolts (2) with Allen Wrench (5). Figure 3 Step 4 Insert Legs (D) into corresponding holes on Top Metal Frame (B). Figure 4 For assistance with assembly or questions contact us.
Step 5 Secure Legs (D) to Shelf (F) using Short Bolts (1). NOTE: Please wait to tighten Short Bolts (1) until after Bottom Shelf (C) is secure. Attach Bottom Shelf (F) to Legs (D) using Short Bolts (1). Tighten all Short Bolts (1) with Allen Wrench (5). Figure 5 Step 6 Turn assembled unit from Figure 5 right-side up. Now your Kitchen Cart is ready to use! Figure 6 For assistance with assembly or questions contact us.