
Installation & Assembly


5 |
English
N
ote! Installation by a certified electrician is recommended.
• Find your main fuse or breaker box in your home.
• Turn off and/or unscrew all fuses.
• Turn off all circuit breaker switches that
control power to the room in which you are working.
• T
urn any wall switches off. If any pull chains or switche
s
are on the fixture, turn off.
N
ote! Do not damage any wire insulation during installation.
Note! Ensure no rough or sharp edges are in contact with any wires.
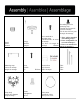
M
ounting Instructions:
1. Confirm power is off.
2.
T
hread screws (C) into the mounting strap (E).
3.
A
ttach the mounting strap (E) to an electrical box with screws (C).
M
ake the wire connections:
1.
C
onfirm power is off.
2.
C
onnect the electrical box black wire to the black fixture wire.
3.
C
onnect the electrical box white wire to the white fixture wire.
4. Attach green/yellow grounding wire to the mounting strap
with grounding screw (D).
A
ttach the lamp:
1.
Pa
ss the wires through the tube (H) and screw the tube (H) to the lamp body (J).
2. Pass the wires through the canopy (B) and screw the canopy (B) to the tube (H).
3. Align the holes in the canopy (B) with the 2 screws of the mounting strap (E).
4. Secure the canopy (B) to the mounting strap (E) with finials (A).
5.
S
ecure glass shades (K) to lamp body with the screws (J). Be careful not to overtighten screws.