
Assembly Instruction

1.0
Assembly Instructions (English)
ASSEMBLY INSTRUCTION FOR
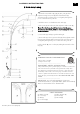
1. Insert the curved tube (A), (B) ,(C) into part (F), then
tighten it using hex screw (E) with allen wrench (D).
You may need to pull any excess cord gently through the
poles so that these two parts fit.
2. Fold the excess cord and insert into tube (G).
3. Place part (F) into tube (G), then tighten it with screw (H) .
Note: The Arc lamp should face forward in the same
direction as the switch, with the cord coming out of the
back of the base.
4. Screw tube (G) and (I) together until tight
5. Insert tube (I) to base (J) & washer (K), then tighten it with
nut (L) using wrench (M). You may need to pull any excess
cord gently through the poles so that these two parts fit.
6. Place shade (O) onto socket (N) and tighten it with socket
ring (P).
GENERAL PRODUCT INFORMATION:
This product is suitable
for dry locations only.
---------------------------------------------------------------
IMPORTANT SAFETY INSTRUCTIONS:
This portable lamp has a polarized plug as a feature to reduce the
risk of electric shock (one blade is larger than the other). This
plug will fit in a polarized outlet only one way. If the plug does
not fit fully in the outlet, reverse the plug. If it still does not fit,
contact a qualified electrician.Do not use with an extension cord
unless the plug can be fully inserted. DO NOT ALTER THE
PLUG .
----------------------------------------------------
BULB TYPE : Use only with maximum of 3*60 watt
incandescent bulbs or 3*13W CFL bulbs. (bulbs not included)
Must use all incandescent or all CFL bulbs.
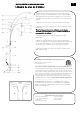
PARTS DIAGRAM
(3)* HEX screw (E) (1)* Allen Wrench (D)
(1) * Screw (H) (1)* Washer (K)
(1)* Nut (L) (1)* Wrench(M)
(3)* Socket ring(P)
3 Arm Arc Lamp