
Installation & Assembly

IMPORTANT:
• ALL INSTALLATION WORK SHOULD BE DONE BY ACCREDITED PROFESSIONAL.
• SHUT OFF POWER SUPPLY AT FUSE OR CIRCUIT BREAKER!
• USE ONLY THE SPECIFIED BULBS. DO NOT EXCEED THE MAXIMUM WATTAGE!
PREPARING FOR INSTALLATION
Carefully remove all of the contents from the carton. See the
important notes above. Shut off the power at the circuit breaker
andcompletelyremovetheoldxturefromtheceiling,including
theoldmountingstrap.
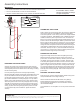
Fromthepartsbagremovethemountingstrapassembly.
Mountingstrap(B)containsseveralpairsofthreadedholes.Find
thepairofholesthatmatchesthespacingoftheholesonthe
junctionboxandthexture’scanopy.Twoofmountingscrews
(A)shouldbeattachedtomountingstrap(B).Youmayneedto
tightennuts(C)thatholdthesescrewsinplace.Pullthehouse
wiresthroughthecenterofmountingstrap(B).Placemounting
strap(B)overthejunctionboxsothatmountingscrews(A)are
vertical,andinalignmentwiththeholelocationsonthexture’s
canopy(F).Securemountingstrap(B)tothejunctionboxwith
mountingscrews(D)andascrewdriver.Tightenthescrews
securely.
ASSEMBLING THE FIXTURE
Rods(LandK)areonthexture’swires.Bymeasuring,determine
thecorrectnumberofrodsneededforproperhangingheight.
There are 3 optional 12 inch rods (L) and a 6 inch rod (K) included.
Tolengthenthexture,addadditionalrods.Ifadditionalrodsare
needed,contacttheplaceofpurchasetoorder.Toshortenthe
xture,trimthewirestothedesiredlengthaddingatleast8to10
inchesofwiretothedesiredlength.Slideanyexcessrodsoffthe
xture’swirestodiscard.Keepinmindthatyoumustuseatleast
theprovided6inchrod(K)tohangthexture.Threadthewires
throughtherodsandpullthewiresuntiltautbeforethreadingthe
rodstogether.Threadbottomrod(K)ontopost(M)atthetopof
the socket. Twist top rod (K or L) onto the threads of swivel post
(I)ofcanopy(F).Locktherodinplacebytwistingscrew(G).Pull
thexturewiresthroughthetopofthecanopy.
CONNECTING THE WIRES
Supporttheweightofthexturewhilecompletingthewiring.
Attachthexture’swirestothepowersupplywiresfromthe
junctionbox.Connectblacktoblack(orsmooth);whitetowhite
(orribbed);groundtoground(greenorcopper).Twisttheends
ofthewirepairstogether,thentwistonawireconnector.Make
surealltwistsareinthesamedirection.Ifthereisnogroundwire
(greenorcopper)fromthejunctionbox,locategroundscrew(E)
onmountingstrap(B)andwrapthexture’sgroundwirearound
thegreengroundscrew(E).Useascrewdrivertosecureground
screw(E)ontomountingstrap(B).Tuckallwiresneatlyintothe
junctionbox.
FINISHING THE INSTALLATION
Pushcanopy(F)uptotheceilingandtightlythreadnuts(H)onto
theexposedthreadsofmountingscrews(A).
Tiltthesocketandinstallthecandlesleeve,thenglass(N)
beforeinstallingthelightbulb(notincluded)inaccordance
withthexture’sspecications.Donotexceedthemaximum
recommendedwattage.
Your installation is now complete. Turn on the power and test the
xture.
CLEANING TIPS
Treat the xture gently! Regular cleaning will reduce the need for deep cleaning. For regular cleaning, turn off the light and wipe down the
xture with a clean lint-free cotton or microber cloth. Never spray cleaner directly onto the xture.
BLACK
(Hot)
WHITE
(Neutral)
GREEN
(Ground)
HOUSE WIRES
SMOOTH
(Or Black)
FIXTURE WIRES
RIBBED
(Or White)
BARE COPPER
(Or Green)
A
B
C
D
E
F
H
G
I
L
K
J
M
O
N
For Customer Service, contact
the place of purchase to arrange
for replacement parts.
Assembly Instructions