
User's Guide


Quantum 2200 Installation Guide v2.1
Page 36
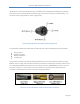
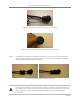
Step 6:
Using your fingers, insert the crimped pins into the corresponding holes of the DC power
connector plug (Figure 27). Be sure to match the pin-out as specified earlier.
Figure 27: Pins inserted into DC power connector
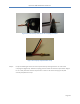
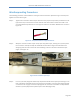
Step 7:
Next use needle nose pliers to insert the pins further by grabbing the first crimp location and
pushing all the way into the connector body. It helps if you place the connector face down
on a table to provide extra leverage. It is critical that the pins are pushed as far into the
connector body as possible. See Figure 28
Figure 28: Use needle-nose pliers to push the pins further into the plug.
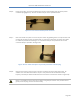
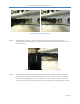
Step 8:
Now use the insertion tool to secure the pins inside the connector plug (Figure 29). An
audible ‘click’ should be heard when the pin is fully inserted into the connector body.
Properly inserted pins will be visible from the front of the connected as shown in Figure 30).
Note: It is possible to over-insert the pin when using the pin insertion tool, so take care to
gently insert the ping into the connector body.