
User's Guide


Quantum 2200 Installation Guide v2.1
Page 20
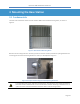
The next step is to mount the front and back pole mount plates (Figure 9) to the pole, using the
provided hardware as indicated in Table 4.
Nylon tie wraps have been provided for convenience to temporarily affix the front mounting
plate to the pole during the installation process.
A selection of carriage bolts has been provided to accommodate a variety of pole diameters. Select a
set of 4 bolts that enable a secure fit to your pole. Insert each carriage bolt through the front mounting
plate and slide a pushnut onto it to temporarily hold it in place. Slide the back mounting plate onto the
carriage bolts, sandwiching the pole in-between, then add lock washers and hex nuts tightened to a
torque of 30 in-lbs.
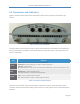
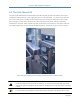
Insert the four provided M8-1.25x25 hex bolts along with M8 split lock washers into the side holes of the
front pole mounting plate and leave them loose for now. These bolts provide the attachment point for
the base station mounting bracket to the pole mount subassembly. The completed subassembly is
shown in Figure 11.
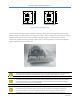
Figure 11: Pole Mount Subassembly
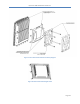
Finally, using the handle on the base station mounting bracket, lift the base station subassembly onto
the pole mount subassembly and hang it on the four side mounting bolts. Torque the bolts to 30 in-lbs.
For this and other installations in this manual, a suitable anti-corrosion lubricant should be
applied to all exposed metal surfaces. For your convenience a tube of Bostik NEVER-SEEZ®
has been provided in the PureWave Quantum Base Station Basic Installation Kit.
Note that these types of lubricants tend to be “messy” and “sticky” to apply due to the
nature of their intended application. Always read the labels or instructions provided and take
necessary pre-cautions during application.