
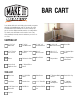
Assembly Instructions
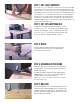


Place the side supports 3” up from the bottom of the
frame and clamp the frame and side support together,
securing them with 1-1/4” screws. Repeat this step on
the remaining side supports.
STEP 6: Side Supports
Transfer the width measurement of the frame legs to the
corners of the bottom shelf to create cutting lines. Cut all
four corners with a jigsaw and use an orbit sander to
smooth out any rough areas on the corner cuts. You can
now assemble the bottom shelf.
NOTE: Be sure to take your time when cutting out the leg notches so the
bottom shelf ts snug and neat onto the length supports and side
supports.
STEP 7: Create Cutting Lines
Coat the bar cart frame with layer of primer and allow it
to dry.
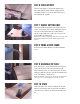
Next, mark where to cut the top shelf sides and repeat on
each shelf side piece. Each corner should have a 45º
mitered nished corner, so set the miter saw to 45º. After
cutting, pre-drill holes into the shelf sides and attach them
to the shelf with #8 2” nish screws.
NOTE: The alignment of each corner is critical to the overall t and look
of the project, so precision and attention to detail are necessary.
STEP 9: Assemble Top Shelf
Stain all the sides of the shelves and dowels as this will
allow for easy touchups after the cart is fully assembled.
Then add a coat of paint to the main frame and allow it to
dry.
STEP 10: Stain
STEP 8: Prime & Paint Frame