
Assembly Instructions
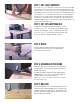


First, use the 2” x 2” x 8’ oak board to cut four cart legs. Do this by measuring
and marking 30-1/2” from the end of the board and cutting with a miter saw.
Then, use the 2” x 2” x 8’ board to create the four leg supports by measuring
and marking every 20-7/8” from the end of the board and cutting with a miter
saw. Using the 2” x 2” x 8’ board, measure and mark 12” before dividing your
board into four 12” long side supports using your miter saw. Finally, measure
and cut two dowels with the miter saw so that they are 20-7/8” long before
cutting two additional dowels at 12” with a miter saw as well. Afterwards, use a
sander to smooth any rough areas.
STEP 1: Cut Legs & Supports
To make the bottom shelf, measure and mark a 1” x 16” x
4’ board to cut a 15” x 24” section using a circular or table
saw. Use the remaining 1” x 16” x 4’ board for the top shelf
to cut a 13-1/2” x 22” section using a circular or table saw.
Be sure to smooth any rough areas with a sander.
STEP 2: Cut top & Bottom Shelf
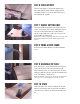
Using a router and a round-over bit, route the edge on
the bottom shelf on all four sides. This will provide a
nice smooth look to your cart.
STEP 3: Route
Drill pocket holes in the outer frame pieces with a pocket
hole jig (using 1-1/4” screws) then sand all of the pieces
with an orbit sander.
Assemble the frame using the legs and length supports,
drilling with the 1-1/4” screws. The top length supports
should be ush to the top of the cart legs.
NOTE: Be sure to use two 32” clamps to support the pieces in place
while fastening the screws.
STEP 4: Assemble Outer Frame
Next, tape the drill bit at 1/2” from the tip. Measure 11-1/2”
up the cart legs and mark, making sure to repeat this step
on all inner-facing sides. Drill 1/2” into the frame up to the
tape line, repeating on both marks on each leg. Then sand
the holes with an orbit sander.
STEP 5: Drilling