
Assembly Instructions


Take a moment to sand any rough edges from all of
your cut pieces to ensure they have smooth surfaces.
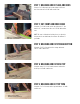
STEP 6: Sand
Route a round-over edge on the desk top and back trim
using your router and round-over bit. Route ONLY three
sides of the desk top and back trim (two edges and one
long side of the back trim; two short sides and one long side
of the desk top). The back side will need to be square to
match the top back trim as this will provide a nice smooth
look to your desk. Once nished, sand the routed edges
until they are smooth.
STEP 7: Route and Sand
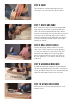
Using the Kreg Jig ®, drill two pocket holes on both
sides of the 11-5/16” side pieces. Keep the jig ush to
one side of the side pieces to leave space for the desk
bottom when assembling. Then use the Kreg Jig® to
drill one centered pocket hole on both sides of the two
9-13/16” side pieces. Use a sander to smooth out any
rough areas.
Assemble the inner frame using the front, back and inner
side pieces by attaching the box sides with 1-1/4” Kreg ne
screws. Pre-drill the side pieces into the storage bottom and
attach. This will complete the inner box of the desk!
STEP 9: Assemble inner box
Attach side pieces to the two desk legs using the 1-1/4”
Kreg ne screws.
STEP 10: Attach side pieces
STEP 8: drill pocket holes