Is it live or is it Memorex? TM MVD1402 14" COLOR TV WITH ooofo oo t°.
Contents ...................................................................... ! o R STD (Picture Standard) .................................... _mportant Safety Instructions ................................... Precautions ................................................................. 2 5 Power Source ............................................................. Location of Controls .................................................. 5 6 o o , Headphone Jack ....................................
i The rightning flash with arrowhead symbor within an equiraterar triangle is intended to alert the user to the presence of uninsurated dangerous voltage within the product's enclosure that may be d sufficient magnitude to constitute a risk of electric shock to persons. CAUTION o CAUTION:TO REDUCE THE RrSK OF ELECTRrC SHOCK, DO NOT REMOVE COVER (OR BACK).
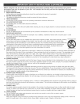
Beforeusingthe unit,besureto readall operatinginstructions carefully. Please note that these are general precautions and may not pertain to your unit. For example, this unit may not have the capability to be connected to an outdoor antenna. 1. READ iNSTRUCTiONS All the safety and operating instructions should be read before the product is operated. 2. RETAIN iNSTRUCTiONS The safety and operating instructions shouUdbe retained for future reference. 3.
17. OUTDOOR ANTENNA GROUNDING If anoutsideantennais connected totheproduct,besuretheantennasystemis groundedsoasto providesome protection againstvoltagesurgesandbuilt-upstaticcharges.Section810of theNationalElectricCode,ANSI/NFPA 70, providesinformation withrespecttopropergrounding ofthemastandsupporting structure, grounding ofthelead-inwire toanantennadischarge product,sizeofgrounding conductors, locationofantennadischarge product,connection to grounding electrodes andrequirements forgrounding electrodes.
NOTES ON HANDLING: TO OBTAIN When shipping this unit, always use the original shipping carton and packing materials. For maximum protection, repack the unit as it was originally packed at the factory. Do not use volatile liquids, such as insect spray, near the player. Do not leave rubber or plastic products in contact with the DVD player for a long time. They will leave marks on the finish. The top and rear panels of the player may become warm after a long period of use.
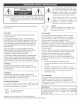
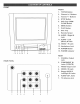
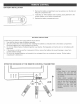
FRONT FRONT 1. TV/BVB Button 2. Channel +/- Buttons 3. Vomume +/- Buttons 4. STOP Button 5. BVB Tray OPEN/ CLOSE Button 6. MENU Button 7. PLAY Button 8. Disc Tray 9. Remote Sensor 10. AUBNO 1 Right Jack mN 11. AUDLO 1 Left (Mono) BN Jack 12. WBEO 1 BN Jack 13. Headphone 1 2 REAR 3 456 7 8 910111213 14. POWER Button 15. POWER hdicator 14 15 1. COAXIAL Jack 2. COMPONENT PANEL Jacks 3 4 Output _N (Y/CB/CR) 3. WBEO Output 4. WDEO 2 BN Jack 5.
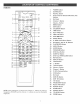
1 2__ 24 25SCAN RECALL _ [____ _MUTE DISPLAY !I -5 26 -- 14_ 15 ----41 18 -DCALL RECALL Button 4. Direct Channel Selection/Number buttons 5, Not Used 6. Channel 7, Volume - Button 8. MENU Button + Button EXIT Button CALENDAR 11, TiME Button 29 12, REV 44 Button 13. FWD _ Button 14. STOP (@) Button 15. SETUP Button 16. D. MENU (DVD Menu) Button 17, 18. Navigation (_,_,A,_') PLAY/ENTER Button 19, ANGLE Button 20. AUDIO Button 21.
BATTERY INSTALLATION 1, Remove the battery compartment cover by pushing in on the tab and lifting the compartment off. 2, Install two (2) "AAA" batteries (not included), paying attention to the polarity diagram in the battery compartment. 3, Replace the battery compartment cover. BATTERY PRECAUTIONS Follow these precautions when using batteries in this device: 1. Use only the size and type of batteries specified.
OUTDOOR VHF/UHF ANTENNA CONNECTION (ANTENNA NOT INCLUDED) Follow the instructions for the type of antenna system you intend to use. If using Cable or satellite, see the next page.
ThisTV hasan extendedtuningrangeandcantunemostcablechannelswithoutusinga CableTV converterbox.Some CableTVcompanies offer"premiumpaychannels"in whichthesignalis scrambled.Descrambling thesesignalsfor normal viewingrequirestheuseof a descrambler devicewhichis generallyprovidedbythecablecompany. FOR SUBSCRIBERS TO BASIC CABLE TV SERVICE For basic cable service not requiring a converteddescrambler box, connect the CATV 75 ohm coaxial cable to the VHF/UHF jack on the rear of the TV. ........
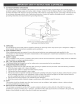
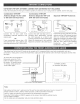
CONNECTION USNNG COAXmAL CABLE: Follow the instructions below to connect an external unit, such as a VCR, to your unit using a 75 ohm coaxial cable. (CABLES NOT INCLUDED.) VCR Fxom VCR OU'[ jack 1. Connect the cable, satellite or incoming antenna to the VHF/UHF IN jack on the rear of the external unit. 2. Connect a 75 ohm coaxial cable from the external unit's 75 ohm OUT jack to the TV Antenna jack on the rear of the unit. 3.
CONNECTION . USING THE COMPONENT Y/CB/CR JACKS Connect the cable, satellite or incoming antenna to the VHF/UHF IN jack on the rear of the external unit, such as a VCR or a second DVD player. 2. Connect the left and right audio cable from the external unit's Audio OUT jacks to this unit's AUDIO 2 IN jacks. 3. Connect the external unit's Component Video OUT jacks to this unit's COMPONENT IN Jacks (Y/CB/CR). l Audio CabUe 4. Press the TV/AV button until DVD appears on the TV screen.
CONNECTION USING THE COAXIAL JACK F£om Digital OBt @@@ (D Fro]]] Video Out / 9 \\ Place the subwoofer, front, rear and center speakers in locations as shown/described here. After correctly positioning the speakers, perform the Tone Test on the AV Amplifier and adjust the volume controls until the desired sound is achieved. For best results, sit in the viewing position and have someone adjust the volumes for you; this will enable you to set the optimal levels. 1. Front Left Speaker 2.
The region number for this DVD Player is: See the following page for information regarding region numbers. PLAYABLE I_if4_'_l D_SCS: The following discs can be played back on this DVD player: VIDEOCD OJGITALAUD_O DISC TYPES: DVD Title 1 Data on most DVDs is divided into sections called "titles" and then into subsections called "chapters", each of which is given a title or chapter number. Some features of this DVD player will not operate with some DVD discs as they are preset.
Notes on Copyright: It is forbidden by law to copy, broadcast, show, broadcast on cable, play in public and rent copyrighted material without permission. DVD video discs are copy protected, and any recordings made from these discs will be distorted. This product incorporates copyright protection technology that is protected by method claims of certain U.S. patents and other intellectual property rights owned by Macrovision Corporation and other rights owners.
WDEO SETUP SETTING MENU: THE PICTURE ,_©@@ Video Video @@@@ 'L.S Press the MENU button @ once; the Video menu will appear. Press the CHANNEL Up @ or Down @button until the desired picture setting is selected (PICTURE, BRIGHTNESS, COLOR, SHARPNESS, TINT). NOTE: Tint option is only available when in the Inner DVD mode. Press the VOLUME Up @ or Down @ button to adjust the setting. When done, press the Menu button @once to return to the Video menu.
TIMER SETUP SETTING MENU (CANNOT BE USED WHEN IN DVD MODE): THE CLOCK SCAN RECAL_D_SPLA¥ MUTE Timer Press the CHANNEL Up @ or Down @ button until CLOCK is selected; the hours will be highlighted in red. NOTE: The clock is a 24 hour (military time) type clock. While in TV/AV mode, press the MENU button @ once; the Video menu will appear. Press the VOLUME Up @or Down @ button to select the Timer setting. NOTE: You can press the TIME button @to directly enter to Time Setting while in TV/AV mode.
SETTING THE ON TIMER Timer Timer ,\_ _, ,_, G© 6 r ................. , ] While in TV/AV mode, press the MENU button @ once; the] / Press the CHANNEL Up @ or Down @ button until TIME ONJ is selected; the hours will be highlighted in red. Video menu will appear. Press the VOLUME Up @or Down / @ button to select the Timer setting. NOTE: You can press the TIME button @to directly enter toj Timer Setting while in TV/AV mode. / Timer Timer '\J VDJD ] Press the VOLUME Up @ or Down @ button to set th
SETTING THE OFF TIMER Timer Timer "_ (¢ r_ kj) (8> ',d.,' k j' While in TV/AV mode, press the MENU button @ once; the] Press the CHANNEL Up @ or Down @ button until TIME OFF is selected; the hours will be highlighted in red. Video menu will appear. Press the VOLUME Up @or Down / @ button to select the Timer setting. / NOTE: You can press the TIME button @to directly enter toj Timer Setting while in TV/AV mode. / Timer Timer /. .
SETTING THE REMIND TIMER Timer Timer \J While in TV/AV mode, press the MENU button @ once; the Video menu will appear. Press the VOLUME Up @or Down @ button to select the Timer setting. NOTE: You can press the TIME button @to directly enter to Timer Setting while in TV/AV mode. Press the CHANNEL Up @ or Down @button until REMIND TIME is selected; the hours will be highlighted in red. Timer /,_ P W'DW Press the VOLUME Up @ or Down @ button to set the desired Remind minute.
SETUP MENU: SETTING THE LANGUAGE _} {_} @ @ Setup @@©@ ©@@,_ \/ @@@G .@ iv,_vL, Press the MENU w_vD button @ once; the Video menu will] Press the VOLUME Up @ or Down @ button to set the] desired Language (ENGLISH, FRENCH or SPANISH)._ When done, press the EXIT button @to exit the menus. | | appear. Press the VOLUME Up @ or Down @ button toj select the Setup setting.
SETTINGTHEVNR(VIDEONOISEREDUCTION _@_@ Setup ,_j @,@ @ ,-, @,y'< @@@@ eeeO Press the MENU button @ once; the Video menu will] Press the VOLUME Up @or Down @button to turn the VNR] ON (this will allow the picture tube to warm up and gently_ turn on, thus increasing the life of the picture tube) or OFF._ appear. Press the VOLUME Up @ or Down @ button to_ select the Setup setting. Press the CHANNEL Up O or[ Down @button until VNR is selected.
SETTING THE CLOSED {i} ¢j2}(3} _4} CAPTIONS Setup @@@@ @©@Y< Press the MENU G@@,_ button @ once; the Video menu will] Press the VOLUME Up @ or Down @ button to turn Closed] Captions off or on and select a mode (see page 38 for_ | appear. Press the VOLUME Up @ or Down @ button to / select the Setup setting. Press the CHANNEL Up O or / Down @button until C. CAPTION is selected. | details). When done, press the EXIT button @ to exit the_ / SETTING THE TV TO DEMO C} ,@@ q} @@10@ C9@@ _ \J menus.
CHANNEL SETTING SETUP MENU: THE CHANNEL II _ _ _ _ SYSTEM Channel ,_@©@ \J ,V,DVD ] While in the TV mode, press the MENU button @ once; the_ Press the VOLUME Up @ or Down O button to set the desired] Channel System (AUTO, NTSC or NTSC443). When done, / press the EXiT button @to exit the menus. NOTE: in USA, the system is NTSC. | / Video menu will appear. Press the VOLUME Up 0 or Down 0 / button to select the Channel Setting.
SETTING CHANNELS INTO MEMORY This unit is equipped with a channel memory feature which allows channels to skip up or down to the next channels set into memory, skipping over unwanted channels. Before selecting channels, they must be programmed into the unit's memory. In addition to normal VHF/UHF channels, this unit can receive up to 125 Cable TV channels. Channel _ While in the TV mode, press the MENU button @ once; the Video menu will appear.
ADDING AND DELETING CHANNELS After setting channels into memory, you can add or delete channels as follows: Channel w;ov_ While in the TV mode, press the MENU button @ once; the Video menu wtl appear. Press the VOLUME Up @or Down @ button to select the Channel Setting. Press the CHANNEL Up O or Down @ button untt CURRENT CH. is selected. fT_ Press the VOLUME Up @ or Down @ button to select a desired channel to add or delete. Channel Press the CHANNEL Up @ or Down @ button until SKIP is] selected.
CALENDAR SETUP MENU: @@@@ ,@@©@ CaEendar Calendar E× ©©©6 _'_"© q Press the MENU button @ once; the Video menu wi11_ appear. Press the VOLUME Up @ or Down @ button to_ sebct the Cabndar setting. Press the CHANNEL Down button @ until the year is] | sebcted. Press the VOLUME Up @or Down @ button to set_ the year, then press the CHANNEL Down button @; the / month will be higNighted.
V-Chipenablesparentsto preventtheirchildrenfromwatchinginappropriate materialonTV.V-Chipreadstheratingsfor programming (exceptfornews,sports,uneditedmoviesonpremiumcableandEmergency Systemsignals),thendenies accessto programming if theprogram'sratingmeetsthelimitations youselect.Inthiscase,the programwill beblocked. PARENTAL CONTROL SET-UP Password Password While in the TV/AV mode, press the MENU button @ once;] the Video menu will appear. Press the VOLUME Up @ or_ Down @ button to select the Password.
TV RATING SET-UP @@@@ @@@@ Parental Lock Enter the Parental Lock menu and turn on the V-chip option as described on page 28 (steps 1 and 2). @@@@ '_ '_ Press the CHANNEL Up @or Down @button until TV RATING is selected, then the VOLUME Up @ or Down O button to select it. @@©@ TV Rating TV Rating i i i i i i i i i i i You can also block some or all criteria for each level Fantasy Violence (FV), Sexual Dialogue (D), Language Sexual Situations (S) or Violence (V).
MPAA RATING SET-UP ©,@@@ @,@@@ @,@@,,x Parental Lock Enter the Parental Lock menu and turn on the V-chip option as described on page 28 (steps 1 and 2). @@©@ Press the CHANNEL Up @ or Down @ button until MPAA RATING is selected, then press the VOLUME Up @ or Down O button to select it. MPAA RATING 6© 6 Press the CHANNEL Up @ or Down @ button to select a rating and then the VOLUME Down button @ to BLOCK (ratings at or above cannot be viewed) or UNBLOCK (ratings at or under can be viewed).
LOCK MENU @@@@ Parental Lock ,_, _{-__, Enter the Parental Lock menu and turn on the V-chip option as described on page 28 (steps 1 and 2). Press the CHANNEL Up @ or Down @ button until LOCK MENU is selected. Lock When Press the VOLUME Up @ or Down @ to enter the Lock menu. Press the CHANNEL Up @ or Down O button to select AV Lock or Program Lock. Press the VOLUME Up @ or Down @to turn the option ON or OFF. finished, Parental menus.
GENERALSETUPMENU: Whilein theDVDstopmodeORwhilein DVDmodeandwithouta DVDinserted, presstheSETUPbutton@oncetoselectthe GENERAL SETUPPage,selectan optionbelowusingthe Navigation (A, _') buttons@,thenselectusingthe Navigation (_,_) buttons@,thenselect/change thesetupoptionusingtheNavigation (A, _) buttons@andthePLAY/ENTER button@.Toexitthe setupmenu,pressthe SETUP button@twice.
TheParentaloptionenablesparentsto preventtheirchildrenfromwatchinginappropriate materialona DVD.It readsthe ratingsfor programming, thendeniesaccessto programming if theprogram'sratingmeetsthelimitations youselect.Inthis case,theuserwillhavetoentera password. WhileintheDVDstopmodeORwhilein DVDmodeand withouta DVDinserted,presstheSETUPbutton@twice; the PasswordPagewillappear.UsetheNavigation (A, T) buttons@to selectPARENTAL.
DISPLAY ,_©_ QQGQ LJ w,_,,D Press the Mute button @ to turn off the sound; the unit's sound will be silenced and "Mute" will appear on the screen. The sound can be turned back on by pressing this button again or one of the VOLUME Up @ or Down @ buttons. While in the TV mode, press the Display button to show the current channel. If in an AV mode, the mode will appear when pressed. Press again to clear the display. TV/AV TVIDVD SCAN nECALLDIS_LA_ ¸ MU_ SCAN _C_L _>_S_'L_¥ _UT_ _, ,_#(4) \J _©_©o©
TIME CALENDAR ,, j' _G,_,,© Press to access the Time setting menu (see page 17). Press to access the Calendar setting menu (see page 27), NOTE: This menu cannot be accessed while in the DVD mode. VOLUME Buttons Set the sound as follows: Press the VOLUME sound level.
OPTIONS Pressthe POWERbutton@on the remote,or frontof the unit, to turn on the unit; the POWERindicatorwill light yellow.Pressthe TV/AVbutton@repeatedly to selectthe TV mode.If the unit is in DVDmode,pressthe TV/DVD button@first, thenpressthe TV/AVbuttonrepeatedlyto selectTVmode. TV: If using a VHF/UHF antenna. CATV: If using Cable TV. Change the Antenna option to select between TV or CATV. Select AIR if using VHF/UHF antenna, and select CATV if using Cable TV (see page 25, steps ! and 2). .......
SCAN __SCAN_FCAU _> j v D A¥ MU_ o© N XT Press the RECALL button to switch between the present channel and the last channel chosen. Press the SCAN button and the unit will automatically scan each station. When you see a channel you would like to view, press the SCAN button again.
WHAT iS CLOSED CAPTiONiNG? Captions in other channels. This television has the capability to decode and display Closed Captioned television programs. Closed Captioning will display text on the screen for hearing-impaired viewers or it will translate and display text in another language. CLOSED CAPTIONING languages are transmitted on these TEXT: The Text Closed Caption Mode will usually fill the screen with a programming schedule or other information. Select between TT1, TT2, TT3 or TT4.
AUDIO MODE BVB CALL BUTTON You can cycle between the audio modes as follows: -- _©o© -j For DVD, Press the AUDIO button repeatedly to cycle through the audio languages available on the playing DVD. For CD/VOD, Press the AUDIO button repeatedly to cycle through Stereo, Mono Left, Mono Right and Mix-Mono. _©o© G©_6 Press the DVD CALL (D. CALL) button to show the elapsed time and remaining time of the playing disc.
IMPORTANT NOTES: "_" wJJJappear on the TV screen during operation if you try to access a function that is not available on the disc. Some discs may take a few seconds to load. If a disc is inserted incorrectly, dirty, damaged, or is not present at all, "NO DISC" will appear in the display. Always hold the disc without touching either of its surfaces. When inserting a disc, position it with the printed title side facing up, align it with the guides and place it in its proper position.
SKNP FAST SEARCH I Press the SKIP (J,_) button @ to advance the DVD to the beginning of the next chapter. Dudng playback, press either the FWD I_ @ or REV 44 @ button to move the DVD forward or backward at double (x2) speed to locate a specific section. Repeatedly press these buttons and the speed will increase to x4, x8, x16, x32 (the sound will be muted) and resume normal playback. You can also resume normal playback by pressing the PLAY/ENTER button @.
TITLE/CHAPTER SEARCH TITLE/CHAPTER/TmME Use this feature to directly go to a specific title and/or chapter. SEARCH Use this feature to directly go to a specific title and/or time, _©®®® _®®®® o®oO ooo© _©oo _© o © Press '_ © _ I Press the SEARCH button @ once. Press the Navigation (_,_) the SEARCH button @ twice. Press the Navigation (_,_) buttons @ to select the Title, then use the Direct Channel Sebction/Number buttons (0-9) @to select the desired title number.
AUDIO LANGUAGE SUBTITLE MENU G©M Press the AUDIO button repeatedly to change the audio] language. This feature is not available on all discs. DVD MENU Press the SUBTITLE button repeatedly to select a subtitle language, and to turn the subtitle menu on/off. This feature is not available on all discs. TITLE MENU wpvr_ G©©G Press the DMENU button @, and the Main Menu of the disc Press the TITLE/PBC will appear.
PROGRAMMED PLAYBACK The DVD player in this unit has a 20 chapter programmable memory that allows you to program up to 20 chapters on any disc for playback in any desired order. You may program 20 different chapters or you may also program certain chapters to play more than once.
OF A CD/VCD PLAYBACK _(_A_ R_c^u pusH,^Y_ur_ T, J Press thePOWER button _toturn ontheun,t: thePOWER] [_resslheOPEN/CLOSE button toopenthed,sctray, indicator will light yellow. Press the TV/DVD button @/ _ OPEN repeatedly to select the UVU mode. will appear on the screen. Insert a disc will the / / label side facing up on the disc tray. // SELECTmNG TRACKS USmNG THE SKNP (_) OR (I_4) BUTTON (FOR VCB ONLY) Press the OPEN/CLOSE button @ to close the disc tray. "CLOSE" will appear on the screen.
FORWARDm m/REVERSE 44 Each press of the FWD _ @ or REV 44 @ will increase search as follows: PLAY A S_NGLE TRACKIREPEAT PLAY For CD: To pHay a song and then stop, seHect the track as described on the previous page, then press the REPEAT button @ once; "SingW' will appear on the TV screen and the unit will repeat the seHected track once.
PROGRAMMED PLAYBACK (VCD ONLY) The DVD player in this unit has a 20 chapter programmable memory that allows you to program up to 20 chapters on any disc for playback in any desired order. You may program 20 different chapters or you may also program certain chapters to play more than once.
'5' '_ '3 _ W_DVD Press thePOWER button Ototurnontheunit; thePOWER]...Press .t,he OPEN/CLOSE button toopenthedisctray, indicator will light yellow. Press the TV/DVD repeatedly to select the DVD mode. button @/ / OPEN will appear on the screen. Insert a disc will the abe s de fac ng up on the d sc tray. C _: ,? S L2_ _ LS_ Press the OPEN/CLOSE button @ to close the disc tray. "CLOSE" will appear on the screen. After loading, the folder/picture menu will appear on the TV screen.
Checkthefollowingbeforerequesting service: SYMPTOM POSSIBLECAUSE GENERAL Nopower. ACcordunplugged. hasformed. Poweron,butunitnotfunctioning Condensation properly. Wrongtypeofdiscinserted. Unitneedsto bereset. POSSIBLE SOLUTION PlugintheACcordtoanACoutlet. Unplugtheunitandwaitaboutoneto twohourstoallowtheplayerto dry. Thisunitcannotplaydiscs,otherthan DVD,VCDor standardCDs. PressthePOWERbutton,thenunplug theAC cord.Waitoneminuteandthen plugthe unit back in. Nopicture.
SYMPTOM I POSStBLECAUSE DVD Theunitdoesnotstartplayback. I Ratinglevelsetto blockthe DVD. POSSIBLE SOLUTION Enter your password, and/or change the rating level. DVDnotinserted, or inserted upside-down.Insert DVDis notselected. Press DVD correctly. the TV/DVD button to select the DVD mode. Thediscis notplacedin theguide. Somefunctionsdo notoperateas stated. Selectedlanguageis notbeing shownin thesubtitles,or spoken. Place the disc on the disc tray correctly inside the guide. Clean the disc.
Caringfor Discs Treatthedisccarefully. Handle thedisconlybyitsedges.Neverallowyourfingerstocomeincontactwiththeshiny,unprinted sideofthedisc. Donotattachadhesivetape,stickers,etc.to thedisclabel. Cleanthediscperiodically witha soft,lint-free,drycloth.Neverusedetergentsor abrasivecleanersto cleanthedisc.If necessary, usea CDcleaningkit. If a discskipsor getsstuckona sectionofthedisc,it is probablydirtyor damaged(scratched).
Power Requirements .......................................................................................................... AC120V, Power Consumption ........................................................................................................................... 70W Weight .......................................................................................................................................... Dimensions ....................................................................
Memcorp, fnc. Weston, FL Printed in Hong Kong Visit our website at www.memorexelectronics.