
User guide

C6010 Printing with your C6010 printer
5 December 2012 – v1.0
Page 47 of 100
This User Guide will direct you to the standard print dialog Help instructions wherever possible.
Where the standard Print dialog Help instructions conflict with information contained in this User
Guide, follow the instructions in this User Guide.
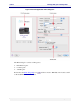
Page orientation
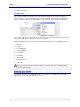
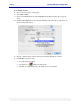
Page orientation in your C6010 printer can be set up in a variety of ways depending on your
application. In Preview:
1. Select the Orientation of your pages via the icons in the Common pane (see Figure 4 on
page 43).
2. If not already showing, select the Preview options pane then select and deselect Auto
Rotate check box until the orientation of the document in the Print preview pane matches
your expectations.
3. As you select the various combinations of options, the graphic on the left pane of the Print
dialog box will display the orientation you have chosen.
4. Click Print when ready.
Some applications may override page orientation set up in this manner.
Custom paper sizes
If you are printing from Tray 1, you can select only from US Letter, ISO A4 and US Legal
sizes.
Paper sizes other than those listed above can be printed only from Tray 2 and can only be fed
manually, one sheet at a time.
The largest paper size you can print on is US Legal.
See Using Tray 2 on page 53 for instructions on setting up and feeding paper into the Tray 2.
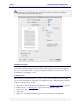
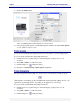
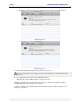
To print on custom sized paper:
1. Open a document in Preview.
2. Select your C6010 printer, click the Preview arrow and select Paper Handling from the
print options pop-up menu.
3. Select Scale to fit paper size.
4. Click the Destination Paper Size arrow and select your custom paper size from the pop-
up box.
5. Select Scale down only if your document size is bigger than the paper in the printer.
6. Click Print.