
User guide


C6010 Setting up your C6010 printer
5 December 2012 – v1.0
Page 35 of 100
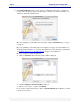
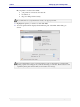
2. Click the Add Printer button . Select Default, the topmost left icon in the dialog that
pops up. You should see a list of printers similar to that shown below.
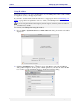
3. Select the USB printer from the list, as shown above. Make sure the Print Using field
shows C6010 printer along with version information.
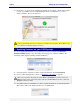
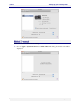
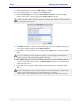
4. Click Add. You should see C6010 printer displayed in the Printers pane of the Print &
Fax dialog.
It is recommended that you test your printer when it is ready to print (see Printing a test page on
page 41).
If there is a problem with printing, a printer icon will appear in your Dock, informing you of the
fact. Click on that icon and expand the printer queue window until you can read the error message.
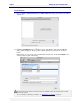
More than one local printer may be connected to your Mac at the same time.
To connect another local C6010 printer, simply connect its USB cable to your Mac, switch
the printer on, and the printer should appear in the Printers pane of your Print & Fax window.
Adding a networked C6010 printer
There are two ways in which to add networked C6010 printers. Both methods rely on your
network having been set up in such a way that your computer can access the printer.