
User guide

C6010 Setting up your C6010 printer
5 December 2012 – v1.0
Page 21 of 100
2. Connect the other end of the power cord to the power source.
Your C6010 printer power supply is auto-sensing, there is nothing to adjust. For
specifications, see page 94.
3. Press the Power On/Off button until your printer is powered up. When first installing your
new printer, the power lamp will be blinking.
Loading paper
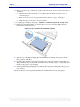
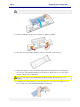
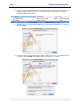
Your C6010 printer has a main paper tray called Tray 1, which may be removed from the
main body of the printer as shown in Figure 1 on page 17.
Tray 1 is designed to hold only the following paper sizes:
ISO A4 (210mm 297mm)
US Letter (8½” 11”)
US Legal (8½” 14”).
Do not feed any other paper sizes from Tray 1.
Intermediate size paper, such as Executive (7¼” 10½”) and Statement (5½” 8½”) should
be fed into the printer from Tray 2.
Some paper may be single-sided. This means the manufacturer applies special processing to one
side of such paper, to achieve best results. When loading such paper into the paper tray, remember
to always load it with the recommended print side facing down for tray 1 and facing up for
tray 2.
For information on use of the Tray 2 to print intermediate size paper, see Using Tray 2 on page
53.
Loading A4/Letter size paper
Tray 1 has been designed to hold up to 250 sheets of A4/US Letter paper (at 70 gsm/19 lb). If
you use heavier paper you may need to reduce the number of sheets.
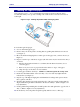
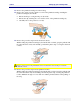
Tray 1 has two adjustable guides, one for length and one for width, as shown in the Tray 1
picture on page 10.
To load the paper:
1. Use recommended paper types.
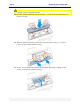
2. Remove Tray 1 from the printer, ensuring that any packing material has been removed
(see Figure 1).
3. Move the Paper Width and Paper Length guides to make space for the paper size you
have chosen.