THANK YOU! Thank you for choosing the Melissa & Doug Fresh Mart Grocery Tors! it's » terrific way to help children stock up on creativity and imagination, and to inspire delicious pretend play for years to come. NOW IT'S TIME TO PUT IT TOGETHER! Don't worry, assembling your new grocery store is simple, and we're here io help. it may go a little faster with a partner to lend 2 hand, but we've made it so one person can assemble the grocery store.
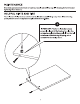
MAINTENANCE Ensure the grocery store continues to function properly and safely by regularly checking the hardware and tightening when necessary. HELPFUL HINTS AND TIPS You will need a Phillips head screwdriver {not included) to assemble the grocery store. When attaching pieces, be sure screws are tightened snugly, but do not over-tighten. IMPORTANT: The barrel nuts have been properly aligned at the factory to allow the screws to easily join the panels.
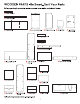
WOODEN PARTS Be Smart—Sort Your Parts Before you begin assembly, make sure you have all the parts listed below.
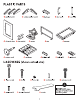
PLASTIC PARTS T €3 notched stabilizer foot (2) &5 bag hanger €3 door handier €3 handle lock €3 scanner {5 conveyor 3 doer cater (2) € shelf labels (7) &5 shelf lip (7) & plastic card j {3 long screw (as} & obit (5) € lock nut {5} 3 wood sows! (12) & medium screw IMPORTANT; Some packages of hardware may € small screw (2} £ barrel nut (5 extras) €5 ranch have extra pieces.
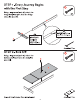
STEP 1 Every Journey Begins with the First Step Using 1 long screw (part 16}, attach the fridge kick plate {part A) to the fridge side plate {part B). ~ IMPORTANT: Hole should be facing up. IMPORTANT: Barrel nuts should face fridge kick plate. STEP 2 Kick Of Using 1 long screw (part 16}, attach the bottom shelf {part C) to the kick plate assembly.
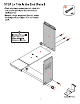
STEP 3 This Is the End (Panel) » First, using 3 long screws {part 16}, attach the end counter pane! {part D) to the bottom shelf (part C}. « Second, using 3 long screws (part 16), attach the fridge side panel (part E) to the bottom shelf. IMPORTANT: Partially tighten the screws before completely tightening all of them.
STEP 4 Divide & Conquer » First, insert the shelf divider (part F} into the 2 slots in the bottom shelf.
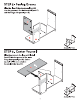
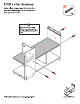
STEP 5 Feeling Groovy Slide the lower fridge back panel (part G) into the grooves in the bottom shelf (part C) and the fridge side panel (part E). View STEP 6 Center Yourself Slide the groove in the long middies shelf {part H} into the groove in the lower fridge back panel (part G). Cutout on shelf will fit over notch on the shelf divider (part F).
STEP 7 Get Attached Using 4 long screws (part 16}, attach the long middle shelf (part H) to the counter base {parts D and E). IMPORTANT: Partially tighten the screws before completely tightening all of them.
STEP 8 That’s Right Using 5 long screws {part 16), attach the right side shelf (part I) to panels A, C, and H. Partially tighten screws. Align groove with the lower fridge back panel {part G) before completely tightening screws. IMPORTANT: Make sure long groove is facing towards the base.
STEP ¢ Can't Beat the Feet Using 4 bolts (part 17), 4 lock nuts (part 18), and the wrench (part 23), attach 2 stabilizer feet {(part 1) to the counter base {pair D). Then, attach the 2 notched stabilizer feet (part 2} to the counter base {parts | and E}. HELPFUL HINT: You @ may find it easier to tip the assembly to attach stabilizer feet. IMPORTANT: Notched stabilizer feet go on this end, Melissa & Doug Customer Care: 1-800-284-3948 IMPORTANT: Make sure flat side of lock nuts is facing toward bolt.
STEP 10 Get Into the Groove « First, using 2 long screws {part 16) and 2 wood dowels {part 19), attach the fridge top panel (part J} and the stretcher {part K} to the back counter panel {part L). = Second, slide the belt cover (part M} into the grooves in the counter top assembly.
STEP 11 Encounter the Counter Fit the counter top assembly into the notches on the end counter panel {part D) and the fridge side panel (part E). Using 2 long screws {part 16), attach the assembly to the base. Then, insert 1 wood dowel (part 19} into the fridge top panel (part J) and 1 wood dowel (part 19} into the stretcher (part K).
STEP 12 Counter Attack « First, fit the drawer cover (part O) into the top grooves on the counter panel {part D) and the stretcher {part K). » Second, using 3 long screws, attach the front counter panel {part N) to the grocery store assembly {parts J, K, and D). IMPORTANT: The small {IMPORTANT: Make notch should be located sure the drawer cover in this corner. is in the upper groves.
STEP 13 It's Bin Fun Using 2 long screws (part 16) and 2 wood dowels {part 19), attach the 2 bin fronts (part P) to the right side shelf (part 1). IMPORTANT: The bin fronts are attached at an angle.
STEP 14 One More Foot » First, using a bolt (part 17), a nut {part 18}, and the wrench {part 23}, attach a stabilizer foot {part 1} to the base of the left side shelf {part Q). » Second, using 2 long screws (part 16) and 2 wood dowels (part 19), attach the left side shelf (part Q) to the bin fronts (part P). IMPORTANT: Make sure flat side of lock nuts is facing toward bolt.
STEP 15 Bin There Slide the 2 bin bottoms {part R} into the grooves on the bin fronts {part P}, Fit noises on the bin bottoms inch the grooves on the inside of the left and right shelf panels (parts [ and Q).
STEP 16 Back It Up « First, insert 2 wood dowels {part 19} into each bin back {(part S). « Second, using 2 long screws (part 16}, attach the bin backs to the left side shelf panel (part IMPORTANT: Grooves should be on the lower end.
STEP Yourself « First, using 4 long screws (part 16), attach the lower shelf (part T) to the left and right shelf panels. Do not completely tighten screws. Second, insert notches on the middle shelf {part U) into the upper grooves in the left and right shelf panels. + Third, using 4 long screws {part 16), attach the upper shelf (part V) to the left and right shelf panels, Partially tighten the screws before completely tightening all of them. « Finally, completely tighten screws on the lower shelf.
STEP 18 Bag It « First, place the bag hanger (part 3) into the notch on the back of the counter. » Second, using 7 long screws (park 16) attach the counter top (part W) to the counter base.
STEP19GetaHandleon It « First, insert the door handle {part 4) through the front of refrigerator door (part 6). Place the handle lock {part 5} onto the back of the door handle and slide down to lock. » Second, insert the 2 door catches (part 7) into the holes on inner refrigerator wall. « Third, attach the refrigerator door by inserting the hinge pins into holes inside the refrigerator (insert top pin first). The lower hinge pin flexes to help it attach to the base.
STEP 20 Yes You Scan « First, remove battery panel from the scanner {part 8) and insert 2 AA galleries {nol included). Reachable battery panel. = Second, insert scanner into counter top and slide to align holes. Using 2 medium screws (part 20) attach scanner to counter top.
STEP 21 Keep It Rolling « First, place the conveyor {part 10) into the counter top. Attach the conveyor using 2 small screws {part 21). » Second, insert the conveyor crank (part 11) into the hole in the side of the counter top until you hear it click. IMPORTANT: Make sure open hole in conveyor aligns with the conveyor crank opening in the counter top.
STEP 22 Sign Up Now « First, insert the sign (part 9) into 2 holes on top of the upper shelf. « Second, slide the cash drawer (part 12) into the slots in the counter top underneath the scanner.
CITED 23 What Fun — You're Done! Insert shelf labels (part 13) into shelf clips (part 14). Attach the shelf clips to any shelf.
YOU DIDST! M Now the real fun begins—it's time for young entrepreneurs and shoppers to discover the excitement of playful purchasing! Here are some of the special features of the Fresh Mart Grocery Store: » MULTI-SIDED FOR ALL AROUND FUN: Customers can browse shelves to find the items on their grocery list, while grocers can stock the store and ring up purchases! » HAND-CRANKED CONVEYOR BELT: Turn the creek and the silicone conveyor belt moves groceries along the check-out counter, just like in real grocery