
User`s manual


6
10 seconds to initialize. Thereafter the Windows CE Screen will
be projected.
5. Place the Projector at a suitable distance so the image size
is around 20” to 40” diagonal
6. Turn the Focus Knob to bring the image into focus.
7. Navigate the Mouse Cursor with the built-in Mouse Touch Pad to
operate the projector using the internal Windows CE system.
8. External signal source can also be played through the projector
using the AV and VGA cables supplied. Bring up the SOURCE SELECT
window and tap on VGA or CVBS(composite video). To change the
input source, push the “Source” button to cycle through the
different connections (note : selecting a source without the
required electrical signal connection will result in a blank
or random image being projected)
9. The default brightness is Standard Brightness. Lower Brightness
to extend battery life or Enhanced Brightness to suit the
presentation environment can be selected on the MODE SELECT
Window.
Caution:
Always use the power adaptor that was shipped with the Pico
Projector. The adaptor accepts power 100-240V 50-60 Hz. Check
to ensure that the main voltage is within the range on the
rating plate on the rear of the projector. When disconnecting
the Pico Projector, always remove the power adaptor from
the power source first, then from the Pico Projector
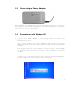
2.2 Connector Panel
This illustration shows the connector panel on your DLP Pico
Projector. Refer to this figure when connecting the DLP Pico
Projector.