QUICKSTART GUIDE P E R F E C T O N A N D O F F T H E S T A G E UNIVERSAL-FIT NOISE-ISOLATING MUSICIAN’S IN-EAR MONITORS 2 N D G E N E R A T I O N model: M6PROG2 www.MEEaudio.com/M6PRO HOW TO WEAR FIT VIDEO Before first use, watch our fit video by visiting MEEaudio.
QUESTIONS? WE’RE HERE TO HELP! Phone Support: 626-965-1008 x31 Monday ~ Friday 9am to 5:30pm PST Email Support: support@MEEaudio.com All emails are responded to within 2 business days LIFETIME REPLACEMENT Things don’t always go according to plan in the real world. Whether your headphones get crushed, shredded, fried, misplaced, or carried off by army ants, we’ve got you covered.
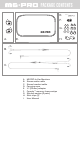
PACKAGE CONTENTS E. F. G. D. H. R A. L B. L R C. A. B. C. D. E. F. G. H. I. M6 PRO In-Ear Monitors Stereo audio cable Stereo headset cable Carrying case ¼” (6.
STEP 1 - SELECTING EARTIPS Multiple sets of eartips are included to ensure you get the best fit with your headphones. The correct eartips for your ear will allow the earpieces to fit flush, reduce outside noise, and provide good bass response. Install eartips as shown. Make sure eartips are installed securely before use.
MEMORY FOAM EARTIPS 1. REPLACE EARPHONE TIPS WITH COMPLY™ TIPS 2. ROLL TIP INTO THIN, ROUND CYLINDER 15-30 sec. 3. GENTLY INSERT TIP INTO EAR 4.
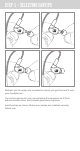
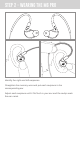
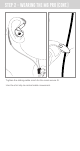
STEP 2 - WEARING THE M6 PRO Identify the right and left earpieces. Straighten the memory wire and put each earpiece in the corresponding ear. Adjust each earpiece until it fits flush in your ear and the eartip seals the ear canal.
STEP 2 - WEARING THE M6 PRO (CONT.) Holding the earpiece in place, bend the memory wire around your ear to achieve a conforming fit. While pulling the cable gently with one hand, squeeze the memory wire behind your ear with the other hand until the fit is tight and secure.
STEP 2 - WEARING THE M6 PRO (CONT.) Tighten the sliding cable cinch for the most secure fit. Use the shirt clip to control cable movement.
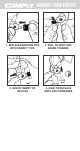
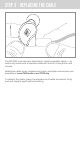
STEP 3 - REPLACING THE CABLE The M6 PRO includes two detachable, interchangeable cables – an audio-only cable and a headset cable with built-in microphone and remote. Additional cable types, replacement parts, and other accessories are available at www.MEEaudio.com/PROhelp. To detach the cable, grasp the earpiece and cable connector firmly, and pull straight apart without twisting.
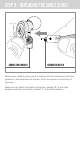
STEP 3 - REPLACING THE CABLE (CONT.) CONNECTOR GROOVES CONNECTOR NOTCH Attach new cable by lining up the notches on the connectors with the grooves in the earpieces as shown. Push connectors in until they fit securely. Make sure to attach the cable connector marked “R” to the right earpiece and the connector marked “L” to the left earpiece.
MICROPHONE & REMOTE USE The included headset cable features an inline microphone and remote that can be used during phone calls and to control media playback.
ADDITIONAL INFORMATION FOR ADDITIONAL SUPPORT • View FAQs and troubleshooting guides at MEEaudio.com/Support • Contact us at support@MEEaudio.com WARNING Using headphones at high to moderate volumes for extended periods of time will result in permanent hearing damage. It is advised you keep volume levels moderate to low at all times for your safety. Do not use while driving a car, cycling, operating machinery, or performing other activities that require hearing surrounding sounds.