
User's Manual


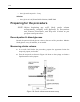
Table Of Contents
- Table of contents
- List of figures
- CHAPTER 1 Description
- CHAPTER 2 Indications and contraindications
- CHAPTER 3 Personal Pump Communicator (PPC)
- CHAPTER 4 Pump implantation
- Preprogramming and pre-testing the Pump
- CHAPTER 5 Pump refill procedure
- CHAPTER 6 Explanting the Pump System
- CHAPTER 7 Warnings and precautions
- CHAPTER 8 Adverse reactions
- CHAPTER 9 System alarms and messages
- Pump alarms
- Alarm feedback
- Pump low battery
- Depleted pump battery
- System error
- Pump self test fail
- PPC low battery
- PPC alarms
- Low reservoir
- Empty reservoir
- Telemetry communication error
- Initialize alarm
- PPC not initialized
- Battery replacement
- Initialize to factory defaults
- Pump stopped
- Pump suspended
- Auto off
- Hourly maximum exceeded
- Pump alarm table
- Pump alarms
- CHAPTER 10 Troubleshooting Pump System under-delivery
- CHAPTER 11 Technical specifications
- APPENDIX A Label information symbol dictionary
- APPENDIX B Implant worksheet
- APPENDIX C Refill form
- APPENDIX D Precautions and general procedures
- APPENDIX E Pump rinse procedure
- APPENDIX F Side Port Catheter flush procedure
- Supplies and solutions
- Preparing for the procedure
- Flushing the Side Port Catheter
- Program minimal basal rate
- Remove insulin and fill with rinse buffer
- Equilibrate and pull rinse buffer through system
- Flush side port catheter
- Remove rinse buffer and fill with insulin
- Equilibrate and pull insulin through system
- Remove guide needles and record refill amount
- Program new basal rate
- Remove rinse buffer from catheter
- APPENDIX G Stroke volume measurement

131
3. Open the stopcock and allow the Pump to fill completely with RINSE
BUFFER. When the fluid level stops moving, the Pump is filled.
4. Close the stopcock and remove the syringe.
5. Prepare syringe 2 for aspiration. Obtain a vacuum by pulling back on the
plunger until it locks. Press the lock into the plunger groove and be sure it is
firmly secured.
6. Re-enter the Pump.
7. Open the stopcock and remove the RINSE BUFFER. After the fluid level
stops moving, wait an additional 30 seconds for all the RINSE BUFFER and
air to be removed.
8. When the time has elapsed, close the stopcock and remove the syringe.
9. Prime the needle and close the stopcock.
Syringe 3: Rinse Buffer - Degassed
1. Enter the Pump fill port with the refill needle.
2. Open the stopcock and allow the Pump to fill completely with RINSE
BUFFER. When the fluid level stops moving, the Pump is filled. When the
Pump is filled, approximately 10 mL of RINSE BUFFER will remain in the
syringe. Leave the RINSE BUFFER in the syringe, and leave the syringe in
place for the next step.
Equilibrate and pull rinse buffer through system
The reservoir pressure in the Pump is equilibrated with ambient pressure and
RINSE BUFFER is pulled through the fluid system. This procedure uses syringes
2 and 3:
• Syringe 2 with RINSE BUFFER. Expel all RINSE BUFFER except 5 mL.
Change the refill needle if desired.
• Syringe 3 with residual RINSE BUFFER from the previous section.
Syringe 3: Rinse Buffer - Residual
1. Maintain syringe 3 with approximately 10 mL of RINSE BUFFER in the
Pump fill port. Verify that the stopcock on syringe 3 is open.
Syringe 2: Rinse Buffer - Residual