
User Manual


GPI171-IM27 MDS86850ESKD
Revised: 04/10/2014
10
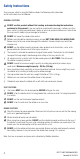
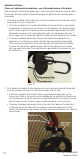
Adjustment of Brakes:
(There are 2 adjustments for each brake – one at the handle and one at the brake):
When adjusting the brakes on the rollator, keep in mind if you adjust it too far one way or the other,
the lock will not function properly. Please test thoroughly and tighten all parts completely prior to
using rollator.
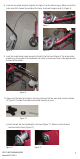
1. At the top of the rollator, find the adjustment nut which is located where the cable goes into the
brake handle. This part is usually silver.
• If the brake is too tight, at the handles of the rollator, check to see if there is a gap between
the adjustment nut and thumb screw. If there is, turn the adjustment nut counter-clockwise
until it is flush up against the thumbscrew (You may need pliers to get started). Then rotate
both together clockwise until it is tight against the handle; this should loosen the brake. If
there is no gap and it is already tight against the handle, no further adjustment can be made.
• If the brake is too loose (not locking), standing at the handles of the rollator, turn the
adjustment nut and thumbscrew counter-clockwise (You may need pliers to get started).
The thumbscrew and adjustment nut will push away from the handle and this will tighten
the brake. Once the brake is adjusted properly, rotate just the adjustment nut clockwise
until snug against the handle. There should now be a gap between the adjustment nut and
the thumbscrew.
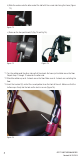
2. At the bottom of the rollator, find the adjustment nut similar to the one located at the top. Hold
the brake pad against the wheel. This will take the tension off of the cable.
• If the brake is too tight, check to see if there is a gap between the adjustment nut and
thumb screw. If there is, pull up on the cable, and looking at the adjustment nut from the top,
turn the adjustment nut counter-clockwise, screwing the adjustment nut to the thumb screw.
Adjust to correct tension. If there is no gap, no further adjustment can be made here.
• If the brake is too loose (not locking), pull up on the cable, then, looking at the adjustment
nut from the top, turn the adjustment nut clockwise, screwing the adjustment nut to the
bracket. There will now be a gap between the thumb screw and the adjustment nut. Adjust to
correct tension.
Figure 19
Figure 20