
User's Manual


Page20 / 35
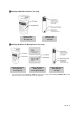
2. The meter identifies the code number automatically. Compare the code number displayed on the LCD
with the code number shown on the vial. If they do NOT match, try again with another test strip. If the
problem persists, please contact Customer Service.
3. When the blood symbol appears, it indicates that the meter is ready for blood glucose testing.
IMPORTANT
█ Obtaining a Blood Drop
1. Adjust the puncture depth setting if necessary, by turning the lancing device cap, number 1 is the
shallowest depth while number 5 is the deepest. Slide the ejection/cocking control barrel back until it
clicks. If it does NOT click, the lancing device may have been cocked when the lancet was inserted.
2. Hold the lancing device firmly against the side of your fingertip and lance the finger by pressing the
release button of the lancing device.
3. Gently massage your finger towards the puncture site to produce a drop of blood.
NOTE: Prick the side of fingertip to avoid soreness. To avoid calluses, choose a different testing site each time.
IMPORTANT SAFETY INFORMATION
IMPORTANT
• Do NOT squeeze excessively around the puncture site when you produce a drop of blood.
• If alcohol wipes are used to disinfect the fingertip, make sure the fingertip is completely dry before
obtaining the blood sample.
If you have taken the cap off of the lancet and the lancet has fallen to the ground, do NOT use it. Make sure
you dispose of it and replace it with a new lancet.
• Before the test you must make sure that the code number displayed on the meter matches the code
number on the test strip vial.