7 INCH LCD COLOR MONITOR © 2004 All rights reserved. This manual is protected by Copyright. The Copyright is owned by Medion®. Trademarks: MS-DOS® and Windows® are registered trademarks of Microsoft®. Pentium® is a registered trademark of Intel®. Other trademarks are the property of their respective owners. Medion® makes no warranty of any kind with regard to this material, including, but not limited to, the implied warranties of merchantability and fitness for a particular purpose.
Contents: SAFETY AND PRECAUTIONS................................................................................................... 1 Operating Safety ...............................................................................................................1 Repair .............................................................................................................................. 1 Notes for Service Engineers ....................................................................................
SAFETY AND PRECAUTIONS Please read through this section carefully and follow the instructions given. In this way you will guarantee reliable operation and a long life for your LCD monitor. Always keep these instructions handy and close by your LCD monitor. Keep the instructions and the packaging so that if you sell or give away your LCD monitor you can give them to the new owner.
POINT OF USE • Keep your LCD monitor and all units connected to it away from moisture and avoid dust, heat and direct sunlight. Failure to observe these instructions can lead to malfunctions or damage to the LCD monitor. • Place and operate all units on a stable, level and vibration-free surface in order to avoid the LCD monitor from falling. • Avoid dazzle, reflections, extreme light/dark contrast in order to save your eyes and ensure a pleasant, ergonometric work station.
STANDARDS/ELECTRO-MAGNETIC COMPATIBILITY Your monitor fulfils the requirements for electro-magnetic compatibility and electrical safety specified in the following standards: EN 55022, EN 55024, EN 60950, EN 61000-3-2, EN 61000-3-3 UL60950 / CAN CSA 22.2 No 60950, FCC • When connecting ensure that Guidelines for Electro-Magnetic Compatibility (EMC) are observed.
FCC COMPLIANCE STATEMENT This equipment has been tested and found to comply with the limits for a Class B digital device, pursuant to Part 15 of FCC Rules. These limits are designed to provide reasonable protection against harmful interference in a residential installation. This equipment generates, uses, and can radiate radio frequency energy and, if not installed and used in accordance with the instructions, may cause harmful interference to radio communications.
INTRODUCTION NOTES ON THESE INSTRUCTIONS We have arranged these instructions so that you can quickly find the subject related information in the table of contents. The purpose of these instructions is helping you operate your LCD display safely, quickly and easily. OUR TARGET GROUP Thank you for purchasing our LCD display. We thank you for your confidence in our products and are pleased to greet you as a new customer. These instructions are intended for initial users as well as advanced users.
START-UP Â Before start-up always read the Chapter “Safety and Precautions” on page 1ff. PREPARATIONS ON YOUR COMPUTER If you have operated your computer previously with a CRT monitor, it will be necessary for you to make a few preparations. This is required when your previous monitor was operated with settings which are not supported by your new LCD monitor.
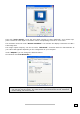
Then click "Color quality" to set the color depth (number of colors displayed). Your monitor supports a maximum color depth of 16 million colors corresponding to 32 bit or "True Color“. The resolution can be set under “Screen resolution”. Your monitor can display a maximum of 1280 x 1024 image dots. The image repeat frequency can be set under "Advanced“. A window with the characteristics of your video card appears depending on the configuration of your computer.
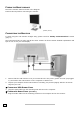
FIXING THE MONITOR BASE Mount the monitor stand as shown in the diagram. Perform this step before connecting the monitor. (Similar picture) CONNECTING THE MONITOR To start using the LCD monitor straight away, please read the “Safety and Precautions” section (page 1). We recommend that you also read all the other sections as these contain detailed explanations and tips on how to use your LCD display. 1.
p CONNECTING THE POWER SUPPLY 5. Now connect the mains socket of the monitor using the mains cable supplied with a properly configured mains outlet. The outlet should be near the monitor and ease to access. (same circuit). 6. Your monitor features a power switch for turning your monitor on and off. If the switch is set to 0, then no power is consumed. Set the switch to I and next switch your monitor on using the on/off switch (see page Fehler! Textmarke nicht definiert.). 7.
POSITIONING OF THE MONITOR Please ensure that the monitor is set up in such a way that that reflections, glare and light-dark contrast are avoided (as this will make the screen less attractive to look at). YOUR POSTURE Sitting in one position for long periods can be uncomfortable. To minimize the potential for physical discomfort or injury, it's important that you maintain proper posture.
WORKING ERGONOMICS Hand’s support rest: 2” – 4” Top line of screen should keep eye’s level or be a little beneath Eye’s distance to screen: 20” – 28” Legroom (vertical): at least 26” Legroom (horizontal): at least 24” The illustration above should give you a guideline for an ergonomic workplace.
CONTROLS AUTO - + MENU Auto Adjustment With this key you can automatically adjust the image. Minus When OSD is active this key sets a parameter value and decreases it. Decrease volume Executing it directly lowers the volume. Plus When OSD is active this key sets a parameter value and increases it. Increase volume Executing it directly raises the volume. OSD When this key is pressed the OSD (ON screen display) starts on your LCD monitor Confirm you selection by pressing this key.
SETTING THE LCD MONITOR You can set certain parameters for the LCD monitor on the OSD menu (ON screen display). OSD MENU (ON SCREEN DISPLAY, ALL PICTURES SIMILAR) (picture similat) Main menu Sub-menu Usersetting Press the menu key to activate the OSD. 1. Select the options from the main menu with the + or - function selection keys. 2. Press the menu key to activate the sub-menu. 3. Select the options from the sub-menu with the + or - function selection keys. 4.
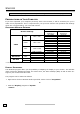
SAVING ENERGY This monitor can be switched into various states of energy saving by the respective computer or operating system. This meets the current requirements for reduction of power consumption. The monitor supports the following states of low energy consumption: Status Power Consumption Colour of the indicator Standby mode ON OFF < 35 W <5W Blue Orange 3 seconds (approx.
Characters displayed dark, picture too small, too large or not centered, etc.: Readjust the corresponding settings. (Setting LCD monitor, page 13) DO YOU REQUIRE ADDITIONAL SUPPORT ? If the suggestions in the above section have not solved your problem, please contact the hotline. We will try and help you over the telephone.
PIXEL DEFECTS ON LCDS (TFT-DISPLAYS) Active matrix LCDs (TFT) with a resolution of 1024 x 768 pixel (XGA), which are in turn composed of three sub-pixels each (red, green, blue), contain about 2.4 million addressable transistors. Because of this very high number of transistors and their extremely complex production process occasionally defective or incorrectly addressed pixels or subpixels may occur. There have been several attempts in the past to define the acceptable number of defective pixels.