
Installation Guide


INSTALLATION
INSTALLATION
Contact us : For support & assistance, please feel free to contact us below.
E-Mail: info@medinahpower.com | Web: www.medinahpower.com | Ph: +1 (844) 870-5337
LED Troffer Retrofit
Installation Instructions
MEDINAH
POWER
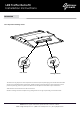
keyhole
Hinges
Locking Latch
Safety cable
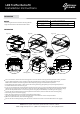
The existing fluorescent luminaries housing shall be
larger than dimensions described in below table:
NOTICE:
Figure 1
2' x 2'
Figure 3
Figure 4
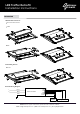
Figure 5
Figure 6
Figure 4A
Figure 2A
Figure 5A
2' x 4'
Housing Designation Overall inner Dimensions
610 mm by 608 mm by 78 mm high
1220 mm by 608 mm by 78 mm high
Figure 2
Prior to installation, disconnect all incoming power to fixture. Remove existing hardware (lens/lens frame, parabolic
louver, reflectors/ballast covers, brackets, lamps/lamp holders).Leave supply and grounding leads.(Fig.1)
NOTE: Follow all federal and local regulations when disposing of lamps and removed components.
Install LED panel end brackets to each end of the existing fixture by gently lifting it and placing LED panel end
brackets between the fixture and T-grid.
If you are not pleased with the gap between the fixture and T-grid, you may install LED panel side brackets between
the fixture and T-grid, there are two tabs to allow for placing the side brackets into the slot of end brackets. (Fig.2)
Secure the LED panel brackets to the existing fixture using the provided #8x1/2” self-drilling screws. (Fig.3)
Locate the door assembly body onto the keyholes of end brackets, and then slide the door assembly body
horizontally to the end of slots. (Fig.4)
Hook the safety cables into the holes positioned the end brackets.
Use the provided wire caps to connect the wire leads of the troffer kits to the main power leads.
(Black-Live, White-Neutral, Green-Grounding) (Fig.5)
Secure the door assembly body by lock the latches riveted on each end of the assembled door frame. (Fig.6)