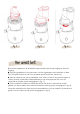
-IT COOK Handleiding Slowjuicer
Voor gebruik Bedankt voor het kiezen van onze slowjuicer. Lees deze gebruiksaanwijzing aandachtig door en bewaar deze alstublieft goed voor toekomstig gebruik Belangrijke veiligheidsmaatregelen Bij het gebruik van elektrische apparaten moet altijd de basisveiligheidsmaatregelen worden gevolgd, waaronder de volgende: Lees alle instructies goed door 2. Om het risico op elektrische schokken te voorkomen, mag u de hoofdeenheid, het netsnoer of de stekker niet in water of een andere vloeistof plaatsen. 3.
Steek uw vingers of andere voorwerpen niet in de opening van de juicer terwijl deze in werking is. Als voedsel vast komt te zitten in de opening, gebruik dan de stamper of een ander stuk fruit of groente om het naar beneden te duwen. Als deze methode niet werkt, zet u de motor uit en haalt u de juicer uit elkaar om het resterende voedsel te verwijderen. 15. Gebruik het apparaat niet als de zeef of de andere onderdelen beschadigd zijn of zichtbare scheuren vertonen. 16.
Als er tijdens het gebruik abnormale geluiden, geuren, oververhitting, rook, enz. zijn, schakel dan onmiddellijk de stroom uit en vraag het servicecentrum voor onderhoud en reparatie. Zo voorkomt u elektrische schokken, elektriciteitslekken en brandgevaar. 14. Schrob of was nooit de machinebehuizing op een met water gevuld platform of giet nooit water om de binnenkant van de machine te wassen om brand, elektrische schokken of schade aan de machinebehuizing, enz. te voorkomen. 15.
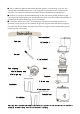
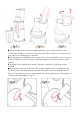
Hoe te monteren? Haal de producten en accessoires uit de verpakking en maak de sapkom, sapbeker, zeef, vijzelschroef, vultrechter en stamper schoon. 2. Druk de afval siliconen stop in de sapkom (zoals weergegeven in fig. 1). 3. Lijn de sapkom " " uit met de " " op het motorapparaat en installeer het op het motorapparaat (zoals weergegeven in Fig. 2), lijn de drie gaten aan de onderkant van de sapkom uit met de drie positioneringspilaren op het motorapparaat. 4.
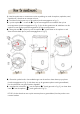
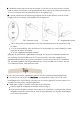
Fig. 4 Fig. 5 Fig. 6 Hoe werkt het? Plaats de sapbeker en de afvalbeker respectievelijk onder de sap uitgang en de afval uitgang; 2. Snijd de ingrediënten in de juiste maat. Voor de ingrediënten met harde kern of dikke schil, verwijder de kern en schil voor het persen (zoals perzik, kers, kokosnoot). 3.
Fig. 7 Fig. 8 Fig. 9 Bij het extraheren van te grote voedselmaterialen en grove vezelmaterialen (zoals watermeloen, selderij, kool), snijd ze eerst in de juiste stukken. Wanneer ze vast zitten; haal ze er dan uit om verstopping te voorkomen. 6. Om diepgevroren voedselmaterialen te gebruiken, is het noodzakelijk om ze van tevoren goed te ontdooien voordat ze kunnen worden gemengd met koud water, melk of andere dranken. 7.
Bedek de slimme dop om het sap te mengen. U kunt het fruit en de groenten, inclusief melk en andere vloeistoffen, in het gemengde sap doen. Dek na het persen de slimme dop af om te voorkomen dat het resterende sap uit de uitgang loopt. 10. Laat de machine na het persen nog ongeveer 30 seconden draaien, zodat er zoveel mogelijk van de fruitresten in de sapbeker wordt afgevoerd. 9. "ON": Positieve rotatie "0": Stop "R": Omgekeerde rotatie "ON" is het positieve rotatietandwiel.
Doe geen gedroogde of harde ingrediënten zoals volkoren granen, fruit met harde zaden of ijsblokjes in de juicer. Deze kunnen de onderdelen van de sapcentrifuge beschadigen (bijv. sapkom, vijzel en zeef). Bonen of granen kunnen worden gebruikt als ze een nacht worden geweekt of worden gekookt. Vruchten met pit en harde zaden (bijv. nectarines, perziken, mango's en kersen) moeten vóór het persen ontpit worden.
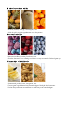
Harde of oneetbare schillen Ananas, meloen, mango, sinaasappel, enz. Schil de schil van de ingrediënten voor het persen. Bevroren fruit of ijs Bevroren aardbei, bosbes, framboos, enz. Ontdooi bevroren fruit volledig voordat u er sap van maakt. Gebruik geen ijs. Plantaardige of dierlijke olie Sesamzaad, pinda, boter, margarine, etc. Extraxt geen ingrediënten die plantaardige of dierlijke olie bevatten. Dit kan de prestaties verminderen en zelfs de juicer beschadigen.
Ander voedsel Kokos, suikerriet, volkoren granen etc. Extraheer geen ingrediënten zonder water. Voorbereidingstips Zacht fruit en groenten (bijv. sinaasappels, tomaten). 1-4 Partjes Schil de schil van de sinaasappels en verwijder de steel voor tomaten en appels. Als de ingrediënten groter zijn dan de vultrechter, snijdt u de ingrediënten in stukken die in de vultrechter passen. Vruchten met zaden moeten worden ontpit voordat ze worden geëxtraheerd.
Hoe de slimme dop te gebruiken: Sap maken met de slimme dop gesloten maakt het mogelijk om gemengde sapcreaties te maken met verschillende soorten fruit, groenten en vloeistoffen. Sluit na het persen de slimme dop om te voorkomen dat overtollig sap druppelt, vooral wanneer u de sapkom van de basis haalt. Bij het maken van sappen spoel je eventuele restjes snel weg door een glas water in de sapcentrifuge te laten lopen met de slimme dop gesloten.
Ingrediënten met kleine pitjes (bijv. framboos, granaatappel, druif) Voeg langzaam ingrediënten met kleine zaadjes toe om te voorkomen dat de zaadjes de zeef verstoppen. Voeg ingrediënten langzaam toe om de hoeveelheid overgebleven zaden in de zeef te minimaliseren. Voor het beste resultaat sap gebruik ingrediënten met een grotere hoeveelheid vocht (bijv. appel, peer) Bereidingstips: Zorg er bij het persen van bevroren ingrediënten (bijv. framboos, aardbei) voor dat ze volledig ontdooid zijn.
Bereidingstips: Week vezelige ingrediënten ongeveer 30 minuten in koud water voordat u ze snijdt. Scheid elke stengel, snijd de buitenste stengels die dik en taai zijn tot 4 inch (10,16 cm) lang of minder. Extractietips: Voeg één voor één langzaam de voorbereide ingrediënten toe. Rol de bladeren in een spiraal zoals ze in de sapcentrifuge steken. Voeg eerst het bladgedeelte van de ingrediënten toe en wissel dan af tussen het bladgedeelte en de stengels.
│ Opmerking Als u het apparaat verplaatst, til het dan niet op door de vultrechter vast te pakken, maar til het apparaat altijd op door het motorapparaat of de handgreep vast te pakken. 3. Haal de sapkom uit het motorapparaat. Verwijder de vijzelschroef, zeef uit de sapkom. Reinig met meegeleverde reinigingsborstel. 4. Opmerking | Maak de juicer direct na elk gebruik schoon. Als de resterende resten in de juicer opdrogen, zal het moeilijk zijn om deze te demonteren en schoon te maken.
Probleem & oplossing Wanneer de juicer niet aan gaat: Controleer of het netsnoer goed is aangesloten. Controleer of de vultrechter en de sapkom goed in elkaar zitten. Controleer of de topset en het motorapparaat goed zijn gemonteerd. De juicer werkt niet als de onderdelen niet goed zijn gemonteerd. Vreemd geluid van de juicer: Controleer of de onderdelen correct zijn gemonteerd. Probeer de onderdelen opnieuw in elkaar te zetten en luister naar het vreemde geluid.
De vultrechter sluit niet: Zorg ervoor dat de vijzelschroef helemaal in de zeef is geduwd, zodat de vultrechter goed sluit. Als de vijzelschroef niet goed op zijn plaats zit, sluit de vultrechter mogelijk niet. Lage sapopbrengst: Verschillende ingrediënten bevatten verschillende hoeveelheden vloeistof die verschillende hoeveelheden sap opleveren. Als de ingrediënten niet vers zijn, kunnen ze minder vocht bevatten, waardoor er minder sap ontstaat.
-IT COOK Slow juicer manual
Before use Thanks for choosing our slow juicer. Please read this instruction manual carefully before use. And please save this properly for future reference Important safeguards When using the electrical appliances, basic safety precautions should always be followed including the following: Read all instructions 2. To protect against risk of electrical shock do not put the main body, power cord or plug in water or other liquid. 3.
Don’t put your fingers or other objects into the juicer opening while it is in operation. If food becomes lodged in opening, use the food pusher or another piece of fruit or vegetable to push it down. When this method is not possible turn the motor off and disassemble juicer to remove the remaining food. 15. Don’t use the appliance if the strainer or the other parts are damaged or with visible cracks. 16. Don’t operate without the pomace container in place. 17.
When using, if there are any abnormal sounds, smells, overheating, smoke, etc. immediately turn off the power and apply to the service center for maintenance and repair. This will make sure that you avoid electric shock, electricity leakage and fire hazard. 14. Never scrub or wash the machine body on water-filled platform or pour water to wash the inside of the machine to avoid fire, electric shock or damage to machine body, etc. 15.
How to assemble Take the products and accessories out of the packing box, and clean the juicing bowl, juice cup, strainer, auger screw, feeding tube and pusher. 2. Press the pomace silicone stopper into the juicing bowl (as shown in Fig. 1). 3. Align the juicing bowl “ ” with the “ ” on the motor device and install it on the motor device (as shown in Fig. 2), align the three holes at the bottom of the juicing bowl with the three positioning pillars on the motor device. 4.
Fig. 4 Fig. 5 Fig. 6 Operating instruction Put the juice cup and pomace cup container under the juice outlet and pomace outlet respectively; 2. Cut the ingredients into proper size. For the ingredients with hard core or thick peel, please remove the core and peel before squeezing (such as peach, cherry, coconut ). 3. Plug in the power cord, adjust the switch to the “ON” position, and the product starts to work; put the prepared food materials into the motor device from the feeding tube (as shown in Fig.
Fig. 7 Fig. 8 Fig. 9 When extracting oversized food materials and coarse fiber food materials (such as watermelon, celery, cabbage), cut them into proper pieces at first, when they are stuck; extract them to avoid blockage. 6. To use frozen food materials, it is necessary to thaw them properly in advance before they can be mixed together with cold water, milk or other drinks. 7. Do not put dry food (such as peanuts, walnuts, soybeans) and ice cubes into this machine for operation. 8.
Cover the smart cap to mix the juice. You can put the fruits and vegetables, including milk and other liquids into the mixed juice. After juicing, cover the smart cap to prevent the residual juice from flowing out of the tube. 10. After juicing, keep the machine rotating for about 30 seconds, so that as much as the fruit residue in the juice cup will be discharged. 9. "ON": Positive rotation "0": Stop "R": Reverse rotation “ON” is the positive rotation gear.
Do not put dried or hard ingredients like whole grains, fruits with hard seeds or ice cubes into the juicer. These may damage the juicer parts (e.g. Juicer bowl, auger screw, and strainer). Beans or grains can be used if soaked overnight or boiled. Fruits with pits and hard seeds (e.g. nectarines, peaches, mangoes and cherries) must be pitted before juicing. When using frozen fruits with small seeds such as grapes, completely thaw before inserting them into the juicer. 5.
Hard or inedible skins Pineapple, melon, mango, orange, etc. Peel the skins from the ingredients before juicing. Frozen fruits or ice Frozen strawberry, blueberry, raspberry, etc. Completely thaw frozen fruits before juicing. Do not use ice. Vegetable or animal oil Sesame seed, peanut, butter, margarine, etc. Do not extraxt ingredients containing vegetable or animal oil. This can reduce performance and even damage the juicer.
Others Coconut, sugarcane, whole grains etc. Do not extract ingredients with no water content. Preparation tips Soft fruits and vegetables (e.g. oranges, tomatoes). 1-4 Wedges Peel the skin off oranges, and for tomatoes and apples, take them out the stem. If the ingredients are larger than the feeding tube, cut the ingredients into pieces that will fit into the feeding tube. Fruits with seeds must be pitted before extraction. Cut to 1-4 wedges then slowly insert the ingredients down the feeding tube.
How to use the smart cap: Juicing with the smart cap closed allows mixed juice creations with different fruits, vegetables and liquids. After juicing close the smart cap to block excess juice from dripping, especially when disassembling the juicing bowl off the base. When making juices quickly rinse away any leftover flavors by running a glass of water in the juicer with the smart cap closed. Leave the smart cap open when juicing ingredients that create excessive foam during extraction (e.g.
Ingredients with small seeds (e.g. raspberry, pomegranate, grape) Slowly insert ingredients with small seeds to prevent the seeds from clogging the strainer. Insert ingredients slowly to minimize the amount of leftover seeds in the strainer. For best result, juice with ingredients with higher amount of fluid (e.g. apple, pear) Preparation tips: When juicing frozen ingredients (e.g. Raspberry, strawberry), make sure they are completely thawed. Thoroughly rinse ingredients like grapes.
Preparation tips: Soak fibrous ingredients in cold water for about 30 minutes before cutting them. Separate each stem, cut the outer stems that are thick and tough to 4 inches (10,16 cm) long or less. Extraction tips: One at a time, slowly insert the prepared ingredients. Roll leaves into spiral as inserting into the juicer. Insert the leafy part of the ingredients first then alternate between leafy parts and stems. For ingredients like wheatgrass , grab a handful and insert a bundle.
│ Note When moving the appliance, do not lift by grabbing the feeding tube, please always lift the appliance by grabbing the motor device or handle. 3. Remove the juicing bowl from the motor device. Remove the auger screw, strainer from the juicing bowl. Clean with provided cleaning brush. 4. Note | Immediately clean the juicer after each use. If remaining residue in the juicer dries up, it will be difficult to disassemble and clean. The excess pulp build up can cause bad performance in future uses.
Troubleshooting When the juicer doesn't turn on: Check if the power cord is properly plugged in. Check if the feeding tube and the juicing bowl are properly assembled. Check if the top-set and the motor device are properly assembled. The juicer will not operate if parts are not assembled properly. Odd noise from the juicer: Check if the parts are assembled correctly. Try to assemble the parts again and listen for the odd noise. Do not start the juicer unless there are Ingredients and/or liquid in it.
The feeding tube will not close: Make sure the auger screw is pushed all the way in to the strainer in order for the feeding tube to close properly. If the auger screw is not properly in position, the feeding tube may not close. Low juice yield: Different ingredients hold different amounts of fluid that will yield different amounts of juice. If the ingredients are not fresh, they may contain reduced amounts of fluid, which will yield less juice. Check if the pomace silicon sealer is firmly Inserted.