
Manual
Mech-Tech CCU Operation & Maintenance
Manual - 1911 Model
1)
Safety
Inherent in virtually all products is the capacity for unsafe
use. This applies to everything from automobiles to egg beaters.
The Mech-Tech CCU is a piece of mechanical machinery and must
be operated with the observation of proper safety procedures.
Read and understand
this entire document before attempting op-
eration or maintenance of the CCU.
I) At all times when handling the CCU for routine assem-
bly, disassembly, and/or maintenance procedures be very certain
that the CCU and all ammunition are
totally
separated
from each
other.
II)
Always
open and lock back the bolt before any other
handling of the CCU begins.
III) The CCU bolt is a spring loaded assembly. Be careful to
observe caution regarding the placement of fingers when the bolt is
locked open. Do not place fingers into the ejection port area. Be
aware that a potential for pinching fingers or portions of the hand
exists also on the cocking handle side of the CCU between the rear
of the foregrip and the cocking handle. When the bolt is locked back
it has the potential to slam shut if the unit is jarred.
IV) Be certain to
read and understand
the disassembly/
assembly instructions before attempting these procedures. The
bolt/ barrel subassembly is spring loaded. Always wear appropriate
eye protection during these procedures.
V) In the normal operating mode, the CCU is assembled to
the lower unit or frame of the pistol for which the CCU is designed
and the complete assembly becomes a functioning firearm capable
of discharging the same ammunition for which the pistol is de-
signed. This assembly operates in the same semi-automatic mode
as the pistol from which the lower unit originated. Observe all of the
safety precautions which apply to the pistol as outlined by the pistol
manufacturer. Wear appropriate eye and ear protection at all times
when firing the CCU.
VI) Use only ammunition of the caliber and style for which
the CCU is designed. Use only ammunition loaded by licensed com-
mercial ammunition manufacturers (‘factory ammunition’). The use
of any other ammunition has the potential to be unsafe and also will
1
void the warranty applied to the CCU.
VII) For 1911 model CCU’s, use only unmodified stock Colt 1911
lowers with all factory approved parts. Mech-Tech requires the same
criteria for safety that is required by Colt. Aftermarket parts and
other modifications to Colt lowers have shown unsafe operation
under certain conditions.
2) Operation
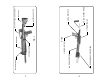
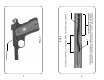
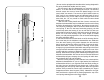
Fig.1 and Fig.2 show a 1911 model CCU completely as-
sembled and indicate the major components and features involved.
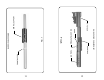
Fig.4 is a photo of the underside of a CCU housing. Observe in
Fig.4 the openings which allow for the assembly of the 1911 lower
unit into the CCU housing.
The first step is to install a 1911 frame (lower) unit into the
CCU housing. Before attempting this it is helpful to become familiar
with the features of the lower unit and the CCU housing which are
involved in mating the two components. Refer to Fig.3, a view of
the 1911 lower unit, and notice the ‘rail’ area. This of course is a
picture of the lower unit with the slide and barrel removed as would
be seen in normal field stripping of the 1911. Next refer to Fig.4
and notice the features indicated in the CCU housing.
There is an opening in the CCU housing into which the 1911
lower unit ‘rails’ (Fig.3) must be introduced, after which the lower
unit is pushed firmly forward (toward the muzzle).
Before the
lower is installed into the CCU be certain to pull the bolt to
the rear and lock it there using the bolt handle.
(Note: ob-
serve the shape of the slot on the left side of the CCU housing. An
enlarged opening exists about half way to the rear of the slot.
When the bolt is pulled fully to the rear, the bolt handle is pushed
inward toward the CCU housing and engages the enlarged opening.
This locks the bolt in the rear position. To release the bolt pull back
on the handle and then pull the handle outward away from the CCU
housing and release the handle.) Also be certain to cock the ham-
mer of the lower unit before attempting assembly into the housing.
(Be careful to avoid pulling the trigger when the hammer is cocked.
Pulling the trigger will of course release the hammer which action
can cause damage to the lower unit in the absence of the slide.)
Note that the correct orientation of the 1911 lower relative to the
housing (Fig.4) is such that the lower unit is pointing toward the
2