
Data Sheet
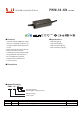
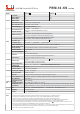

60W PWM Output KNX LED Driver
PWM-60-KN series
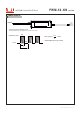
Installation Manual
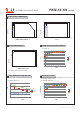
◎Connection for KNX-type
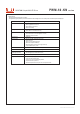
◎Cautions
Before commencing any installation or maintenance work, please disconnect the power supply from the utility. Ensure
that it cannot be re-connected inadvertently!
Keep proper ventilation around the unit and do not stack any object on it. Also a 10-15 cm clearance must be kept when
the adjacent device is a heat source.
Mounting orientations other than standard orientation or operate under high ambient temperature may increase the
internal component temperature and will require a de-rating in output current.
Current rating of an approved primary /secondary cable should be greater than or equal to that of the unit. Please refer
to its specification.
For LED drivers with waterproof connectors, verify that the linkage between the unit and the lighting fixture is
tight so that water cannot intrude into the system.
Tc max. is identified on the product label. Please make sure that temperature of Tc point will not exceed limit.
DO NOT connect "KNX- to Vo-".
The power supply is considered as a component that will be operated in combination with final equipment. Since EMC
performance will be affected by the complete installation, the final equipment manufacturers must re-qualify EMC
Directive on the complete installation again.
For more information about installation, for details. http://www.meanwell.com/manual.htmlPlease refer to :
AC/L(BROWN)
Vo+(RED)
Vo-(BLACK)
KNX-(BLACK)
KNX+(RED)
AC/N(BLUE)
+
-
Any KNX Input Device
File Name:PWM-60-KN-SPEC 2019-12-19
LED Strip or constant
voltage LED bulb
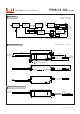
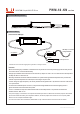
PWM KN series can be ETS adressing/programming WITHOUT connecting to AC mains
Recommend Mounting Direction