Instruction Manual mySKY™ PLUS Your personal guide for sky exploration
INSTRUCTIONS mySKY is an easy-to-use, multimedia tool that will guide you through the night sky. It’s like having your own personal astronomer pointing out the wonders of the universe. ™ Important Note About Your mySKY Your mySKY uses very sensitive magnetic sensors to determine where you are pointing it in the sky. The magnetic lines of force that are detected by these sensors are bent and distorted by any magnetic materials or large metal objects such as cars, metal fences or steel reinforced buildings.
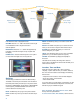
Illuminated Sights Soft Keys SD Card Slot Arrow Keys Enter Power ON/OFF Brightness Control “Identify” Trigger Volume Control Press ENTER to select a highlighted choice. VOLUME: Press the + or – side of the volume control to get a comfortable level when using the ear buds or external speakers. BRIGHTNESS: Press the + or – side of the brightness key to brighten or dim both the sights on top of mySKY and the display. POWER Button: Press and hold the power to turn mySKY on.
scroll down to the “New Location/Time” line and press DONE. Next, choose your state or country: Press the UP or DOWN ARROWS to scroll through the list one line at a time. Press the right or left arrows to scroll through the list one page at a time. Once your country or state is highlighted, press ENTER and the City list displays. Scroll through the list of cities and choose the city nearest to your location (the city can be as far away as 100 miles or 160km). Once your choice is highlighted press ENTER.
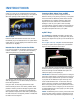
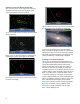
How to Locate an Object in the Sky: When you press “GoTo” on any object screen, the screen will display a star map and an arrow will appear. Move mySKY in the direction the arrow is pointing. The circle will then flash to let you know that you have found the object and the screen will display the object page. As you move mySKY closer to the object, the arrow will get shorter and shorter. When you get very close to the object, a crosshair will be displayed at the position of the object on the SkyMap.
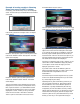
Example of locating an object: Choosing Saturn from one of mySKY’s catalogs the DOWN ARROW to select “Saturn”. If necessary, push the BACK key until you see the SkyMap screen. The three soft keys are labeled OBJECTS, OPTIONS and TOURS. For most objects (in this case, Saturn), you will see an image of the object or a similar object representing the object type. Press the key just below the “Objects” label. The Objects screen displays. Notice the “Solar System” option is at the top of the screen.
Constellations If you choose a selection from mySKY’s Constellation list and then select “Trace,” mySKY will guide you to the major stars of the chosen constellation, one by one, tracing out its popular shape on the sky (for example, it will trace out the “dipper” shape of Ursa Major). The first star in the constellation will be located when you select “Trace”. Select “Next” and the second star will be located. Continue to select “Next” to locate each star in the constellation.
updated. In the unlikely event of a computer crash, start this step over. 6. After the software has been updated, reinsert the SD memory card back into mySKY. 7. Turn on mySKY. That’s it! You now have updated software. How to Reset mySKY if It Freezes Up First, press and hold the ON/OFF key. If that does not work, open the battery compartment and remove one battery for 15 seconds. Replace the battery. Press the ON/OFF key again to restart mySKY.
Notes
Notes MEADE LIMITED WARRANTY Meade’s mySKY is warranted by Meade Instruments Corporations (“Meade”) to be free of defects in materials and workmanship for a period of ONE YEAR from the date of original purchase in the U.S.A and Canada. Meade will repair or replace a product, or part thereof, found by Meade to be defective, provided the defective part is returned to Meade, freight-prepaid, with proof of purchase. This warranty applies to the original purchaser only and is non-transferable.
Step 1 Quick Start Guide %0 For technical support, please call: (800) 626-3233 Install Batteries , 25""%2 #/6%2 /&& - (%!$3%4 *!#+ ).3%24 $3%4 0,5' )& 53).' $% 2%-/6% 2%$ #/6%2 Slide door forward and flip open. 34%0 05,, 25""%2 #/6%2 /&& &2/- (%!$3%4 *!#+ ).3%24 (%!$3%4 0,5' )& 53).' ).3)$% 2%-/6% 2%$ #/6%2 Step 2 Connect Headphones Open rubber cover. Plug headphone jack into headphone port. 34%0 452. /. "9 02%33).' 0/7%2 "544/.