TE653ELW-M Complete Weather Forecaster with Indoor/ Outdoor Temperature and Humidity USER MANUAL
INTRODUCTION Thank you for selecting a Meade Instruments Weather Forecaster. This device combines precise time keeping, monitoring and displaying of current temperature data from up to three remote locations (additional sensors are required). Meade Instruments is the world’s leading designer and manufacturer of telescopes for professional and amateur astronomers – famous for its innovative, high performance telescopes at affordable prices.
INSTALLATION Communications between the main unit (receiver) and the remote sensor (transmitter) is wireless. This allows you to greater flexibility in choosing the location of remote sensor. The remote transmits data up to 164 feet (50 meters) over an open, unobstructed area. The remote sensor can be located either indoors or outdoors, allowing you chose where your data is obtained. NOTE: • It is critical to power the remote sensor BEFORE setting up the main unit.
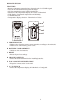
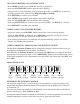
REMOTE SENSOR FEATURES • Remote temperature transmission to the main unit via 433 MHz signal • Case can be wall mounted using built-in hanger • 164 feet transmission range without interference • Selection of the temperature display in Celsius or Fahrenheit • LCD display of measured temperature and humidity • 3 channel selection • Temperature display selection - Fahrenheit or Celsius 4 3 3 M H z E W I R E L E S S 1 A C MADE IN CHINA RESET 1 2 3 CHANNEL F ˚C/˚F D B TM THERMO – SENSOR A LED INDICA
PLACEMENT • The remote sensor should be placed under eaves or a similar location with free air circulation, sheltered from direct sunlight and extreme weather. • Ideally, place the remote sensor over soil, rather than asphalt, which would cause false readings. • Avoid placing the remote sensor near sources of heat, such as chimneys or hot air exhaust vents. • Avoid areas that collect heat from the sun and radiate heat, such as metal, brick or concrete structures, paving, and patios.
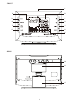
FRONT L A B H I G D F J E K C REAR M N O 6
A. WEATHER FORECAST/ PRESSURE window B. TEMPERATURE/ HUMIDITY window C. CLOCK window D. DOWN button • Select the next available mode • Press and hold for 2 seconds to search for wireless signal from remote sensor. • Decrease parameters. E. ALARM button • When time mode has been selected, press once to display the alarm time of weekday alarm (W), single alarm (S) and pre-alarm (Pre-AL).
L. SNOOZE/ LIGHT button • Stops alarm temporarily and activates LCD backlight M. WALL-MOUNT hole • A recessed opening to mount the unit on a wall N. BATTERY COMPARTMENT • Requires two (2) AA batteries O. TABLE STAND • When placing the main unit on the table or other horizontal surface, unfold and adjust the table stand for the desired viewing angle. BATTERY INSTALLATION • Remove the battery door located at the back of the main unit. • Insert two (2) AA batteries and replace the battery compartment door.
PRESSURE OPERATION The pressure window displays: current barometric pressure, sea level pressure, and weather forecast. The information contains a number of historical statistics: pressure/ temperature/ humidity history bar-chart for the past 24 hours. Pressure can be measured in inHg, hPa/mBar or mmHg, and altitude is determined in either meters or feet. IMPORTANT: There are three viewing options available: barometric pressure SEA LEVEL or LOCAL and ALTITUDE.
CHANGING PRESSURE AND ALTITUDE UNITS • Press MODE as needed, until “LOCAL” pressure is displayed. • Press and hold HISTORY, until the pressure unit is flashing. • Change local or sea level pressure units by pressing the UP (? ) or DOWN (? ) buttons to select the pressure units. Choose from: inHg, hPa/mBar or mmHg. • Press HISTORY to confirm your selection. • Press MODE button until the local altitude value will be displayed. • Press and hold HISTORY until the altitude unit is flashing.
REMOTE SENSORS STATUS The wave icon above the current channel icon shows the connection status of the corresponding remote sensor: Icon Status Searching for the signals from the remote sensor Corresponding remote sensor signal received successfully No signals received for over 1 hour SEARCH FOR REMOTE SENSORS • The main unit can be manually activated to search for the signals from remote sensors by pressing and holding DOWN (? ) button.
VIEWING MAX/MIN AND MINIMUM READINNGS Press the MEMORY button recalling: • Current temperature and humidity • Minimum temperature and humidity • Maximum temperature and humidity at the remote location. RESETTING TEMPERATURE MEMORIES Press and hold MEMORY button for 3 seconds to clear all channel memories. COMFORT LEVEL INDICATION The main unit is capable of detecting and displaying the current indoor comfort levels of surrounding environment.
ICON (Flashing) Atomic Time Reception Strength Undefined data No Reception for the past 24 hours Weak signal, but can be decoded Strong signal • The atomic clock receiver is programmed that it will search for the atomic time signal daily for 0:00, 3:00, 6:00, and 12:00 am. • To enable or disable the atomic time receiver, press and hold UP (? ) button for 3 seconds. If atomic time reception is activated, a tower icon will start flashing. If reception is disabled, the tower icon will disappear.
CLOCK ALARMS There are two time alarms – Weekday alarm (W) and Single day alarm (S) - and one Ice Warning Alarm (PRE-AL).
TROUBLESHOOTING Check here before contacting customer service.
Meade Instruments Corp. 27 Hubble Irvine, CA 92618 U.S.A. ©2011 Meade Instruments Corp. All Rights Reserved. All user manual contents and information are subject to change.