Instruction Manual StarNavigator™ Series Reflecting and Refracting Telescopes with Audiostar™ MEADE.
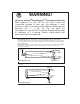
WARNING! ® Never use a Meade StarNavigator™ Telescope to look at the Sun! Looking at or near the Sun will cause instant and irreversible damage to your eye. Eye damage is often painless, so there is no warning to the observer that damage has occurred until it is too late. Do not point the telescope at or near the Sun. Do not look through the telescope or viewfinder as it is moving. Children should always have adult supervision while observing.
CONTENTS Battery Safety Instructions • Always purchase the correct size (8 x 1.5V AA, 15A/15AC ANSI, LR6 IEC), (2 x ANSI/NEDA5004LC, IEC-CR2032) and grade of battery most suitable for the intended use. Easy Set-Up Guide ........................................................ 4 Telescope Features ...................................................... 7 Audiostar Features ........................................................ 9 Getting Started .............................................................
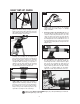
EASY SET-UP GUIDE 4&5 1 Fasten wingnuts 1. Open the tripod: Remove the tripod from the giftbox and stand vertically. Gently pull the legs apart to a fully open position. Attach the tray to the tripod: Slide the bolts through the tray and struts. Thread the wingnuts onto the bolts. 4. Remove 4 screws from the mounting arm shaft: Locate the four screws on the mounting shaft. Remove the screws using a "+" (Phillips head) screwdriver. 5.
7b 9 D I F H E 9. 7a. Attach the 90° diagonal prism (refractor models only, see inside front cover): Pull out to remove the plastic dust cover from the eyepiece holder (A). Slide the tube of the diagonal prism (B) into the telescope’s eyepiece-holder and tighten the thumbscrews (C) to a firm feel only to secure. 7b. Insert the eyepiece: Remove the supplied 25 mm or 26 mm eyepiece (D) from it’s container and place it in the diagonal prism (refractor models only; see Fig.
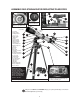
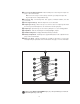
ASSEMBLY VIEW: STARNAVIGATOR REFRACTING TELESCOPES E F 5 8 4 7 6 9 2 3 Fig. 1d (Inset): Compass/bubble level. Fig. 1b (Inset): (E) Altitude setting circle; (F) Altitude lock. Fig. 1e (Inset): Focus assembly and viewfinder. 10 (not visible) (opposite side) 1. Focus Knob 8 2. Eyepiece Holder 3. 90° Diagonal Prism 12 (refractors only) 4. Eyepiece Holder Thumbscrew 11 7 6 13 5. Eyepiece 6. Focus Lock Knob 7. Red Dot Viewfinder 8. Red Dot Viewfinder Alignment Screw 14 5 25 15 4 9.
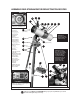
ASSEMBLY VIEW: STARNAVIGATOR REFLECTING TELESCOPES E F 2 5 4 1 10 6 7 14 8 15 13 Fig. 1b (Inset): (E) Altitude setting circle; (F) Altitude lock. 12 1. Focus Knob 2. Eyepiece Holder (not visible) 3. 90° Diagonal Prism (refractors only) IMPORTANT NOTE: Do not remove the velvet pads from this end of the telescope. 4. Eyepiece Holder Thumbscrew 5. Eyepiece 16 6. Focus Lock Knob 25 7. Red Dot Viewfinder 8. Red Dot Viewfinder Alignment Screws 9. Compass/Bubble Level (refractors only) 10.
This page folds out
TELESCOPE FEATURES Take the time to become acquainted with all of these controls before attempting observations through the telescope. 쐃 쐅 Focus Knob: Moves the telescope’s focus drawtube in a finely-controlled motion to achieve precise image focus. Rotate the focus knob clockwise to focus on distant objects, and counterclockwise to focus on nearby objects. Eyepiece Holder: Holds the eyepiece in place. On refractor models, also holds the 90° diagonal prism in place.
씍 Accessory Tray Attachment Bolts - Attach to wing nuts to fasten tray to the tripod. See page 11 for more information. Note: It is not necessary to remove the tray each time you collapse the tripod. The tray is designed to be collapsed with the legs. 씎 Accessory Tray - Conveniently holds extra eyepieces, Audiostar handbox, and other accessories. 2) 2! Inner Support Struts (3) - Make the tripod more secure and stable.
AUDIOSTAR FEATURES Tour the Cosmos with Just the Push of a Button Control your StarNavigator Series system with the standard-equipment Audiostar. Nearly all functions of the telescope are accomplished with just a few pushes of Audiostar’s buttons. Some of the major features of Audiostar are: • • • • • • • Automatically move the telescope to any of over 30,000 objects stored in the database or manually enter the astronomical coordinates of any celestial object.
DEFINITION: Throughout this manual, you will notice the term "Alt/Az." Alt/Az (short for altazimuth) just means that your telescope moves up and down and from side to side. Alt/Az is one of many methods used by amateur astronomers to locate celestial objects. the Up Arrow key starts with the digit "9." The Left and Right Arrow keys are used to move the blinking cursor left and right across the LCD display. • Alt/Az Alignment: Use the Up and Down Arrow keys to move the telescope vertically up and down.
GETTING STARTED Packing List Getting the telescope ready for first observations requires only a few minutes. When first opening the packing box, note carefully the parts listed on your giftbox. How to Assemble Your Telescope The telescope attaches directly to the tripod. The telescope in this way is mounted in an “Altazimuth” (“Altitude-Azimuth,” or “vertical-horizontal”) format. The telescope in this configuration moves up and down and from side to side. Fig. 6: Attach cradle to mounting arm. 1.
it in the diagonal prism (refractor models only; 1, Fig. 9) or directly into the eyepiece holder (2, Fig. 10, reflector models only). Tighten the thumbscrews (2 and 4, Fig. 9, refractor models only) to a firm feel only. Tighten the thumbscrew (3 , Fig. 10, reflector models only) to a firm feel only. 3 2 12. Insert batteries: The telescope’s battery compartment (25, Fig. 1) is located on top of the drive base. Open the battery compartment by lifting the cover and pulling it away from the drive base.
Intensity Slider Choosing an Eyepiece A telescope’s eyepiece magnifies the light gathered by the optical tube. Each eyepiece has a focal length, expressed in millimetres, or “mm.” The smaller the focal length, the higher the magnification. For example, an eyepiece with a focal length of 9 mm has a higher magnification than an eyepiece with a focal length of 25 mm. Fig. 13: Red Dot Viewfinder intensity slider. Slide the switch to the right to turn on the viewfinder.
OBSERVING Important Note: When you look through your telescope’s eyepiece, the image might look strange at first. If you have a refracting telescope, objects will appear right-side-up, but reversed left-for-right. This will not make a difference when observing astronomical objects and, in fact, all astronomical telescopes present inverted images. During terrestrial observing, when a corrected image (rightside up and correct leftfor-right) is desirable, an optional Meade 45° Erecting Prism is available.
NOTE: Do not look through the telescope's eyepiece or viewfinder while it is rapidly moving. Children should always have adult supervision while observing. TIP: When a message is scrolling across the display, press and hold the Up Arrow key to increase the scrolling speed or press and hold the Down Arrow key to decrease the scrolling speed.
To Track an Object Automatically True North Pointer to 0° on the Altitude Setting Circle As the Earth rotates beneath the night sky, the stars appear to move from East to West. The speed at which the stars move is called the sidereal rate. You can setup your telescope to move at the sidereal rate so that it automatically "tracks" the stars and other objects in the night sky. In other words, if the telescope is not tracking an astronomical object, the object will drift out of the eyepiece field of view.
IMPORTANT NOTE: Audiostar requests the Zip Code or Country/State, City, and Telescope Model information only the first time Audiostar is activated. If you wish to change this information, use the "Site" and "Telescope Model" options in the Setup menu. See pages 26 and 27 for more information. IMPORTANT NOTE: While performing the automatic tracking procedure, only use the Arrow keys to move the telescope.
How to Easy Align Your Telescope If you have performed Initializing AudioStar as shown on page 16, continue to step 2. Otherwise, before proceeding, please perform the steps shown on page 16, Initalizing AudioStar. NOTE: For the Easy Align procedure to function properly, AudioStar must have the correct time, date and location of the observing site. If you have changed locations since your telescope was last used, or would like to change this information, see the Setup Menu on page 25 for more information.
which you are familiar from this database when first trying out this method or the One-Star Alignment method. One-Star Alt/Az Alignment One-Star Alignment also requires some knowledge of the night sky. One-Star Alignment is identical to Easy: Align (see EASY (TWO-STAR) ALIGN, Pg. 17), except Audiostar displays a database of bright stars and one star is chosen by the observer from this database for alignment.
BASIC AUDIOSTAR OPERATION OBJECT Select from over 30,000 database objects and press GO TO to move the telescope automatically to the object and place it in the telescopic field of view. SETUP Quick, easy alignment permits all telescope operations with only a 2-minute setup. Select Item: Setup UTILITIES Calculate eyepiece magnifications; set the timer for an observing session; or change the display brightness.
To Calculate Sunset time: 1. Press the MODE key several times, until “Select Item: Object” is displayed. 2. Press the Scroll Down key once to display the “Event” option in the “Select Item” menu. 3. Press the ENTER key to choose the "Event" option and move down a level. "Event: Sunrise" is displayed. 4. Press the Scroll Down key once to display the "Sunset" option in the Event menu. 5. Press the ENTER key to choose the "Sunset" option and move down another level. 6.
MENUS AND MENU OPTIONS Object Menu Almost all observing with Audiostar is performed using the Object menu category. (NOTE: Exceptions include Guided Tour and Landmark Survey.) See GO TO SATURN, page 19, for an example of observing using the Object menu. Also see TAKE A GUIDED TOUR, page 19. Many Audiostar menu categories contain databases. An Audiostar database is a list of viewable objects, such as stars, planets, comets, nebulae and so forth.
Landmarks stores the location of terrestrial points of interest in the permanent Audiostar database. IMPORTANT NOTE: To use the Landmark function, the telescope must be located and aligned exactly as when the landmark was added to the database. 쏋 Select: To select a Landmark already in the database (see ADD below), choose the "Select" option and scroll through the list. Press ENTER to select a Landmark, then press GO TO and the telescope slews to the object.
Glossary Menu The Glossary menu provides an alphabetical listing of definitions and descriptions for common astronomical terms and Audiostar functions. Access directly through the Glossary menu or through hypertext words embedded in Audiostar. A hypertext word is any word in [brackets], usually found when using the Audiostar Help function or when reading a scrolling message such as a description of a planet or star.
Brightness Adj: Adjusts the brightness of the display using the Scroll keys. When complete, press ENTER. Contrast Adj: Adjusts the contrast of the display using the Scroll keys. When complete, press ENTER. NOTE: This feature is usually only required in very cold weather. Beep: Turns the beep on or off. Sleep Scope is a power saving option that shuts down Audiostar and the telescope without forgetting its alignment. With "Sleep Scope" selected, press ENTER to activate the Sleep function.
value near 100, the telescope tube responds more quickly (it responds immediately at 100%) as you hold down an Arrow key and also slews (moves) the tube more quickly. If you enter a value near 0, it takes longer for the tube to respond as you hold down an Arrow key and also slews the tube more slowly. Experiment with this option. Try changing the percent value until you get a "feel" for the Arrow keys that is comfortable for you.
쩦 Edit: Edits a selected site, including: the name, latitude, longitude, and time zone. Time Zone refers to the Greenwich Mean Time (GMT) time zone shift. Users West of Greenwich, England use “-” hours, East of Greenwich use “+” hours. For the United States, look up the time zone shift in Table 1. NOTE: Audiostar compensates for daylight savings time, if selected. See SETUP MENU: DAYLIGHT SAVING, page 25.
ADVANCED AUDIOSTAR FEATURES Before trying out the examples in this section, familiarize yourself with the basic operations of Audiostar described earlier in this manual. The following examples assume that you have a basic knowledge of Audiostar and understand how to scroll to a desired menu or menu option, and how to enter numbers and text. It also assumes that you have initialized Audiostar and have placed the telescope in the "Home" position (when appropriate).
Landmarks This menu option allows you to define and store terrestrial objects in the Landmark database. First, a landmark needs to be stored in memory using the "Landmark: Add" option. To view a landmark, use the "Landmark: Select" option. Landmarks may also be viewed using the "Landmark Survey" option in the Utilities menu. To Add a landmark to the database: In this procedure, you will store the location of terrestrial landmarks in Audiostar's memory. 1.
3. Press MODE to pause the Survey. Press ENTER to restart the survey at the first object of the survey. To check on the available amount of memory in Audiostar. Audiostar has a limited amount of memory. Once you begin to store Landmarks, User Objects and other bits of information in Audiostar, you will begin to use up memory. This procedure allows you to check on how much memory is still available. 1. Navigate to the "Setup: Statistics" menu option and press ENTER. 2. "Statistics: 97.6K Char.
6. After "Minimum Elevation," "Object Type" displays. Press ENTER." "+Black Hole" displays.If you do not wish wish to have "Black Holes" in your search, press ENTER and the "+" changes to a "–." Press the Scroll Down to scroll to the next item. "+Diffuse Nebula" displays. Continue to scroll through the list and press ENTER if you wish to change the "+" to a "–" or vice-versa. 7. After you have scrolled to the last item on the "Object Type" list, press MODE twice and the Scroll Down key once.
OPTIONAL ACCESSORIES A wide assortment of professional Meade accessories is available for the StarNavigator telescopes. The premium quality of these accessories is well suited to the quality of the instrument itself. Consult meade.com for complete details on these and other accessories. Eyepieces: For higher and lower magnifications, Meade Series 4000 Super Plössl (SP) yield high-resolution imaging with all StarNavigator telescope models. A useful selection includes the SP 15 mm and SP 12.4 mm eyepieces.
CARING FOR YOUR TELESCOPE Your StarNavigator telescope is a precision optical instrument designed to yield a lifetime of rewarding observations. Given the care and respect due any precision instrument, your telescope will rarely, if ever, require factory servicing. Maintenance guidelines include: a.
thread inward one of the adjustment/lock knobs (1, Fig. 24) while unthreading another of these knobs. Only make adjustments to two knobs at a time until the secondary mirror appears as in Fig. 28. 3. Secondary mirror-holder adjustments: If the secondary mirror (1, Fig. 28) is centred in the focuser drawtube (2, Fig. 28), but the primary mirror is only partially visible in the reflection (3, Fig. 28), the three “+” (Phillips head) secondary mirror-tilt screws (2, Fig.
4 3 1 2 5 6 Fig. 23. 3 2 2 1 2 3 Fig. 25. Fig. 24. 1 2 2 3 4 1 5 Fig. 26. Fig. 27. 1 1 2 2 Fig. 28. 4 3 3 Fig. 29. Looking at or near the Sun will cause irreversible damage to your eye. Do not point this telescope at or near the Sun. Do not look through the telescope as it is moving.
SPECIFICATIONS StarNavigator60 Optical design......................................................................................Refractor Clear aperture ....................................................................................60 mm Focal length ........................................................................................700 mm Focal ratio ..........................................................................................f/11.7 Resolving power .................................
StarNavigator114 Optical design......................................................................................Reflector Clear aperture ....................................................................................114mm Focal length ........................................................................................910mm Focal ratio ..........................................................................................f/8 Resolving power ...................................................
APPENDIX A Celestial Coordinates It is helpful to understand how to locate celestial objects as they move across the sky. +90 Dec. Star De clin 1 17 18 19 16 15 14 13 12 atio A celestial coordinate system was created that maps an imaginary sphere surrounding the Earth upon which all stars appear to be placed. This mapping system is similar to the system of latitude and longitude on Earth surface maps.
APPENDIX B TIP: Entering R.A. and Dec. Coordinates of an object without using the menus: If you do not wish to navigate through the menus, a more direct way to enter coordinates is to press and hold MODE for two seconds or more. R.A. and Dec. coordinates display. Press GO TO. "Object Position" and a set of coordinates displays. Enter the R.A. and Dec. coordinates of any celestial object using the Number keys, overwriting the coordinates currently displayed.
APPENDIX C Observing Satellites In this procedure, you will prepare your telescope to observe a satellite pass. 1. Go to the "Object: Satellite" menu option and press ENTER. 2. Use the Scroll keys to scroll through the list of satellites. 3. Select a satellite from the list and press ENTER. 4. "Calculating...." and then "Tracking..." displays. If the satellite is going to make a pass, "Located" displays. 5.
APPENDIX D Training the Drive Train the telescope motors using Audiostar. Perform this procedure if you are experiencing any pointing accuracy problems. Fig. 32 depicts the complete Drive Training procedure. NOTE: Use a terrestrial object, such as a telephone pole or lamp post, to train the drive. Complete this exercise once every 3 to 6 months to maintain the highest level of telescope pointing accuracy. This manual gives only the briefest introduction to astronomy.
APPENDIX E Batteries Replace the red dot Viewfinder’s battery with a CR2032 lithium battery. The battery is located on the bottom of the red dot viewfinder. You may need to slide your fingernail or a screwdriver blade underneath the battery and then slide it out. Replace the internal clock’s battery with a CR2032 lithium battery. This battery is located in the battery compartment. Both batteries are available from photographic supply houses or any place lithium batteries are sold.
BASIC ASTRONOMY In the early 17th century, the Italian scientist Galileo, using a telescope smaller than your StarNavigator model, turned it skyward instead of looking at the distant trees and mountains. What he saw, and what he realized about what he saw, has forever changed the way mankind thinks about the universe.
Planets Planets change positions in the sky as they orbit around the Sun. To locate the planets on a given day or month, consult a monthly astronomy magazine, such as Sky and Telescope or Astronomy. You can also consult Audiostar for information about planets. Scroll to the "Object: Solar System" menu and scroll through the lists of planets. When a planet you are interested in displays, press ENTER.
Declaration of Conformity for CE Marking EMC Directive 2004/108/EC (Electromagnetic Compatibility) Meade Instruments Corp 27 Hubble Irvine, CA 92618 U.S.A. We declare that the Meade Instruments Corp.
MEADE LIMITED WARRANTY Every Meade telescope, spotting scope, and telescope accessory is warranted by Meade Instruments Corporation (“Meade”) to be free of defects in materials and workmanship for a period of ONE YEAR from the date of original purchase in the U.S.A. and Canada. Meade will repair or replace a product, or part thereof, found by Meade to be defective, provided the defective part is returned to Meade, freight-prepaid, with proof of purchase.