Instruction Manual NGC-Series Telescopes NG-Series Telescopes
WARNING! Never use a Meade® NGC™ or NG™ Telescope to look at the Sun! Looking at or near the Sun will cause instant and irreversible damage to your eye. Eye damage is often painless, so there is no warning to the observer that damage has occurred until it is too late. Do not point the telescope or its viewfinder at or near the Sun. Do not look through the telescope or its viewfinder as it is moving. Children should always have adult supervision while observing. CONTENTS Telescope and Features..............
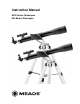
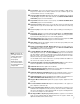
TELESCOPE FEATURES G F E D C B H 1& I 1^ J 1) 1! 1% 1@ 1# 1$ Fig. 1: The NGC telescope. Inset: Alternate tray style. Your telescope may look different from the one depicted above. Some differences include: • NG models do not include a control panel (4, Fig. 1) or a battery compartment (18, Fig. 2) • 90° diagonal mirror styles vary (8, Fig. 1 or 28, Fig. 4 inset) • Some models include 1.25" diameter eyepieces; other models include .965" diameter eyepieces (7, Fig.
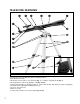
E 1* B A 1( C D EF 2) G Fig. 2: Top view of the NGC base. Fig. 3: Detailed view of the NGC computer control panel. 2@ 2# G 2! 2& 2* H 2% 2^ 2$ I J 1) Fig. 4: Detailed view of the focuser assembly and the viewfinder. Inset: Alternate style focuser and viewfinder.
Telescope and Tripod Features 6 b Dust Cap (not shown): Pull to remove from the dew shield (17, Fig. 1). NOTE: The dust cap should be replaced after each observing session and the power turned off (NGC models only) to the telescope. Verify that any dew that might have collected during the observing session has evaporated prior to replacing the dust cap.
1) Focus Knobs: Use to move the telescope’s focuser assembly to obtain precise image focus. Rotate the focus knobs clockwise to focus on distant objects, and counterclockwise to focus on nearby objects. 1! Tripod Leg Nuts and Bolts (3): Attach the tripod legs (15, Fig. 1) to the tripod head (16, Fig. 1) using these three nuts and bolts. See HOW TO ASSEMBLE YOUR TELESCOPE, page 8, for more information. 1@ Tripod Struts: Attach the struts to accessory tray.
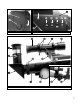
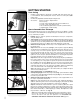
GETTING STARTED Parts Listing • • • Insert bolt Fig. 5: Attach tripod legs to the tripod head. Fig. 6: Tighten screws with screwdriver tool to attach tray to the struts (Style 1). Fig. 7: Attach pin to tripod leg bracket with a large pliers (Style 2). Fasten wing nuts Fig. 8: Attach tray to the tripod: Thread the wing nuts to the bolts (bottom view; Style 2).
6. Bracket Attachment Nuts 7. 8. Insert the diagonal mirror and eyepiece: Insert the diagonal mirror (8, Fig. 1) into the focuser drawtube (9, Fig. 1) and a low-power eyepiece (e.g., 25mm or 26mm eyepiece) into the diagonal mirror. Tighten the eyepiece and diagonal mirror thumbscrews (25 and 26, Fig. 4) to a firm feel. Note: Some models are supplied with one of two styles of the 90° diagonal mirror. Quantities of eyepieces and eyepiece size varies with each model.
Low power eyepieces offer a wide field of view, bright, high-contrast images, and eye relief during long observing sessions. To find an object with a telescope, always start with a low power eyepiece (e.g., 25mm or 26mm eyepiece). When the object is located and centered in the eyepiece, you may wish to switch to a higher power eyepiece to enlarge the image as much as practical for prevailing seeing conditions. NOTE: Seeing conditions vary widely from night-to-night and site-to-site.
Initializing the Control Panel (NGC Models Only) 1. 2. 3. 4. 5. 6. 7. 8. 9. Make sure that you have installed a 9v battery in the battery compartment. Press ON/OFF to turn the power on. The control panel display lights up and a copyright message displays briefly. A message displays that warns you not to use the telescope to look at the Sun. At the end of this message, press the button prompted by the display to signify that the message has been read and understood.
7. "Enter Time: 08:00:00AM" displays. The leftmost "0" is highlighted. Press UP/DOWN until "1" displays. Press ENTER. 8. "8" is highlighted. Press UP/DOWN until "1" displays. Press ENTER. 9. "0" is highlighted. Press UP/DOWN until "3" displays. Press ENTER. 10. Keep pressing ENTER until "AM" is highlighted. Press UP/DOWN until "PM" displays. Press ENTER. 11. The time display now reads "11:30:00PM." Easy Alignment (NGC Models Only) 1. 2.
Go To Saturn (NGC Models Only) After performing the Easy Alignment procedure, the telescope is aligned for a night of viewing. IMPORTANT NOTE: As you observe Saturn, you will notice that the image moves in the eyepiece. This is because the Earth is rotating. You can use the horizontal and vertical slow motion controls (20, Fig. 2 and F, Fig. 3) to re-center the image in the eyepiece. The image will move much faster if you are using a higher-powered eyepiece such as a 4 mm or the 12mm eyepiece.
1. After observing Saturn, press MODE twice so that "Select Item: Object" displays again. Press UP/DOWN until "Select Item: Guided Tour" displays. Press ENTER. "Guided Tour: Tonight’s Best" displays. Press ENTER. NOTE: If you wish to try out other Guided Tours, press UP/DOWN to scroll through other tour choices. When the tour you wish to select displays, press ENTER. "Tonight’s Best: Searching..." displays. After calculating, "Tonight’s Best: Jupiter" displays.
Select Item: Object Solar System Mercury Etc. Moon Asteroids Comets Constellations Andromeda Etc. Deep Sky Named Object Galaxies Nebulae Planetary Neb. Etc. Star Named SAO Catalog Double Etc.
Object Menu IMPORTANT NOTE: To use the Select and Add features of the Landmark menu, the telescope must be physically located in the same place it was located when the landmark list was created. Also, the optical tube must be pointed at and centered on the first object in the Landmark list. Almost all observing is performed using the Object menu category. (NOTE: Exceptions include Guided Tour and Landmark Survey.) See GO TO SATURN, page 13, for an example of observing using the Object menu.
NOTE: Meteors are fast moving objects that cover large areas of the sky and are usually best observed with the naked eye. NOTE: The equinox and the solstice are the days of the year when the seasons change. These days are determined by the location of the Sun in the sky. Vernal means spring. Sunrise and Sunset calculates the time that the Sun rises or sets on the current date and location. Find rise and set times for other dates by entering a new date into the "Setup: Date" menu.
Eyepiece Calc calculates information about an eyepiece for your telescope. Field of View: Scroll through a list of available eyepieces. When an eyepiece is • selected, the field of view is calculated. • Magnification: Scroll through a list of available eyepieces. When an eyepiece is selected, the magnification is calculated. Suggest: Suggests the best eyepiece for viewing, based on the telescope and • the object being viewed. Brightness Adj: Adjusts the brightness of the display using UP/DOWN.
OPTIONAL ACCESSORIES A wide assortment of professional Meade accessories is available for the NG-Series and NGC-series telescopes. Consult the Meade General Catalog for complete details of these and other accessories. Eyepieces (1.25" barrel diameter): For higher or lower magnifications with the telescopes that accommodate 1.
MAINTENANCE AND SERVICING General Maintenance Horizontal adjustment nut Your telescope is a precision optical instrument designed to yield a lifetime of rewarding applications. Given the care and respect due any precision instrument, your telescope will rarely require factory servicing or maintenance. Maintenance guidelines include: 1. Avoid cleaning the telescope’s optics.
• • • • If inside a warm house or building, move outside. Interior air conditions may distort terrestrial or celestial images, making it difficult, if not impossible, to obtain a sharp focus. For optimal viewing, use the telescope outside in the open air instead of observing through an open or closed window or screen. If viewing a land object on a warm day, heat waves distort the image. See SIMPLE OBSERVATIONS, page 10. For clear viewing of objects, turn the focus knob (10, Fig.
APPENDIX A: ADVANCED FEATURES Celestial Coordinates North Celestial Pole (Vicinity of Polaris) +90 Dec. Star 17 18 19 16 15 14 13 12 11 ation clin De 1 10 9 Earth’s Rotation 20 21 22 23 0 1 2 Right Ascension 3 8 4 7 6 5 Celestial Equator 0 Dec. 2 South Celestial Pole -90 Dec. Fig. 15: Celestial Sphere. A celestial coordinate system was created that maps an imaginary sphere surrounding the Earth upon which all stars appear to be placed.
6. 7. 8. 9. "Right Asc.: 00.00.0" displays. Use UP/DOWN and ENTER to enter the digits for the Right Ascension coordinate of your object. "Declination: +00°.00'" displays. Use UP/DOWN and ENTER to enter the digits for the Declination coordinate of your object. If necessary, use UP/DOWN to change "+" to "." The computer control panel then prompts you to enter the size of the object. This step is optional.
APPENDIX B: ALTERNATE TRAY ASSEMBLY Leg brace Introduction Some NGC/NG models are now shipped with a third style tray. The third style assembles with a round accessory tray. Assembly Leg brace support • Use the provided 3 short screws, 3 washers and 3 bolts to attach the round accessory tray to the tripod. You will need a Phillips-head screwdriver to perform this assembly. • Line up one of the leg braces (see Fig.
BASIC ASTRONOMY In the early 17th century, Italian scientist Galileo, using a crude telescope smaller than your NG or NGC, turned it to look towards the sky instead of distant trees and mountains. What he saw, and what he realized about what he saw, forever changed the way mankind thought of the universe.
and Telescope or Astronomy. Listed below are the best planets for viewing through your telescope. Venus is about nine-tenths the diameter of Earth. As Venus orbits the Sun, observers can see it go through phases (crescent, half and full) much like those of the Moon. The disk of Venus appears white as Sunlight is reflected off the thick cloud cover that completely obscures any surface detail. Mars is about half the diameter of Earth, and appears through the telescope as a tiny reddish-orange disk.
MEADE LIMITED WARRANTY Every Meade telescope, spotting scope, and telescope accessory is warranted by Meade Instruments Corporation ("Meade") to be free of defects in materials and workmanship for a period of ONE YEAR from the date of original purchase in the U.S.A. and Canada. Meade will repair or replace a product, or part thereof, found by Meade to be defective, provided the defective part is returned to Meade, freight-prepaid, with proof of purchase.