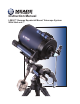
Instruction Manual LX850™ German Equatorial Mount Telescope System With StarLock™
WARNING! Never use a Meade® LX850 Telescope to look at the Sun! Looking at or near the Sun will cause instant and irreversible damage to your eye. Eye damage is often painless, so there is no warning to the observer that damage has occurred until it is too late. Do not point the telescope at or near the Sun. Do not look through the telescope or Finder Scope as it is moving. Children should always have adult supervision while observing.
CONTENTS Introduction The LX850 Telescope . . . . . . . . . . . . . . . . . . . . . . . 5 Telescope Features Precision Machined German Equatorial Mount . . . . 6 Faster, Sharper Optical System . . . . . . . . . . . . . . . . 6 StarLock — Full-Time Automatic Guiding . . . . . . . . 6 Key Features Figure 1: Right View . . . . . . . . . . . . . . . . . . . . . . . . . 7 Figure 2: Left View . . . . . . . . . . . . . . . . . . . . . . . . . . 8 Figure 3: Detail RA Access . . . . . . . . . . . . . . . .
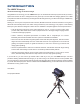
The LX850 Telescope Advanced Technology for the Astro Imager Congratulations on receiving your new LX850 telescope. You’ll find that this telescope system has all you need to explore the Universe we live in. Designed from the ground up to be the ideal Astro-imaging platform, the LX850 incorporates several new revolutionary technologies that will change the way you observe and image. Available only from Meade.
AutoStar #497 HANDBOX Telescope Features Telescope Features Meade Instruments introduces the latest in a long line of advanced astronomical products: the LX850™. Using revolutionary new technology, every aspect of this system has been designed to deliver the new standard in astrophotographic and visual performance.
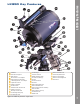
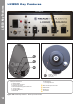
O 28b OO 24b 24a O 25a B O 25b 3! 2( 3& 3^ 2@ O 1( O 1& 3) 4a O D G 4b F O H 3* 1@ 1! J I 1) 3$ B Viewfinder D HD-60 25mm Eyepiece 4a Rear Cell Port o 4b o SC Thread to 2” ACC Adapter F Diagonal Mirror Thumbscrews G 2” Star Diagonal with 1.
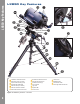
AutoStar #497 LX850 KeyHANDBOX Features LX850 Key Features 2^ C O 28a 2# 3! 2!2@ 3@ 4) 5@ 2# 3# 3% 3$ 4& 4* 4( 5) 2& 4^ 5! C Viewfinder Collimation Screws 2! DEC Drive Power Connector 2^ Optical Tube Assembly (OTA) 2& Dovetail Plate Safety Bolt 28a StarLock Mount (on saddle ) O 3! StarLock Dovetail Lock Bolts 3@ DEC External Cable Access Port 3# RA External Cable Access Port 3$ Azimuth Adjustment Knob 3% Collimation Screws (3) 4) Carry Handles 4^ Leg Locks 4& Spreader Bar 4* Tension Knob Figure 2
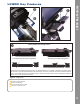
3# 3^ 3& 4! Figure 3: Detail, RA Access 3( LX850 Key Features LX850 Key Features Figure 4: StarLock Counterweight Mount Saddle Plate Configurations Losmandy® Style Dovetail Configuration Vixen® Style Dovetail Configuration Note that there are different angled surfaces on the dovetail brackets on the saddle.
AutoStar #497 LX850 KeyHANDBOX Features LX850 Key Features C A D B F E G H Figure 6a: Telescope Control Panel 4@ 4# 4$ STARLOCK: TELESCOPE CONNECTION RS-232 PORT GUIDER STATUS 4% Figure 6b: StarLock Control Panel Figure 6c: OTA Rear View Telescope Control Panel: A. ON/OFF Switch B. 12v DC Power Connector C. Electronic Focus Port D. Illuminated Reticle Eyepiece Power Port E. 12v DC Output F. Handbox (HBX) Port G. RS232 Port H. StarLock Port I.
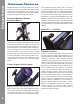
b Viewfinder: 8x50, wide-field sighting scope with D. Illuminated Reticle Port crosshairs that enables easy centering of objects in the telescope eyepiece. E. 12v DC Output F. Handbox (HBX) Port c Viewfinder Collimation Screws: Adjust these screws to align the viewfinder. See page 23 for more information. G. RS232 Port d Eyepiece: Place the supplied HD-60 25mm eyepiece into the 2” Star Diagonal with 1.25” Adapter (Pg 18, Fig. 24) and tighten in place with locking thumbscrew. e SC f H.
AutoStar #497 LX850 KeyHANDBOX Features LX850 Key Features StarLock System. 2$b StarLock Widefield OTA: Used to orient the LX850 in relation to the sky. 2%a StarLock Connector Panel: Starlock cable connection point and place where Starlock status is displayed. 2%b StarLock Connector Cable: 4-pin connector cable plugs into StarLock. 2^ Optical Tube Assembly (OTA): The main optical component that gathers the light from distant objects and brings this light to a focus for examination with the eyepiece.
You may want to perform the assembly of the LX850 in the light of day to become familiar with the parts and operation before performing observations on the night sky. Setup the telescope in a large open area where you can see lots of sky. Do not setup right next to a building or a wall that will obstruct its view of the sky. Make sure the ground is stable and is approximately level.
AutoStar #497 HANDBOX Assembly Loosen the two (2) leg lock-knobs on each tripod leg. Adjust the height of the tripod to the desired height and with the tripod head approximately level, tighten the leg locks. Tighten the locks to a firm feel only; do not over tighten. Slide the threaded rod through the spreader and then slide this assembly through the central mounting hole in the tripod head. Place the threaded rod through central mounting hole far enough so that the retaining clip channel is exposed.
Attach the Counterweight Shaft Remove the counterweight shaft, with attached safety nut, from its packaging. The safety nut is attached at the factory for shipping. Removing the safety nut at this time to lighten the counterweight shaft and make it easier to attach on the DEC axis. Remove the retaining nut by unscrewing it and set aside. Thread the shaft into the receiver, making sure that the threads are matching, not binding or cross threading.
AutoStar #497 HANDBOX Assembly Removing the Saddle Your telescope mount shipped from the factory with the OTA mount saddle attached. You will have to remove it to gain access to the upper portion of the internal raceway to finish routing any additional cables you want to run to the OTA for cameras of other optional equipment. Remove the StarLock counterweight by loosening its retaining knob and sliding it off.
Assembly connector is now ready to be inserted into the RS232 receptacle on the control panel labeled “StarLock.” At this point you will need to reattach the Optical Tube Saddle Plate. Reverse the steps outlined in the step “Removing the Saddle” above. Attach the Control Module Take the control panel module out of the box that Fig 22: Replace the saddle plate Note Rail to attach Telescope Control Module Fig 20: Connecting motor to control module.
AutoStar #497 HANDBOX Assembly dovetail, you may need to relocate both sides of the dovetail receiver rails (Page 9, Fig. 5). • OTAs with a Losmandy®-Style Dovetail: All Meade LX850, Advanced Coma-Free Optical tubes utilize the standard Losmandy®-style dovetail plate.
The Meade OTAs sold with the LX850 are equipped with a standard 8x50 finderscope. To assemble and align the viewfinder, perform steps 1 through 6 below during the daytime. 1. Assemble the viewfinder by attaching all included thumbscrews onto the viewfinder bracket and Assembly Attach the Viewfinder to the OTA Fig 26: Mounting StarLock to the saddle plate. Attach StarLock counterweight. OTA.
Assembly Assembly To balance the telescope, unlock the Right Ascension or RA clutches (3-Places, Page 14, Fig. 10). When this axis is unlocked, the telescope pivots on the RA axis. Later in the procedure, you will also unlock the Declination or DEC clutches (3-Places, Page 14, Fig. 10). When unlocked, it pivots on the DEC axis. Try to become familiar with these locks and observe how the telescope moves on each axis.
Coarse Focus Knob Fig 31: Balancing the StarLock assembly Getting Started Focusing and Aligning the Viewfinder 1 . If you have not already done so, insert the Meade eyepiece into the diagonal mirror on the rear of the OTA. 2 . With the telescope properly balanced in both axes (See the section “ BALANCING THE TELESCOPE” BEFORE performing this step), Unlock the RA and DEC clutches (Page 14, Fig. 10) so that the telescope moves freely on both axes. 3.
AutoStar #497 HANDBOX Getting Started precise focus use the smaller fine focus knob for final focus. If you have a 2” eyepiece, remove the 1.25” eyepiece adapter from the diagonal by loosening the thumbscrew(s). Slide the 2” eyepiece into the diagonal and tighten with the eyepiece locking screw(s). The bottom side of the focuser has a locking knob which locks the focuser drawtube in place. Use this lock knob when the focuser is attached with heavy equipment to prevent unwanted movement to the drawtube.
One Star Alignment To prepare your telescope for One Star Alignment: 1. Plug in the AC adapter to the control panel. 2. Verify both the RA and DEC clutches are tight. 3. Connect Autostar II to the HBX port of the control panel. 4. Flip the power switch of the control panel to the ON position. The Autostar II screen is activated and a copyright message displays briefly. 5. “Press 0 to Align or Mode for Menu” displays. Press 0. 6. The telescope will seek the home position and align with its internal sensors.
AutoStar #497 HANDBOX Getting Started 5. The telescope will slew to that star. When slewing has been completed, re-center the star in the eyepiece or camera. Then hold the “ENTER” key for 2 seconds. Then press “ENTER” again to confirm your position. StarLock will now compensate for the offset. Test your Collimation Before collimating an LX850 telescope, you will need to test your collimation.
g. You may find after your initial adjustment that the dark center is off in a new direction (e.g., instead of being off side-to-side it is now off in an up-and-down direction). In this case repeat steps b through f to find the new adjustment screw. h. Now try a higher power eyepiece (e.g., 9mm or less) and repeat the above tests. Any lack of collimation at this point will require only very slight adjustments of the three set screws. You now have good collimation of the optics. i.
AutoStar HANDBOX StarLock And#497 Mount Flexure StarLock Automatic Rate Calibration (ARC) Obtaining best performance from StarLocked telescopes requires that the guiding aggressiveness be optimally set for current viewing/imaging conditions. This is an essential procedure to obtain peak tracking accuracy Please refer to Appendix C, page 53 for details.
B C D E F G H I J 1) 1! 2-Line LCD Display ENTER Key MODE Key “GO TO” Key Arrow Keys Number Keys Scroll Keys “?” Key Coil Cord Port Coil Cord AutoStar II Operation AutoStar II Operation Utility Light Figure 35: The AutoStar II Handbox category, then returns to the first option. The Scroll Up key (Fig. 35, 7) cycles up through the options in the opposite order. Note that this capability is a quick way to get to an option that is near the bottom of the list.
AutoStar II II Operation Operation AutoStar 7. Press MODE once to start moving back up through the AutoStar levels. The first level up is the Event menu. 8. Press MODE again to move up another level. This is the top level, “Select Item”. 9. Press MODE again to return to the starting point of “Select Item: Object”. Figure 37: AutoStar Levels Figure 38: Menus set in loop line, press the ENTER key to choose that option and move down one menu level.
Solar System Mercury Etc. Moon Asteroids Comets Constellations Andromeda Etc. Deep Sky Named Object Galaxies Nebulae Planetary Neb. Etc. Star Named SAO Catalog Etc. User Objects Select Add Delete Edit Landmarks Select Add Delete Identify Browse Start Search Edit Parameters Select Item: Object Sunrise Sun Transit Sunset Moonrise Moon Transit Moonset Moon Phases Next Full Moon Next New Moon Next 1st Qtr Next 3rd Qtr Meteor Showers Quadrantids Lyrids Etc. Solar Eclipses Lunar Eclipses Min.
AutoStar #497II HANDBOX AutoStar Operation 9. Press the Up or Down Arrow key. Notice that a letter of the alphabet displays. Continue to press one of the Arrow keys until the first letter of your name displays. 10. Use the Right Arrow key to move to the next position so you can choose the second letter of your name. Continue to use the Arrow keys to enter your full name. 11. Press ENTER when you are finished. Your name is now entered into AutoStar II’s memory. 12.
Press GO TO. The telescope, if aligned, will slew to that chosen object. Press MODE repeatedly to return to previous menu levels. User Objects: Allows the user to define and store in memory deep-sky objects of specific interest that are not currently in the Autostar II libraries. See CREATING USER OBJECTS, page 37, for more information. Identify: An exciting feature for an observer who wants to scan the night sky and start exploring.
AutoStar #497II HANDBOX AutoStar Operation such as a description of a planet or star. Press ENTER whenever a hypertext word is on screen and Autostar II goes to the glossary entry for that word. When ON is displayed, press ENTER to activate the timer. When the timer runs out, four beeps sound and the timer is deactivated. To access directly from within the Glossary menu, use the Scroll keys to scroll through the alphabet. Press ENTER on the desired letter.
There are numerous other features available within the Setup menu, including: Align: Lets you choose a method of alignment. • • • • • Easy One Star Two Star Align on Home Drift Align Telescope: Accesses several options, including: • Telescope Model: Allows you to select the type of OTA mounted on LX850. • Align OTA: Provides an alignment routine that adjusts the OTA so that it is orthogonal to the LX850 telescope mount.
AutoStar #497II HANDBOX AutoStar Operation • Tracking Rate: Changes the speed at which the telescope tracks targets in the sky. a. Sidereal: The default setting for Autostar II; sidereal rate is the standard rate at which stars move from East to West across the sky due to the rotation of the Earth. b. Lunar: Choose this option to properly track the Moon over long observing sessions. c. Solar: Choose this option when observing the Sun.
the entry is complete. Daylight Saving: Enables or disables the Daylight Savings time setting. Note: Daylight Savings Time may be referred to by different names in various areas of the world. Check local time to verify. GPS-UTC Offset: Universal Time (UTC) allows you to add leap seconds to its time calculations, GPS does not. The offset is the number of leap seconds added since the establishment of GPS.
AutoStar #497II HANDBOX AutoStar Operation be accessed directly using the Number keys (commonly referred to as “hot buttons”). The two functions, the Speed mode and the Utility light are described earlier in the manual. Focus Control Menus: If you have installed the Meade Zero Image Shift Micro Focuser, Press Number key “4” to select these menus directly from Autostar II’s keypad. Each time you press Focus, the key toggles between focus/focus speed menus.
Before trying out the examples in this section, familiarize yourself with the basic operations of Autostar II described earlier in this manual. The following examples assume that you have a basic knowledge of Autostar II and understand how to scroll to a desired menu or menu option, and how to enter numbers and text. It also assumes that you have initialized and aligned your telescope. Zone” value may not need to be changed. 2. Scroll to “Site: Edit” and press ENTER. “Edit: Name” displays. Press ENTER.
AutoStar #497IIHANDBOX Advanced AutoStar Features celestial objects (stars, nebulae, planets, etc.) that you can observe, you may eventually want to view objects that are not part of a library. Autostar II provides a feature that allows you to enter an object’s RA and DEC coordinates in the “User: Objects” option of the Object menu and allows automatic slewing of the telescope to the user-entered coordinates.
To enter coordinates of an object into the “User: Objects” option of the Object menu: 1. Make sure AutoStar has been initialized and the telescope has been aligned. To GO TO a user-entered object: In this procedure, you will choose an object from the User Object list and GO TO the object. 1. With “User Object: Add” displayed, press the Scroll Up key once. “User Object: Select” displays. Press ENTER. 2. After the telescope is aligned, “Select Item: Object” displays.
AutoStar #497IIHANDBOX Advanced AutoStar Features Solar System” displays. 5. Press the Scroll Up key twice and “Object: Landmarks” displays. Press ENTER. “Landmark: Select” displays. 6. Press the Scroll Down key once. “Landmark: Add” displays. Press ENTER. 7. “Landmark Name” displays. Using Arrow keys, enter a name for the landmark you wish to add to the database. When finished, press ENTER. 8. “Center Landmark. Press Enter” displays.
Example: Catalog or common name . . . . . . . . . . . . Messier 107, NGC 6171, Orion Nebula, etc Type of object . . . . . . . . . . . Globular Cluster, Nebula, Black Hole, etc. Right Ascension . . . . . . . . . . . . . . . . . . . . . . . 16:32:4 Declination . . . . . . . . . . . . . . . . . . . . . . . . . . . . 13°03’ Constellation . . . . . . . . . . . . . . . . . . Virgo, Orion, etc. Magnitude. . . . . . . . . . . . . . . . . . . . . . . . . . . . . . . . . 3 Size. . . . . . . . . . . . . . . . . .
AutoStar #497IIHANDBOX Advanced AutoStar Features Alternate Polar Alignments If you would rather set up your telescope without using the One-Star alignment routine, Autostar II offers alternative alignment methods for equatorial mounting. During some of these procedures, you will (unlike the Automatic and Easy alignment procedures) manually place the telescope in the home position. Initialize Autostar II First, you need to initialize Autostar II. 4.
Easy Alignment is similar to Two-Star Polar Alignment, except it requires no knowledge of the night sky. Autostar II, rather than the user, chooses two stars its library and merely asks the user to center them in the eyepiece. To Download the Latest Version of Autostar II Software Included with your telescope is a DVD ROM and a USB cable. You need to install the USB drivers, that are included on the DVD ROM, BEFORE plugging in the cable: 1 Select “USB Drivers” from the DVD ROM.
AutoStar #497 HANDBOX Optional Accessories Optional Accessories A wide assortment of professional Meade accessories is available for the LX850 telescope models. The premium quality of these accessories is well-suited to the quality of the instrument itself. To find out more information about these and other exciting Meade accessories visit Meade’s website at www.meade.com. stainless steel. Additional LX850 Counterweights: Designed to precisely fit the counterweight shaft.
• Xtreme Wide Angle: Xtreme Wide Angle Series 5000 Eyepieces use 9 optical elements to achieve a high contrast image with razor sharp correction all the way to the edge of the huge 100 degree Apparent Field of View. The lenses are Super Fully Multi-Coated with blackened edges in 2” diameter format. Three focal lengths, 9mm, 14mm and 20mm are all parfocal.
AutoStar #497 HANDBOX Maintenance/Customer Service MAINTENANCE Your LX850 model telescope is a precision optical instrument designed to yield a lifetime of rewarding observations. Given the care and respect due any precision instrument, the telescope will rarely require factory servicing or maintenance. Use the following guidelines: 1.
10 inch Advanced ComaFree 12 inch Advanced ComaFree 14 inch Advanced ComaFree 130mm APO Product number 1008-85-01 1208-85-01 1408-85-01 0130-85-01 UPC 7 09942 60061 2 7 09942 60062 9 7 09942 60063 6 7 09942 60064 3 Optical design Advanced Coma-Free Apochromatic Refractor Clear aperture 10 inches 12 inches 14 inches 130mm Focal length focal ratio 2032mm, f/8 2438mm, f/8 2845mm, f/8 910mm, f/7 Resolving power (Dawes limit) .46 arcseconds .38 arcseconds .325 arcseconds .
AutoStar #497 HANDBOX Specifications SPECIFICATIONS German Equatorial Mount Product number 37-0850-00 UPC 7 09942 60060 5 Mount body Machined from solid 6061-T6 Aircraft grade Aluminum and stainless steel Finish Anodized Aluminum and stainless steel Main gear - RA & DEC 5.8 inch under cut 225 tooth aluminum Worm gear - RA & DEC .68 inch diameter precision machined brass Counterweight shaft 1.
Manual Drift Alignment How to manually Drift Align the LX850 Telescope (Northern Hemisphere). The LX850 with StarLock is specially equipped to perform an Automatic Drift Alignment. In the Autostar Setup menu, select “Drift Alignment” and the LX850 will guide you through a quick Automatic drift alignment procedure. This method is substantially quicker than the manual drift alignment method. However, if you prefer to drift align the mount using the manual drift alignment procedure, follow the steps below.
AutoStar #497Appendix HANDBOX B APPENDIX B: StarLock Utility The StarLock Utility program provides the ability to: • Install Firmware Updates • StarLock Tracking Performance Meade is constantly working to improve the performance of the product and it is common for new features or performance improvements in the software to be developed. Use the StarLock Utility to update your Starlock firmware.
Additional controls that will be helpful are the “Exposure” control and the “Contrast” control. For most nighttime viewing the contrast control should be set about 2/3rds toward the right. For daylight viewing the contrast should be all the way to the left. This control allows you to look at only a subrange of and image. It is primarily for testing the StarLock using nighttime stars that may be very faint.
AutoStar #497Appendix HANDBOX B In general, if seeing is poor, you will need to reduce your guide rate so you do not chase seeing. Under better conditions you can increase guide rates until over correction starts to make the scope jump back and forth across the star making it too wide again. Histograms The other way to monitor tracking is with the histogram function. This plots how many corrections are made at each distance. The result is typically a Gaussian distribution function.
Automatic Rate Calibration (ARC) Using StarLock’s Automatic Rate Calibration (ARC) Feature Obtaining best performance from StarLocked telescopes requires that the guiding aggressiveness be optimally set for current viewing/imaging conditions. A guide rate calibration routine has been included in the StarLock software that automatically determines the best rate based on viewing conditions. Calibrating your guide rate is a two-step process.
AutoStar #497Appendix HANDBOX D APPENDIX D: LATITUDE CHART Latitude Chart for Major Cities of the World To aid in the polar alignment procedure, latitudes of major cities around the world are listed below. To determine the latitude of an observing site not listed on the chart, locate the city closest to your site.
ADVANCED COMA-FREE OPTICAL SYSTEM (2) (1) (1) (2) Ray (2) Appendix E APPENDIX E: Ray (1) (2) (1) Focal Plane Secondary Mirror Secondary Baffle Primary Baffle Tube Field Stops Primary Mirror Unlike Schmidt-Cassegrain systems, Meade’s Advanced Coma-Free (ACF) optical system provides razor-sharp pin-point star images all the way to the very edge of the field of view. This aplanatic (coma-free) optical system brings the highest level of performance to the amateur astronomer.
AutoStar #497Appendix HANDBOXF APPENDIX F : Initial Set-up: 12” and 14” ACF OTA’s, Starlock and the StarLock Counterweight Set-up The following provides guidelines for during your initial set-up of your 12” and 14” ACF LX850 Telescopes. These guidelines are meant only as a starting point, as you will need to fine tune the balance of your telescope depending on the equipment and accessories that you will be using.
Notes Notes 57
Recycling Information RECYCLING INFORMATION (EU Countries only) Correct Disposal of this Product (Waste Electrical & Electronic Equipment) This marking shown on the product or its literature indicates that it must not be disposed of in unsorted municipal waste at the end of its working life To prevent possible harm to the environment or human health from uncontrolled waste disposal, please separate this from other types of wastes and recycle it as required by law.
Notes Notes 59
MEADE LIMITED WARRANTY Every Meade telescope, spotting scope, and telescope accessory is warranted by Meade Instruments Corp. (“Meade”) to be free of defects in materials and workmanship for a period of ONE YEAR from the date of original purchase in the U.S.A. and Canada. Meade will repair or replace a product, or part thereof, found by Meade to be defective, provided the defective part is returned to Meade, freight-prepaid, with proof of purchase.