Instruction Manual LX80™ Multi-Mount Telescope System With Astronomer Inside™
WARNING! Never use a Meade® LX80 Telescope to look at the Sun! Looking at or near the Sun will cause instant and irreversible damage to your eye. Eye damage is often painless, so there is no warning to the observer that damage has occurred until it is too late. Do not point the telescope at or near the Sun. Do not look through the telescope or finderscope as it is moving. Children should always have adult supervision while observing.
CONTENTS Introduction A solid telescope built for a lifetime of service . . . . . . . . . . .5 Telescope Features Multi-Mount. . . . . . . . . . . . . . . . . . . . . . . . . . . . . . . . . .6 Robust Aluminum Construction . . . . . . . . . . . . . . . . . .6 Gears and Drives . . . . . . . . . . . . . . . . . . . . . . . . . . . . .6 Tripod . . . . . . . . . . . . . . . . . . . . . . . . . . . . . . . . . . . . . .6 AudioStar . . . . . . . . . . . . . . . . . . . . . . . . . . . . . . . . . . .
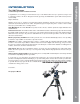
The LX80 Telescope A solid telescope built for a lifetime of service Congratulations on receiving your new LX80 telescope. You’ll find that this telescope system has all you need to explore the Universe we live in. Designed from the ground up, the Multi-Mount system delivers both precision and versatility. Only from Meade. Introduction INTRODUCTION Drawing on 40 years of experience and innovation, Meade Instruments introduces the latest in a long line of advanced astronomical products: the LX80.
AudioStar #497 HANDBOX Telescope Features Telescope Features Meade Instruments introduces the latest in a long line of advanced astronomical products: the LX80™. Using revolutionary new technology, every aspect of this system has been designed to deliver the new standard in astrophotographic and visual performance. Gears and Drives The LX80 incorporates an astonishing array of technological and mechanical achievements and provides the kind of innovation and quality that only Meade can deliver.
Counterweight Shaft AudioStar™ computer-control handbox. Meade’s revolutionary AudioStar computer controller finds and points your telescope to over 30,000 objects in the night sky. With its Astronomer Inside™ digital audio technology, everyone around the telescope can listen and learn about the 500-plus celestial objects contained in its database, including planets, nebulae, star clusters, the Moon and much more.
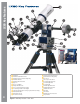
AudioStar #497 LX80 KeyHANDBOX Features LX80 Key Features 3) 2! 2@ 2& 2( 3! Viewfinder Viewfinder Collimation Screws Viewfinder Front Cell and Locking Ring Viewfinder Bracket Viewfinder Bracket Screws Eyepiece Accessory Adapter Adapter Thumbscrews Focus Lock Knob (Refractors Only) 2” Star Diagonal with 1.
LX80 Key Features LX80 Key Features 4! 3% 4) 3$ 4( 2* 2# 1% Vixen®-style Dovetail Receiver 1^ Cradle Rings (Refractors only) 2# Azimuth Lock Knob 2* Latitude Scale 3$ DEC Setting Circle 3% DEC Reference Point 4) Battery Compartment Cover 4! Battery Compartment Lock Knob 4( Counterweight Lock Knob Figure 2: LX80 Key Features - Front View 9
AudioStar #497 LX80 KeyHANDBOX Features LX80 Key Features 1( A. B. C. D. E. F. Figure 3: LX80 Control Panel - Detail 1( 3( 3* 3& 3@ 3! 10 Figure 4: LX80 Controls Control Panel: 1( Telescope A. Power-On Lamp B. C. D. E. F.
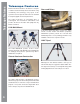
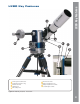
2# Azimuth Lock Knob 3^ True North Indicator 4@ Spreader Bar 4# Tripod Mounting Base 4$ Variable Height Tripod Legs 4% Spreader Bar Tension Knob Leg Lock Knobs (two on 4^ Tripod each leg) 4& Tripod Leg Leveler 4* Tripod Lock Knobs 3^ LX80 Key Features LX80 Key Features 2# Figure 5: LX80 Drive Base Close-up 4# 4* 4& 4$ 4@ 4% 4^ Figure 6 : LX80 Tripod 11
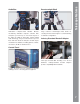
AudioStar #497 LX80 KeyHANDBOX Features LX80 Key Features Adjustments for German EQ Mode 2$ Azimuth Adjustment Drive 2% Latitude Adjustment Drive 2^ Latitude Lock 2& Latitude Pivot Point 3! Multi-Function Hex Head Tool 3! 3! Fig 7: Multi-Function Hex Head Tool 3! 3! 2$ Fig 8: Azimuth Adjustment 2% Fig 9: Latitude Adjustment 3! 3! 2& 2^ Fig 10: Latitude Pivot Point 12 Fig 11: Latitude Lock Knob
Star Diagonal with Adapter: Holds the eyepiece upright for easy viewing. Provides a more comfortable right-angle viewing position. Slide the diagonal directly into the Adapter and tighten the thumbscrew to a firm feel only. See Page 18 for a photo and more information. The Meade LX80 Series models are versatile, highresolution telescopes. Supplied with an AudioStar handbox, the LX80 Series models offer unmatched mechanical and electronic performance.
AudioStar #497 LX80 KeyHANDBOX Features D. Handbox (HBX) Port F. Aux 2 2) 2! 2@ 2# 2$ 2% 2^ 2& 2* 2( 3) 3! 3@ 14 3# E. Aux 1 Counterweight Safety Cap: Prevents the counterweight from accidentally slipping off the end of the counterweight shaft. 3$ 3% 3^ Counterweight Shaft: Slide the counterweight onto this shaft (below). The shaft is composed of 3 segments which can be added or removed as needed.
Unpacking your telescope: The LX80 is shipped in two or four boxes: Box #1: Box #2: Box #3: Box #4: LX80 Multi-mount (with components) LX80 Field Tripod (if ordered): Optional Optical Tube Assembly (if required): Additional Counterweight As you unpack your telescope, carefully note the following parts. • LX80 Multi-Mount with computer control panel, dovetail adapter, and dedicated LX80 adjustment tool. • Counterweight and sectional counterweight shaft with safety nut.
AudioStar #497 HANDBOX Getting Started 4. Attach mount to tripod base. Place the mount onto the tripod head using the built-in handles on the mount (see Fig. 15). Note the “arrow” and “N” graphic printed on the front side of the mount. safety cap which needs to be removed to install the counterweights. Fig 17: Thread-on counterweight shaft Fig 15: Place mount base on tripod. Point the “N” on the front of the mount to True North.
prevent the OTA from moving once it is installed in the receiver. Next loosen the two dovetail receiver lock knobs, pick-up the OTA and slide the tube’s dovetail mount into the mount;s receiver. Maintain your grip on the OTA so that it does not slide through or off of the receiver; secure by tightening the two (2) lock knobs to a firm feel. Note: If the counterweight ever slips, the safety cap prevents the counterweight from sliding entirely off the shaft.
AudioStar #497 HANDBOX Getting Started a twisting motion. Using the bubble level on the mount head, you can now adjust the leg levelers to achieve precision mount/tripod level. If you are far off the level position, you may need to adjust the height of the tripod legs using the tripod leg lock knobs. Fig 22: Secure diagonal into holder the rear cell thread. Slide the diagonal into the accessory adapter and lock in place by turning the thumbscrew to a firm feel.
In order for the telescope to be stable on the tripod and also for it to move smoothly, it must be properly balanced in both vertical and horizontal axes. The horizontal axis is commonly referred to as the DEC (Declination) axis and vertical axis the RA (Right Ascension) axis. Most the OTA can be slid fore and aft. Slide the OTA until it no longer rotates in either direction and is balanced. When the OTA is balanced, tighten the two dovetail lock knobs firmly.
AudioStar #497 HANDBOX Getting Started Fig 28: Loosen RA lock – right and left sides Fig 31: Adjust counterweight to achieve balance (See Fig 31). Manually rotate the counterweight shaft so it is parallel to the ground. Continue to keep your hand on the counterweight shaft to control rotation. extension pieces to achieve balance. Your telescope is now balanced in both DEC and RA axes and will perform optimally.
4. Unlock the RA lock (Page 8, Fig 1, 29) and the DEC lock (Page 8, Fig 1, 30) so that the telescope turns freely on both axes. Then point the main telescope at a tall, well-defined and stationary land object (e.g., the top of a telephone pole) at least 200 yards distant and center the object in the telescope’s eyepiece. Focus the image by turning the optical tube focus knobs (Page 8, Fig 1, 11). Retighten the RA and DEC locks and verify the object is still centered in the eyepiece. 5.
AudioStar #497 HANDBOX Getting Started and DEC locks. • Once centered, an object can be focused by turning one of the knobs of the focusing mechanism (Page 8, Fig 1, 11). Notice that when observing astronomical objects, the field of view begins to slowly drift across the eyepiece field. This motion is caused by the rotation of the Earth on its axis. Objects appear to move through the field more rapidly at higher powers.
Speed 9: Moves the telescope quickly from one point in the sky to another. Playing Audio The LX80 is equipped with Astronomer Inside technology. This revolutionary technology provides object descriptions of night sky objects while you are viewing them. Object descriptions for the Moon, planets, stars, clusters, nebulae and galaxies are presented by Astronomer Inside. Information such as temperature, size, distance and mythology are presented in a fun and entertaining way.
AudioStar #497 HANDBOX The LX80 Multi-Mount System The LX80 Multi-Mount System The LX80 series telescopes feature Meade’s innovative Multi-Mount System that allows you to choose between three (3) modes of operation; Alt-Az, German Equatorial or Dual OTA Mode. Below is a brief overview of the pluses and minuses of each mode: Alt-Az Mode: Easiest to set-up, operate and understand. This mode is ideal for visual observation and casual, short exposure digital imaging.
Note: The location settings (country/state/province and city, or ZIP code) are only asked for the first time you turn on the control panel. If you wish to change this setting later on, use the Site menu. See SITE, Page 42 for more information. a. If you chose the ZIP code option, the left most “0” is highlighted. Use the Number keys to enter the digits. As you enter a digit, the next digit to the right will be highlighted. Enter the next digit.
AudioStar #497 HANDBOX The LX80 Multi-Mount System still level, rotate it so that it points in the direction of the North Star. Lock the horizontal lock. The tube is pointing True North and now in the alt/az home position. provided combination bubble level/compass into the telescopes diagonal to aid you in the leveling process. Method #2: Finding True North using a compass adjusted for local declination: True North and Magnetic North differ and will vary from location to location.
Note: If that area of the sky is obscured, you can prompt AudioStar to choose an alternate star by pressing either one of the two Scroll keys When the procedure is performed correctly, “Alignment Successful” displays. If AudioStar does not display this message, perform this procedure again. Note: AudioStar locates alignment stars based on the date, time and location entered. Using this information and the Home Position as its starting point, the alignment stars should easily be placed within the viewfinder.
AudioStar #497 HANDBOX The LX80 Multi-Mount System Note: Different objects may be displayed on a tour list on any given night. Press ENTER to display information about the object. Press GoTo to move the telescope to the object. 5. Press MODE to return to the Tour list. Press the Scroll keys to scroll through the list. Press ENTER when you find the next object you wish to observe. 6. Press and hold down MODE for two seconds to leave the Guided Tour menu.
Using the LX80 hex head tool loosen the right and left side latitude locks. Insert the same tool into the latitude adjustment drive. Turn the LX80 tool until the latitude reference arrow points to the latitude that corresponds to your location. Once your have “dialed in” your latitude, secure the right and left latitude adjustment locks with the hex head tool. point at the pole, find the North Star (Polaris) by using the Big Dipper as a guide (Page 62, Fig 47).
AudioStar #497 HANDBOX The LX80 Multi-Mount System Successful” displays. If AudioStar does not display this message, perform this procedure again. Note: AudioStar locates alignment stars based on the date, time and location entered. Using this information and the Polar Home Position as its starting point, the alignment stars should easily be placed within the viewfinder. The alignment stars may change from night to night.
Fig 37: Dual OTA Alt-Az 3. Locate the included secondary dovetail adapter (Fig 38). Note the adapters’ two hex head attaching screws. Inspect the adapter mounting hole and verify the attaching screws are sufficiently screwed back allowing it to fit onto the counterweight shaft. You may need to back the attaching screws out using the LX80 tool if necessary. Next slip the dovetail adapter onto the counterweight shaft.
AudioStar #497 HANDBOX The LX80 Multi-Mount System 6. If you have not previously done so, align the finderscope on the secondary OTA. 7. Synchronize the two OTAs by first sighting and aligning the primary OTA on a distant landmark. Loosen the secondary dovetail adapter carefully and rotate the secondary OTA so that it is aligned on the same object. Retighten the dovetail adapter locks to a “snug” fit.
AudioStar Handbox AudioStar Handbox 2-Line LCD Display “? Key ENTER Key Coil Cord Port MODE Key Coil Cord “GoTo” Key RS-232 Port Arrow Keys Utility Light Number Keys Speaker Opening Scroll Keys Figure 39: The AudioStar #497 Handbox Tour the Cosmos Push of a Button with Just the Control of the LX80 is through the operation of the standard-equipment AudioStar.
AudioStar #497 HANDBOX AudioStar Handbox revisions directly from the Meade website (www. meade.com) and share software with other AudioStar enthusiasts. If MODE is pressed and held for two seconds or more, information about the telescope’s status displays. When the status displays, press one of the Scroll keys (Page 33, Fig. 39, 7) to display the following information: • Control your LX80 with your PC using a serial interface. • Access a glossary of astronomical terms.
Number Keys: Input digits 0 - 9 and changes the slew speeds (see Slew Speeds, see below). The “0” key also turns on and off the red utility light on the top of the handbox. Speed 9: Moves the telescope quickly from one point in the sky to another. Note: While the audio descriptions are playing, the 7 and 9 keys adjust the speaker volume. Press 7 to decrease the volume.
AudioStar #497 HANDBOX AudioStar Handbox more details. Utility Light: Use this built-in red light to illuminate star charts and accessories without disturbing your eye’s adaptation to darkness. Speaker Opening: Built-in speaker Astronomer Inside audio content. plays Observation Using AudioStar’s Arrow Keys You may observe land and astronomical objects using AudioStar’s arrow keys to move the telescope. 1.
Important Note: No matter how many levels into AudioStar are traveled, each press of the MODE key moves up a level, until the top level, “Select Item”, is reached. Once in the Select Item level, press MODE to return to the topmost level, “Select Item: Object”. AudioStar Navigation Exercise Audiostar To demonstrate how the AudioStar menu structure works, the following exercise calculates Sunset time so an evening observing session can be planned. Audiostar To Calculate Sunset time: 1.
AudioStar #497 HANDBOX AudioStar Operation Object Menu Almost all observing with LX80 is performed using the Object menu category. (NOTE: Exceptions include Guided Tour and Landmarks). Many AudioStar menu categories contain databases. An AudioStar database is a list of objects, such as stars, planets, comets, nebulae and so forth. When one of these objects is selected from a database by pressing “ENTER” and then “GoTo”, LX80 moves your telescope (when properly aligned) and points it at the selected object.
AudioStar #497 Menu Tree AudioStar #497 MENU TREE Figure 43: The AudioStar #497 Menu Tree 39
AudioStar #497 HANDBOX AudioStar Operation Largest, etc. Once you have set the parameters of the search, select “Start Search” and press ENTER. AudioStar will display the results of the search. See Page 49 for more information. and date of the winter or summer solstice of the current year. Event Menu The Glossary menu provides an alphabetical listing of definitions and descriptions for common astronomical terms and AudioStar functions.
Eyepiece Calc calculates information about an eyepiece for the specific telescope to which AudioStar is connected. • Field of View: Scroll through a list of available eyepieces. When an eyepiece is selected, the field of view is calculated. • Magnification: Scroll through a list of available eyepieces. When an eyepiece is selected, the magnification is calculated. • Suggest: AudioStar calculates and suggests the best eyepiece for viewing, based on the telescope and the object being viewed.
AudioStar #497 HANDBOX AudioStar Operation selected telescope. • Az Ratio and Alt Ratio: The Az (Azimuth) ratio and Alt (Altitude) ratio refers to the gears of the telescope’s motors. Do not alter these numbers. • Az Percent: The Az (Azimuth) Percent allows you to change the azimuth backlash, i.e., the way the arrow keys move the telescope along the azimuth (horizontal) axis.
• Add: Allows you to add new observing sites to the database (up to six sites may be stored). Scroll through the list of Countries/States. Press ENTER when the site you wish to add displays. Then choose the desired city in the same manner. • Delete: Deletes the database. a stored site from • Edit: Edits a selected site, including: the name, latitude, longitude, and time zone. Time zone refers to the Greenwich Mean Time (GMT) time zone shift.
AudioStar #497 HANDBOX AudioStar Operation Advanced AudioStar Features Adding Observing Sites If you plan to observe using AudioStar at different geographic locations, you can store up to six observation sites in AudioStar’s memory to help simplify your telescope setup. Perform these procedures using the Site options (Add, Select, Delete, Edit) of the Setup menu. To Add a Site to the user-defined site list: In this example, you will choose a city and add it to the database list.
In this procedure, you will enter coordinates of celestial objects that do not appear in any of the AudioStar database lists. You will enter the object’s name and RA and DEC coordinates (required information). You may also enter the object’s magnitude and size (optional information). Although AudioStar contains an extensive database of celestial objects (stars, nebulae, planets, etc.) that you can observe, you may eventually want to view objects that are not part of the database.
AudioStar #497 HANDBOX AudioStar Operation 5. Use the Scroll keys to display data about the pass: aos—acquisition of signal and los—loss of signal. If you subtract the aos from the los, you can calculate how long the satellite will be visible. Location information also displays. 6. “Alarm” displays after the location information. Press ENTER and AudioStar automatically sets the alarm to sound a minute before the satellite’s scheduled appearance.
6. Press the Scroll Down key once. “Landmark: Add” displays. Press ENTER. 7. “Landmark Name” displays. Using arrow keys, enter a name for the landmark you wish to add to the database. When finished, press ENTER. 8. “Center Landmark. Press Enter” displays. Using only the arrow keys (do not manually move the telescope), move the telescope to the desired landmark and center the object in the eyepiece. Press Enter. The object is now stored in memory. 9. “Landmark: Add” displays.
AudioStar #497 HANDBOX AudioStar Operation Displayed information: Example: Catalog or common name... Messier 107, NGC 6171, Orion Nebula, etc Type of object...................... Globular Cluster, Nebula, Black Hole, etc. Right Ascension .................. 16:32:4 Declination .......................... 13°03’ Constellation ...................... Virgo, Orion, etc. Magnitude ........................... 3 Size..................................... 2’ Scrolling message...............
2. Press one of the scroll keys and “Browse: Edit Parameters” displays. Press Enter. 3. “Edit Parameters: Largest (mins)” displays. “Mins” stands for arc-minutes Advanced alt/az Alignment If you would rather choose your own alignment stars from the AudioStar database during the alt/az alignment procedure, AudioStar offers two methods described below. AudioStar Operation 18. The telescope slews and “Press V until it is centered” displays. Press the Down Arrow key until the target is centered again.
AudioStar #497 Photography withHANDBOX the LX80 PHOTOGRAPHY WITH THE LX80 Photography using a 35mm camera requires the addition of the optional #62 T–Adapter. See OPTIONAL ACCESSORIES, Page 52. With the #62 T-Adapter and a T-mount attached to the telescope, through-the-telescope photography is possible with any 35mm camera body with a removable lens. In this way, the telescope effectively becomes the lens of the camera.
• If the camera is not directly coupled to the eyepiece, keep it as close to the eyepiece as possible and center the image to be photographed to minimize vignetting (darkening of the edges of the photo). even more powerful and easy-to-use astronomical instrument. LPI and Deep Sky Imager combine the power of an electronic astronomical imager with the simplicity of a web cam.
AudioStar #497 HANDBOX Optional Accessories Optional Accessories A wide assortment of professional Meade accessories is available for the LX80 telescope models. The premium quality of these accessories is well-suited to the quality of the instrument itself. To find out more information about these and other exciting Meade accessories visit Meade’s website at www.meade.com. Additional LX80 Counterweights: Designed to precisely fit the counterweight shaft.
Piggyback Brackets: Piggyback photography is one of the most popular and easiest ways to get started in astrophotography. Attach your 35mm camera, with its own 35mm-to-250mm lens, atop your LX80 in equatorial mode, and guide the telescope the optional APM Module. Wide-field photos of the Milky Way showing remarkable detail and clarity can be taken. Dew Shields: In moist climates, water particles suspended in the atmosphere may condense on the front surface of the telescope’s correcting plate.
AudioStar #497 HANDBOX Maintenance MAINTENANCE Your LX80 model telescope is a precision optical instrument designed to yield a lifetime of rewarding observations. Given the care and respect due any precision instrument, the telescope will rarely require factory servicing or maintenance. Use the following guidelines: 1.
when the motor drive is engaged. In fact, when the batteries are installed, the power is on and the RA lock engaged, the telescope is moving. However, the movement is at the same speed as the hour hand of a 24-hour clock; as such, the movement is difficult to discern visually.
AudioStar #497 HANDBOX Customer Service Page 20). Slew speed does not change when you change slew speeds or the telescope moves slowly even though the fast slew speed is chosen: • The battery power may be low. Replace all batteries with fresh, new units. • When using a Schmidt Cassegrain optical tube an eyepiece in the standard 90° observing position reverses an object left-for-right: To view a correctly oriented image requires the optional #932 Erecting Prism.
Perform this procedure if you are experiencing any pointing accuracy problems. Fig. 45 depicts the complete drive training procedure. NOTE: Use a far away terrestrial object, such as a telephone pole or lamp post, to train the drive. When training the drive, it is best to use reticle with high magnification. Complete this exercise once every 3 to 6 months. 1 2 Verify that AUDIOSTAR INITIALIZATION is complete. Press MODE until Select Item is displayed. Select Item Object 12 Scope slews left.
AudioStar #497Astronomy HANDBOX Appendix B: Basic APPENDIX B: BASIC ASTRONOMY In the early 17th century Italian Scientist Galileo, using a crude telescope considerably smaller than the LX80, turned it to look towards the sky instead of distant trees and mountains. What he saw, and what he realized about what he saw, forever changed the way mankind thought of the universe.
Mars is about half the diameter of Earth, and appears through the telescope as a tiny reddish-orange disk. It may be possible to see a hint of white at one of the planet’s polar ice caps. Approximately every two years, when Mars is closest to Earth in its orbit, additional detail and coloring on the planet’s surface may be visible. Jupiter is the largest planet in our solar system and is 11 times the diameter of Earth. The planet appears as a disk with dark lines stretching across the surface.
AudioStarC:#497 HANDBOX Appendix Specifi cations APPENDIX C: SPECIFICATIONS Mount Only 8 inch SC 10 inch SC 80mm APO 115mm APO SolarMax™ II 60 SolarMax™ II 90 Product Number 37-0080-00 0810-08-01 1010-08-01 0306-08-01 4507-08-01 SMT60-10-LX80 SMT90-15-LX80 7 09942 38120 7 Product Number 0610-08-01 UPC Telescope Mounting Alt-Azimuth or German Equatorial UPC AudioStar Controller AudioStar 7 09942 38132 0 7 09942 38121 4 7 09942 38122 1 7 09942 38127 6 7 09942 38128 3 7 09942 38129
EQUATORIAL (POLAR) ALIGNMENT Polar Alignment In Polar Alignment, the telescope is oriented so that the horizontal and vertical axes of the telescope are lined up with the celestial coordinate system. In order to Polar align your telescope, it is essential to have an understanding of how and where to locate celestial objects as they move across the sky.
AudioStar #497Alignment) HANDBOX Appendix D: Equatorial ( Polar Locating the Celestial Pole To get basic bearings at an observing location, take note of where the Sun rises (East) and sets (West) each day. After the site is dark, face North by pointing your left shoulder toward where the Sun sets. To precisely point at the pole, find the North Star (Polaris) by using the Big Dipper as a guide (Fig. 47). For precise tracking of astronomical objects, your telescope should be Polar aligned.
a. If the star drifts South (or down), the telescope’s polar axis is pointing too far East. b. If the star drifts North (or up), the telescope’s polar axis is pointing too far West. 4. Move the base in azimuth (horizontally) to effect the appropriate change in polar alignment. Reposition the telescope’s East-West polar axis orientation until there is no further North-South drift by the star. Track the star for a period of time to be certain that its declination drift has ceased. 5.
AudioStar #497Alignment) HANDBOX Appendix D: Equatorial ( Polar Periodic Error Correction (PEC) Training (Polar Alignment and RA Drive Only) If you wish to improve the tracking performance on your telescope, first, perform the train the drive procedure (see page 57). Then use the Periodic Error Correction (PEC)/Train menu option to remove the slight perturbations from center that occur due to the mechanical nature of a telescope.
LATITUDE CHART Latitude Chart for Major Cities of the World Northern hemisphere observers (N): If the site is over 70 miles (110 km) North of the listed city, add one degree for every 70 miles. If the site is over 70 miles South of the listed city, subtract one degree per 70 miles. To aid in the polar alignment procedure (see Page 28), latitudes of major cities around the world are listed below. To determine the latitude of an observing site not listed on the chart, locate the city closest to your site.
-2 -10 -8 5 -1 5 0 -5 0 -4 -2 -6 5 2 -4 -5 0 -10 -4 -5 0 -6 5 -1 0 -8 -10 -1 2 -20 5 -1 4 -1 4 0 10 6 0 -6 10 2 -2 -5 15 18 8 -4 -6 10 16 -1 6 10 15 18 -20 -25 -2 2 -2 4 -2 6 -1 8 -2 0 -14 -10 -10 0 -10 -6 -6 0 -5 5 -4 -10 -4 5 0 -5 -6 -2 15 10 -8 5 15 20 -10 20 15 24 18 22 32 30 -35 42 40 38 36 34 28 -30 26 20 10 5 5 8 5 6 5 4 50 2 4 46 8 44 -32 -36 -38 -42 -5 0 -5 6 -6 2 -6 8 15 20 25 25 -24 -22 20 15 -8 -1 0 -2
MAGNETIC DECLINATION: GLOBAL MAP Appendix G: Magnetic Declination - Global Map APPENDIX G: 67
AudioStar #497Information HANDBOX Recycling RECYCLING INFORMATION (EU Countries only) Correct Disposal of this Product (Waste Electrical & Electronic Equipment) This marking shown on the product or its literature indicates that it must not be disposed of in unsorted municipal waste at the end of its working life To prevent possible harm to the environment or human health from uncontrolled waste disposal, please separate this from other types of wastes and recycle it as required by law.
Notes Notes: 69
AudioStar #497 HANDBOX Notes
Notes
Every Meade telescope, spotting scope, and telescope accessory is warranted by Meade Instruments Corp. (“Meade”) to be free of defects in materials and workmanship for a period of ONE YEAR from the date of original purchase in the U.S.A. and Canada. Meade will repair or replace a product, or part thereof, found by Meade to be defective, provided the defective part is returned to Meade, freight-prepaid, with proof of purchase. This warranty applies to the original purchaser only and is non-transferable.