
User guide

as those in the Landmark database. Be sure to change this option back to
“Astronomical” when you wish to view celestial objects again.
3. Press MODE once. “Select Item: Setup” displays.
4. Press the Scroll Down key once and “Select Item: Object” displays. Press
ENTER. “Object: Solar System” displays.
5. Press the Scroll Up key twice and “Object: Landmarks” displays. Press ENTER.
“Landmark: Select” displays.
6. Press the Scroll Down key once. “Landmark: Add” displays. Press ENTER.
7. “Landmark Name” displays. Using Arrow keys, enter a name for the landmark you
wish to add to the database. When finished, press ENTER.
8. “Center Landmark. Press Enter” displays. Using only the Arrow keys (do not
manually move the telescope), move the telescope to the desired landmark
and center the object in the eyepiece. Press ENTER. The object is now stored
in memory.
9. “Landmark: Add” displays. If you wish to add more landmarks, repeat steps 5
through 8.
To Select a landmark from the database:
1. Make sure the telescope is located and aligned exactly as when the desired
landmark was entered into memory.
2. Display the “Landmark: Select” menu option. Press ENTER.
3. Use the Scroll keys to scroll through the list of objects you have previously
entered. When the desired object displays, press ENTER to select the object.
Use the Scroll keys to scroll through location information about the object, if
desired. Press GO TO to slew the telescope to the landmark.
4. Press MODE to exit.
To perform a Landmark Survey:
This procedure allows you to perform a tour of the objects entered in the “Object:
Landmark” menu option—note that the Landmark Survey will function only if you have
previously entered objects in the Landmark menu.
1. Navigate to “Utilities: Landmark Survey” menu and press ENTER.
2. “Landmark Survey: Slewing...” displays. The telescope moves to the first object
on the Survey list and displays the name of the object.
3. Press MODE to stop the Survey. Press ENTER to restart the survey at the first
object of the survey.
To check on the available amount of memory in AutoStar II:
AutoStar II has a limited amount of memory. Once you begin to store Landmarks, user
objects and other bits of information in AutoStar II, you will begin to use up memory.
This procedure allows you to check on how much memory is still available.
1. Navigate to the “Setup: Statistics” menu option and press ENTER.
2. “Statistics: 37.2K Char. Free” displays. This is the amount of memory that is still
available to the user.
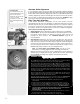
Identify
This procedure allows you to use AutoStar II to identify objects you have found in the
night sky using the Arrow keys. If the object is not in AutoStar II’s database, AutoStar
II displays information about an object in its database that is closest to the one you
queried about.
Important Note: For this function to operate properly, you must first
initialize and align AutoStar II. If you physically move the telescope after
initialization, this function will fail to operate properly.
- 36 -