Instruction Manual ® 8", 10", 12", 14", 16" LX200 -ACF Advanced Coma-Free Telescopes with GPS and AutoStar II Hand Controller ®
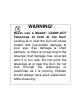
WARNING! Never use a Meade® LX200®-ACF Telescope to look at the Sun! Looking at or near the Sun will cause instant and irreversible damage to your eye. Eye damage is often painless, so there is no warning to the observer that damage has occurred until it is too late. Do not point the telescope at or near the Sun. Do not look through the telescope or viewfinder as it is moving. Children should always have adult supervision while observing.
CONTENTS Battery Safety Instructions • Always purchase the correct size and grade of battery most suitable for the intended use. • Always replace the whole set of batteries at one time, taking care not to mix old and new ones, or batteries of different types. • Clean the battery contacts and also those of the device prior to battery installation. • Ensure the batteries are installed correctly with regard to polarity (+ and -).
QUICK-START GUIDE It is recommended that you attach the supplied tripod to the LX200-ACF for observing. Perform the telescope and AutoStar II setup indoors in the light so that you become familiar with the parts and operation before moving the telescope outside into the dark for observing. The setup is the same for the standard and giant field tripods. NOTE: The LX200-ACF 8", 10", 12" and 14" models are equipped with Series 4000 26mm Super Plössl eyepiece and a 1.25" Diagonal.
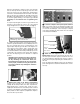
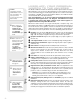
Move the spreader bar so that the 3 arms of the spreader bar are lined up with the 3 tripod legs. Place the entire telescope onto the top of the tripod head, and thread the rod into the central threaded hole in the bottom of the drive base of the telescope. Tighten the T-handle tension knob (Fig. A, 3); firm tightening of the tension knob is sufficient to result in rigid positioning of the tripod legs. It is not necessary to use extreme force in tightening this knob.
E F LC B A OR Display G D H I 6 Press J the Power Switch on the computer control panel to the ON position. The copyright message lights on AutoStar II’s LCD display. K 4.1 Attach the Microfocuser (Optional Accessory – 4 standard on 16" model only): Remove the dust cap from the rear cell port (A) of the telescope (Note: Telescope not shown for clarity). Thread the microfocuser adapter (B) into the rear cell port thread.
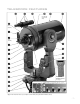
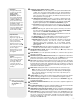
TELESCOPE FEATURES 2@ 2! 2$ 2) 1( 1* (not shown, on left fork arm) 2# (not shown) B c (not shown) 1& d e f 1^ 1% 1$ g h i j 1) AutoStar II Hand Controller. See page 10. 1! 1@ 1# A B C D E F G G H Fig. 1: The LX200-ACF Telescope; Computer Control Panel (inset); AutoStar II Handbox (inset).
LX200-ACF: YOUR PERSONAL WINDOW TO THE UNIVERSE Caution: Using products other than standard Meade accessories may cause damage to the telescope’s internal electronics and may void the Meade warranty. B Want to learn more about the eyepieces available for your LX200-ACF telescope? See OPTIONAL ACCESSORIES, pages 44-46.
Definitions Throughout this manual, you will notice the terms “Alt/Az”, “Right Ascension”, and “Declination”. Alt/Az or more properly, altazimuth, is frequently used to refer to altitude or Declination (the up-and-down vertical movement of the telescope) and azimuth or Right Ascension (the side-to-side horizontal movement of the telescope). Right Ascension is abbreviated as “R.A.” and Declination as “Dec.”. Important Note: After the telescope is aligned (see page 18), the Dec.
AUTOSTAR II FEATURES K 1 2 3 5 6 7 4 8 9 J Fig. 2: The AutoStar II Handbox. Tour the Cosmos with Just the Push of a Button Control of the LX200-ACF telescope models is through the operation of the standard AutoStar II system. Nearly all functions of the telescope are accomplished with just a few pushes of AutoStar II’s buttons. Want to learn more about downloading the latest updates of AutoStar II software from the Meade website? See page 32.
The AutoStar II system provides control of virtually every telescope function. The AutoStar II handbox has soft-touch keys designed to have a positive feel. The LCD (Liquid Crystal Display) is backlit with red LEDs (Light Emitting Diodes) for easy viewing in the dark. The backlit display, key arrangement, and sequential menu structure make AutoStar II extremely user friendly. B c d e Want to learn more e about using the GoTo function? See page 21.
5 SS: Press to display the Solar System library. 6 STAR: Press to display the Star library. 7 RET (Reticle): Press to display the Reticle Control menu. 8 IC: Press to display the Index Catalog library. 9 NGC (New General Catalog): Press to display the NGC catalog library. 0 LIGHT: Press to turn on and off the red utility light on the top of the hand-box. RET Want to learn more about the Reticle menu? See page 32. 7 h Scroll Keys: Press to access options within a selected menu.
Caution: Use care to install batteries as indicated by the battery compartment. Follow battery manufacturer’s precautions. Do not install batteries backwards or mix new and used batteries. Do not mix battery types. If these precautions are not followed, batteries may explode, catch fire, or leak. Improperly installed batteries void your Meade warranty. Always remove the batteries if they are not to be used for a long period of time.
SC Optional Accessory Users: If using any of the optional accessories (such as the Off-Axis Guider, T-Adapter, etc.; see page 44) with the LX200-ACF SC models, slide the supplied SC accessory adapter (Fig. 8, L) into the microfocuser. Line up the groove on the side of the adapter with either of the microfocuser thumbscrews (Fig. 5a and 5b) and tighten that thumbscrew to a firm feel only. Thread the optional accessory into the accessory adapter. Tighten the other microfocuser thumbscrew to a firm feel only.
Choosing an Eyepiece A telescope’s eyepiece magnifies the image formed by the telescope’s main optics. Each eyepiece has a focal length, expressed in millimeters, or “mm”. The smaller the focal length, the higher the magnification. For example: An eyepiece with a focal length of 9mm has a higher magnification than an eyepiece with a focal length of 26mm. Your telescope comes supplied with a 26mm Plössl eyepiece which gives a wide, comfortable field of view with high image resolution.
Mounting and Adjusting the Viewfinder To align the viewfinder, perform steps 1 through 5 during the daytime; perform step 6 at night. Mounting Slot 1. 2. 3. Track Thumbscrews 4. Fig. 9: Viewfinder Assembly. Collimation Screws 5. Viewfinder Eyepiece GPS Receiver 6. Slide the track on the bottom of the viewfinder into the slot in the viewfinder mounting assembly. See Fig. 9. To secure the viewfinder to the mounting assembly, tighten the two thumbscrews (Fig. 9) to a firm feel only.
OBSERVING Important Note: Objects appear upsidedown and reversed left-forright when observed in the viewfinder. Objects viewed through the telescope eyepiece when inserted into the diagonal prism and microfocuser assembly appear right-side-up, but reversed left-for-right. This image inversion is of no consequence when observing astronomical objects and, in fact, all astronomical telescopes yield inverted images.
9. Bring the object into focus (see below). Focusing the Eyepiece Using the Microfocuser (16" Model) The LX200-ACF zero image-shift microfocuser (Pg. 7 Fig. 1, 24) allows you to obtain the most precise image focus possible during visual, photographic, and CCD applications, maintaining precise and “jiggle-free” image centering on even the smallest CCD chips. See MIRROR MIRROR, page 38, for more information about the microfocuser and the primary mirror lock. To use the microfocuser: 1.
Observe the Moon Definition: Initialization is a procedure that ensures that AutoStar II operates correctly. When you first use AutoStar II, it doesn’t yet know where the observation location site is or the time or date of the observation session. During the automatic alignment procedure, the system calculates these parameters automatically.
5. Important Note: Once the telescope is aligned, only use the Arrow keys to move the telescope. Once the telescope has been aligned, do not loosen the telescope locks (Pg. 7, Fig. 1, 12 and 17), or move the base manually, or alignment will be lost. Important Notes: It is recommended that you do not attempt a GPS fix indoors. It is also recommended that you CALIBRATE SENSORS the first time your telescope takes a GPS fix. See page 29 for more information. “Automatic Alignment” displays.
Tip: The GO TO key also allows you to perform a “spiral search”. A spiral search is useful when the telescope slews to an object, but that object is not visible in the eyepiece after the telescope finishes its search. (This sometimes occurs during an alignment procedure.) Press GO TO when the telescope stops slewing. The telescope begins to move in a spiral pattern at a very slow speed around the search area.
5. Press MODE to return to the Tour list. Press the Scroll keys to scroll through the list. Press ENTER when you find the next object you wish to observe. 6. Press and hold down MODE for two seconds to leave the Guided Tour menu. Other Guided Tours are available, such as “How Far is Far” and “A Star’s Life”. If you have programming skills, you may wish to create a custom Guided Tour. See CREATE YOUR OWN GUIDED TOUR, page 59.
BASIC AUTOSTAR II OPERATION Fig. 13: The AutoStar II Universe: The six primary categories listed in the Select Item menu of AutoStar II. It is important to understand that menu selections are set in a loop (Fig. 14). This means that pressing the Scroll Down key (pg. 10, Fig. 2, 7) cycles down through all the available options within a given category, then returns to the first option. The Scroll Up key (Fig. 2, 7) cycles up through the options in the opposite order.
3. Press the ENTER key to choose the “Event” option and move down a level. “Event: Sunrise” is displayed. 4. Press the Scroll Down key once to display the “Sunset” option in the Event menu. 5. Press the ENTER key to choose the “Sunset” option and move down another level. 6. AutoStar II calculates the Sunset time based on the current date, time, and location. AutoStar II then displays the results of the calculation. 7. Press MODE once to start moving back up through the AutoStar II levels.
AUTOSTAR II’s MENUS - 25 -
Object Menu Almost all observing with AutoStar II is performed using the Object menu category. (Note: Exceptions include Guided Tour and Landmark Survey.) See GoTo SATURN, page 21, for an example of observing using the Object menu. Also see USING THE GUIDED TOUR, page 21. AutoStar II contains many libraries of viewable objects, such as stars, planets, comets, nebulae and so forth.
Identify: An exciting feature for an observer who wants to scan the night sky and start exploring. After the telescope has been properly aligned, use the AutoStar II Arrow keys to move about in the sky. Then follow this procedure: Important Note: Only use the Arrow keys to move the telescope during the Identify procedure. Do not loosen the telescope locks or move the base or alignment is lost. 1.
Glossary Menu The Glossary menu provides an alphabetical listing of definitions and descriptions for common astronomical terms and AutoStar II functions. Access directly through the Glossary menu or through hypertext words embedded in AutoStar II. A hypertext word is any word in [brackets], usually found when using the AutoStar II Help function or when reading a scrolling message such as a description of a planet or star.
Sleep Scope: A power saving option that shuts down AutoStar II and the telescope without forgetting its alignment. With “Sleep Scope” selected, press ENTER to activate the Sleep function. AutoStar II goes dark, but the internal clock keeps running. Press any key, except ENTER, to re-activate AutoStar II and the telescope. Park Scope: Designed for a telescope that is not moved between observing sessions. Align the telescope one time, then use this function to park the telescope.
W W W W W W Note: Custom Tracking Rate allows you to enter values from -999 (stands for 99.9%) to 999 (stand for +99.9%). The lower the number, the slower the rate; the higher the number the faster the rate. If you enter -999, the telescope will move so slow as to appear to be stopped. If you enter 999, the telescope will be moving at approximately twice the tracking rate. W W - 30 - (Note that it does not prevent you from performing a manual slew past this limit.
Reverse L/R: Reverses the functions of the Left and Right Arrow keys for controlling the telescope’s motion (i.e., the Right key moves the telescope to the left). W Reverse U/D: Reverses the functions of the Up and Down Arrow keys for controlling the telescope’s motion (i.e., the Up key moves the telescope down). W Home Sensors: Turns off or on the True North and True Level sensors, if preferred, for Easy, One-Star, and Two-Star alignment.
Software: Sends only the basic AutoStar II software. This is useful if one user has downloaded a new version of AutoStar II software from the Meade website (www.meade.com) and wants to pass this software along to friends. W All: Everything—user-defined information and AutoStar II software—is sent to another AutoStar II. Download: Transfers information from a personal computer or another AutoStar II. During the operation, the warning “Downloading Do Not Turn Off” appears.
ADVANCED AUTOSTAR II FEATURES Before trying out the examples in this section, familiarize yourself with the basic operations of AutoStar II described earlier in this manual. The following examples assume that you have a basic knowledge of AutoStar II and understand how to scroll to a desired menu or menu option, and how to enter numbers and text. It also assumes that you have initialized and aligned your telescope.
11. Press MODE. “Site: Edit” displays. 12. Using the Arrow keys, scroll to “Site: Select”. The site you have just edited displays. Press ENTER to select the site. Creating User Objects In this procedure, you will enter coordinates of celestial objects that do not appear in any of the AutoStar II libraries. You will enter the object’s name and R.A. and Dec. coordinates (required information). You may also enter the object’s magnitude and size (optional information).
Observing Satellites In this procedure, you will prepare your telescope to observe a satellite pass. 1. Navigate to the “Object: Satellite” menu option and press ENTER. 2. Use the Scroll keys to scroll through the list of satellites. 3. Select a satellite from the list and press ENTER. 4. “Calculating...” and then “Tracking...” displays. If the satellite is going to make a pass, “Located” displays. 5. Use the Scroll keys to display data about the pass: aos—acquisition of signal and los—loss of signal.
as those in the Landmark database. Be sure to change this option back to “Astronomical” when you wish to view celestial objects again. 3. Press MODE once. “Select Item: Setup” displays. 4. Press the Scroll Down key once and “Select Item: Object” displays. Press ENTER. “Object: Solar System” displays. 5. Press the Scroll Up key twice and “Object: Landmarks” displays. Press ENTER. “Landmark: Select” displays. 6. Press the Scroll Down key once. “Landmark: Add” displays. Press ENTER. 7.
In this procedure, you will center an object you wish to have identified by AutoStar II in the telescope eyepiece and use the “Identify” menu to find out information about the object or the nearest object to it in the AutoStar II database. 1. Center the object you wish to have identified in the telescope’s eyepiece. 2. Navigate to the “Object: Identify” option and press ENTER. 3. “Searching...” displays. When AutoStar II finishes calculating, the name of the closest object displays. 4.
Important Note: If you disable the automatic alignment/GPS function and then use the alternate alignments described in this section, you will be prompted to enter the Time, Date, and Daylight Savings status. North Alternate Alt/Az Alignments If you would rather set up your telescope without using automatic alignment, AutoStar II offers alternative alignment methods for both alt/az and equatorial mounting.
Two-Star Alt/Az Alignment Two-Star Alignment requires some knowledge of the night sky. AutoStar II provides a library of bright stars and two stars from this library are chosen by the observer for alignment. In this procedure, AutoStar II does not automatically find home, level, or North. 1. Select Alignment. Select “Align: Two Star” from the Setup menu. Press ENTER. Note: AutoStar II locates alignment stars based on the date, time, and location entered. The alignment stars may change from night to night.
Periodic Error Correction (PEC Training) If you wish to perform high-precision astrophotography, you may wish to “train” your telescope in order to keep objects that you are imaging dead center in the telescope’s mirror during the photographic exposure. Periodic error correction (PEC) helps to remove the slight perturbations from center that occur due to the mechanical nature of a telescope.
PHOTOGRAPHY & DIGITAL IMAGING You may perform through-the-telescope imaging with any camera body with a removable lens. You may connect a camera to a #62 T-Adapter which is then connected to the microfocuser assembly. See Fig. 19. Using this method, the telescope effectively becomes the lens of the camera. 2 1 The #62 T-Adapter (Fig. 19, 1) connects to the rear cell port (Pg. 7, Fig. 1, 5) ( or microfocuser assembly on 16" models), followed by a T-Mount (Fig.
Photography with a Digital Camera Some digital cameras present problems for the astrophotographer: Many models have lenses that cannot be removed, difficulties in attaching to a telescope, possible vignetting, lack manual focusing and shorter exposure times. Shorter exposure times is one of the biggest drawback. Long exposures with digital cameras introduce undesirable noise and artifacts into a digital image.
• Magic Eye software-assisted focusing. • Automatic and manual exposure control from .001 seconds to 1 hour. • Automatically takes multiple exposures. The AutoStar Suite Software includes powerful tools to help you get the most from your Meade LX200-ACF telescope: • Sophisticated planetarium program with over 19 million objects. Fig. 23: Image of M13 captured with the Deep Sky Imager. • Select objects from the planetarium display and the telescope slews to those objects.
OPTIONAL ACCESSORIES A wide assortment of professional Meade accessories is available for the LX200-ACF telescope models. The premium quality of these accessories is well-suited to the quality of the instrument itself. Consult the Meade General Catalog for complete details on these and other accessories. Meade Series 4000 Eyepieces: Eyepiece 7" f/15 Power/Actual Field 8" f/6.3 Power/Actual Field 10" f/6.3 Power/Actual Field Super Plössl Eyepieces (4-elements; 1.25" O.D., except as noted) 6.4mm 9.
Series 4000 8 - 24mm Zoom Eyepiece: The internal zoom optics of this eyepiece move on smooth, precisely machined surfaces which maintain optical collimation at all zoom settings. A scale graduated in 1mm units indicates the zoom focal length in operation. An excellent addition to any eyepiece set. #140 2x Barlow Lens: A 3-element design, doubles each eyepiece power while maintaining uncompromised image resolution, color correction, and contrast.
errors with an illuminated reticle eyepiece; position corrections can then be effected using AutoStar II. Piggyback Brackets: Piggyback photography is one of the most popular and easiest ways to get started in astrophotography. Attach your 35mm camera, with its own 35mm-to-250mm lens, atop your LX200-ACF in equatorial mode, and guiding the camera through the main telescope, wide-field photos of the Milky Way of remarkable detail and clarity can be taken.
MAINTENANCE LX200-ACF telescopes are precision optical instruments designed to yield a lifetime of rewarding applications. Given the care and respect due any precision instrument, your LX200-ACF will rarely, if ever, require factory servicing. Maintenance guidelines include : a. Avoid cleaning the telescope’s optics: A little dust on the front surface of the telescope’s correcting lens causes virtually no degradation of image quality and should not be considered reason to clean the lens. b.
With the star or hot spot centered, de-focus the image. You will notice that the out of focus star image looks like a ring of light surrounding a dark central spot; the dark central spot is in fact the shadow of the secondary mirror. Turn the focus knob until the ring of light fills about 10% of the eyepiece field-diameter. If the dark central spot is offset in (i.e., not concentric with) the ring of light, your telescope’s optical system is misaligned and requires collimation. 1 2 3 Fig.
i. As a final check of alignment, examine the star image in focus with the higher power eyepiece as suggested (h), under good viewing conditions. The star point should appear as a small central dot (commonly referred to as an “Airy disc”) with a diffraction ring surrounding it. To give a final precision collimation, make extremely slight adjustments of the three set screws, if necessary, to center the Airy disc in the diffraction ring.
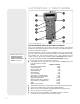
SPECIFICATIONS 8" f/10 LX200-ACF Specifications Optical design ..............................................Advanced Coma-Free Clear aperture..............................................203mm (8") Focal length ................................................2000mm Focal ratio (photographic speed) ................f/10 Resolving power ..........................................0.56 arc sec Coatings ......................................................Meade Ultra-High Transmission Coatings (UHTC) Mounting ..
12" f/10 LX200-ACF Specifications Optical design ..............................................Advanced Coma-Free Clear aperture..............................................305mm (12") Focal length ................................................3048mm Focal ratio (photographic speed) ................f/10 Resolving power ..........................................0.375 arc sec Coatings ......................................................Meade Ultra-High Transmission Coatings (UHTC) Mounting ..............
16" f/10 LX200-ACF Specifications Optical design ..............................................Advanced Coma-Free Clear aperture..............................................406.4mm (16") Focal length ................................................4064mm Focal ratio (photographic speed) ................f/10 Resolving power ..........................................0.28 arc sec Coatings ......................................................Meade Ultra-High Transmission Coatings (UHTC) Mounting .............
APPENDIX A: EQUATORIAL (POLAR) ALIGNMENT Equatorial Alignment Important Note: The “Telescope: Mount”option of the Setup menu is set to “Alt/Az” as the default mount by the factory. The example presented in this section assumes that you are performing an alignment procedure for the first time with your telescope and therefore, the “Telescope: Mount” option does not need to be selected. If the telescope is equatorially mounted, you must choose the “Polar” option from the AutoStar II “Telescope Mount” menu.
Using setting circles requires a developed technique. When using the circles for the first time, try hopping from one bright star (the calibration star) to another bright star of known coordinates. Practice moving the telescope from one easy-tofind object to another. In this way, the precision required for accurate object location becomes evident. Note You may also enter an object’s R.A. and Dec. coordinates using the “User: Objects” option of AutoStar II’s Object menu.
Lining Up with the Celestial Pole Objects in the sky appear to revolve around the celestial pole. (Actually, celestial objects are essentially “fixed”. Their apparent motion is caused by the Earth’s rotation). During any 24 hour period, stars make one complete revolution about the pole, making concentric circles with the pole at the center.
setting circle and slightly loosen the two bolts located under the knob. Now turn the circle unit until it reads 89.2°, the Declination of Polaris. Then tighten down the two bolts and replace the knurled knob. Should you wish to use the manual setting circles, the R.A. setting circle (Fig. 38) must be calibrated manually on the Right Ascension of a star every time the telescope is set up. (The R.A.
AutoStar II Polar Alignment AutoStar II provides three different (manual) methods for polar alignment: Easy, OneStar and Two-Star. Important Note: In order to select any of AutoStar II’s three polar alignment options, you must first select “Polar” in the “Mount” option of the “Setup: Telescope” menu. Easy Polar Alignment Two alignment stars are chosen by AutoStar II based on the date, time, and location. First, choose “Polar” from the “Setup: Telescope: Mount” menu.
APPENDIX B: LATITUDE CHART Latitude Chart for Major Cities of the World To aid in the polar alignment procedure (see page 53), latitudes of major cities around the world are listed below. To determine the latitude of an observing site not listed on the chart, locate the city closest to your site. Then follow the procedure below: Northern hemisphere observers (N): If the site is over 70 miles (110 km) North of the listed city, add one degree for every 70 miles.
APPENDIX C: CREATE YOUR OWN GUIDED TOUR Creating your own Guided Tour can be an extremely useful tool. You can preprogram a script of objects you wish to view and study on any given night. You can also create a viewing script for students or for a friend. More commands will be added from time-to-time to the list below. Periodically visit Meade’s website (www.meade.com) for future additions.
TITLE IC PLANET COMET CONSTELLATION PICK ONE/PICK END TEXT SAO MOON LUNAR ECLIPSE STAR AUTO SLEW USER MESSIER SATELLITE METEOR SHOWER LANDMARK ON/OFF NGC CALDWELL ASTEROID DEEP SKY DEFINE #END Description String: Description of an object. Must be surrounded by quotation marks. If the description is longer than one line, each line must end with a quotation mark and a hard return. Begin the next description line with a quotation mark.
PLANET “name” Enter PLANET and then the name of the desired planet in quotes. AutoStar II provides the user with a description of the selected planet from its database. For example: PLANET “Pluto” MOON This command accesses information about the Moon from the AutoStar II database. SATELLITE “name” Enter SATELLITE and then the name of the desired satellite in quotes. AutoStar II displays information about the satellite from its database.
“They contain 50,000 to 100,000 stars and are located on the fringes of our “galaxy”.” PICK ONE AUTO SELECT MESSIER 13 AUTO SELECT MESSIER 15 AUTO SELECT MESSIER 92 AUTO SELECT MESSIER 4 AUTO SELECT MESSIER 68 AUTO SELECT NGC 1234 AUTO SELECT TEXT “None Available” “I’m sorry. There are no bright globular” “clusters visible at this time.
APPENDIX D: TRAINING THE DRIVE Train the telescope motors using AutoStar II. Perform this procedure if you are experiencing any pointing accuracy problems. Fig. 43 depicts the complete Drive Training procedure. Note: Use a terrestrial object, such as a telephone pole or lamp post, to train the drive. Complete this exercise once every 3 to 6 months to maintain the highest level of telescope pointing accuracy. LX200-ACF TIPS Further Study... This manual gives only the briefest introduction to astronomy.
APPENDIX E: THE MOON MENU The Moon option of the Object menu allows you to observe the moon in a way never possible before. You will be able locate many specific features of the lunar surface, including hundreds of craters, mare, valleys, and mountains. One special feature allows you to view all six Apollo landing sites.
APPENDIX F: 16" LX200-ACF FEATURES A B C D E F G H I Figure 45: 16" LX200-ACF Computer Control Panel. 16" LX200-ACF Unique Features Caution: Due to the weight and size of the 14" and the 16" LX200-ACF models, please use extreme caution whenever assembling, disassembling, lifting, transporting or storing this product. Two or more persons should always be used whenever performing any of the above tasks. Disregard for the above warning could result in serious injury or death.
B Caution: Next to the focus assembly are two red slot-head bolts, used only for safety reasons in shipment. Remove these bolts before attempting to turn the focus knob. In its place, insert the rubber plugs provided as a dust protector (these rubber plugs are included with your hardware package). c d e f The 16" LX200-ACF should never be commercially shipped without the red bolts in place. This is essential during commercial transport, where rough handling may occur.
To collapse the tripod (after removing the telescope) for storage, follow these steps: a. Loosen the tension knob and rotate the spreader bar 60° from its assembled position, so that one spreader bar arm is located between each adjacent pair of tripod legs. b. Move the spreader bar to the top of the threaded rod. Tighten the tension knob, locking the bar. c. Working one leg at a time, gradually collapse the legs of the field tripod until the tension hub is positioned onto the threaded rod.
c. Lock the OTA in place using the four 3/8"-16x3/4" bolts. Thread up the four bolts into the bottom of the Dec. castings, two on each side. Using the supplied hex key, tighten to a firm feel only (Fig. 55). Attaching the Power and Data Cords Several power and data cords are supplied with the 16" LX200-ACF. These should all be attached before powering up the telescope. a. Confirm that the power switch (Pg. 65, Fig. 45, A) on the power panel is in the OFF position.
APPENDIX G: 14" LX200-ACF FEATURES 14" LX200-ACF Unique Features The 14" LX200-ACF contains, for the most part, the same features (covered earlier in this manual) as all other LX200-ACF telescope models. The following features are unique to the 14" model: Fig. 57a: One of the two 14" LX200-ACF battery compartments (older models). Fig. 57b: An indentation on the underside of one of the 14" LX200-ACF battery compartments (older models).
APPENDIX H: DE-ROTATOR AND MICROFOCUSER ASSEMBLY For LX200-ACF Telescopes Equiped with a Zero Image-Shift Microfocuser When using a de-rotator, it is important to attach the microfocuser so that it is backed off slightly from the de-rotator. If the microfocuser is flush against the de-rotator, the assembly will not work properly. This is true also with other accessories that may attach up flush against the de-rotator housing.
APPENDIX I: Smart Mount Introduction Smart Mount improves the pointing accuracy of your LX200-ACF telescope’s “Go To” system. Despite careful efforts to calibrate and align telescopes, they may fail to precisely center objects. Smart Mount allows your telescope to learn about, and then correct for, any systematic pointing errors, regardless of the cause.
Permanently Mounted Scopes For permanently mounted telescopes, it is not necessary to have more than one model unless the weight and balance of auxiliary equipment introduces balance or flexure changes that significantly affect pointing. The best practice is to train the Smart Mount and then run a couple of sessions with Update enabled. Thereafter, simply leave Smart Mount On as the installation default.
APPENDIX J: Previous Model Standard Tripod Setup 1 1. Remove the field tripod from the shipping carton. Stand the tripod vertically with the tripod feet down and with the tripod still fully collapsed. Grasp two of the tripod legs and, with the full weight of the tripod on the third leg, gently pull the legs apart to a fully open position. 4. 2 Remove the spreader bar (see above figure) from the shipping carton.
BASIC ASTRONOMY In the early 17th century Italian Scientist Galileo, using a telescope smaller than your LX200-ACF, turned it skyward instead of looking at the distant trees and mountains. What he saw, and what he realized about what he saw, has forever changed the way mankind thinks about the universe.
Tip: Enter a date in the Date menu and you can determine if a planet(s) will be visible during the night of the entered date by checking its rise and set times. Planets Planets change positions in the sky as they orbit around the Sun. To locate the planets on a given day or month, consult a monthly astronomy magazine, such as Sky and Telescope or Astronomy. You can also consult AutoStar II for information about planets. Scroll to the “Object: Solar System” menu and scroll through the lists of planets.
MEADE LIMITED WARRANTY Every Meade telescope, spotting scope, and telescope accessory is warranted by Meade Instruments Corporation (“Meade”) to be free of defects in materials and workmanship for a period of ONE YEAR from the date of original purchase in the U.S.A. and Canada. Meade will repair or replace a product, or part thereof, found by Meade to be defective, provided the defective part is returned to Meade, freight-prepaid, with proof of purchase.