Instruction Manual DS-2000 Series Altazimuth Maksutov-Cassegrain Telescopes MEADE.
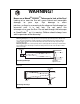
WARNING! ® Never use a Meade DS2000™ Telescope to look at the Sun! Looking at or near the Sun will cause instant and irreversible damage to your eye. Eye damage is often painless, so there is no warning to the observer that damage has occurred until it is too late. Do not point the telescope at or near the Sun. Do not look through the telescope or SmartFinder™ as it is moving. Children should always have adult supervision while observing.
CONTENTS Quick-Start Guide .......................................................... 4 Telescope Features ...................................................... 7 Autostar Features .......................................................... 9 Getting Started ..............................................................11 Packing List ..............................................................11 How to Assemble Your Telescope ............................11 Red Dot Viewfinder .............................
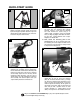
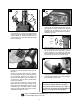
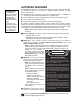
QUICK-START GUIDE 3 1 Mounting Arm Shaft Mounting Plate Fasten wingnuts 1. 3a. Attach the Mounting Plate: If your telescope did not come with the mounting plate already attached, remove 4 screws from the mounting arm shaft. Remove the screws using a "+" (Phillips head) screwdriver. Loosen the Altitude Lock (see Fig. 1a, page 6) and rotate the mounting arm shaft counter-clockwise until it stops. Retighten the Altitude lock. Open the tripod: Remove the tripod from the giftbox and stand vertically.
7 5 K H D F E G J 7. 5. Insert the eyepiece: Rear view for models with red dot finder (H). Remove the supplied 26mm eyepiece (D) from its container and place it in the eyepiece holder (E) Tighten the thumbscrew (F) to a firm feel only. Use the focus knob (G) to bring view to sharp focus. 8 Slew Speed: Fast . . . Medium . . . Slow 8. 6 Connect Autostar: Be certain that the power switch (J) on the computer control panel is in the OFF position.
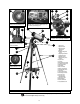
B A 5 6 4 3 A 2 D C Fig. 1c (Inset): Computer Control Panel. (A) Handbox port; (B) Power indicator light, (C) ON switch; (D) Auxiliary port. Fig. 1b (Inset): (A) Altitude Setting Circle; (B) Altitude Lock 26 B 11 1 (not visible) 8 10 9 (on opposite side) Fig. 1e (Inset): Back view of optical tube for models with a red dot viewfinder. 26 21 7 1 Fig. 1d (Inset): Back view of optical tube for models with a right-angle viewfinder. 25 17 13 1. Focus Knob 2. Eyepiece Holder 18 3.
TELESCOPE FEATURES An important array of features and manual controls facilitates operation of a DSX telescope. Be sure to become acquainted with all of these controls before attempting observations through the telescope. b Focus Knob: Moves the telescope’s focus drawtube in a finely-controlled motion to achieve focus. Rotate the focus knob clockwise to focus on distant objects, and counterclockwise to focus on nearby objects. There are two style focus knobs, but they operate identically.
1* Azimuth Setting Circle: Displays Azimuth (horizontal) coordinates. 1( Tripod Legs: Spread the legs out as far as they will open for a secure viewing platform. 2) Inner Support Struts (3): Make the tripod more secure and stable. 2! Mounting Lock Knobs (2): Secure the optical tube to the mounting plate (25, Fig. 1). 2@ Accessory Tray: Conveniently holds extra eyepieces, Autostar handbox, and other accessories when not in use.
AUTOSTAR FEATURES NOTE: DS-2000EC users, see APPENDIX E, page 39, for information about your supplied Electronic Controller. Autostar information does not apply. The #494 Autostar controls the DS-2000AT Series Telescopes. Nearly all telescope operations are accomplished with just a few pushes of Autostar’s buttons. Some of the major features of Autostar are: DS-2000EC users may obtain the #494 Autostar handbox as an optional accessory. See page 40 for more information.
DEFINITION: Throughout this manual, you will notice the term "Alt/Az." Alt/Az (short for altazimuth) just means that your telescope moves up and down and from side to side. Alt/Az is one of many methods used by amateur astronomers to locate celestial objects. telescope is slewing, the operation may be aborted at any time by pressing any key except GO TO. Pressing GO TO again resumes the slew to the object. The GO TO key also allows you to perform a "spiral search.
GETTING STARTED Packing List Getting the telescope ready for first observations requires only a few minutes. When first opening the packing box, note carefully the parts listed on your giftbox. How to Assemble Your Telescope The telescope attaches directly to the tripod. The telescope in this way is mounted in an “Altazimuth” (“Altitude-Azimuth,” or “vertical-horizontal”) format.
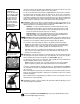
Remove the battery holder from the compartment and carefully lift the 9v connector out from the compartment. Take care not to accidentally detach the wires of the battery connector from the base. Whenever you replace the batteries, to safeguard the wires, disconnect the 9v connector from the battery holder before removing the batteries. 1 2 3 Insert eight AA-size batteries into the battery holder, oriented as shown on the diagram on the battery slots of the battery holder.
Intensity Slider Choosing an Eyepiece A telescope’s eyepiece magnifies the light gathered by the optical tube. Each eyepiece has a focal length, expressed in millimeters, or “mm.” The smaller the focal length, the higher the magnification. For example, an eyepiece with a focal length of 9mm has a higher magnification than an eyepiece with a focal length of 25mm. Fig. 13: To change the red dot's brightness intensity, rotate the intensity knob.
OBSERVING Important Note: When you look through your telescope’s eyepiece, the image might look strange at first. If you have a refracting telescope, objects will appear right-side-up, but reversed left-for-right. This will not make a difference when observing astronomical objects, and in fact, all astronomical telescopes present inverted images. During terrestrial observing, when a corrected image (rightside up and correct leftfor-right) is desirable, an optional Meade 45° Erecting Prism is available.
NOTE: Do not look through the telescope's eyepiece or viewfinder while it is rapidly moving. Children should always have adult supervision while observing. TIP: When a message is scrolling across the display, press and hold the Up Arrow key to increase the scrolling speed or press and hold the Down Arrow key to decrease the scrolling speed.
Pointer to 0° on the Altitude Setting Circle The "Alt/Az" Home Position 1. Loosen the telescope’s Altitude lock (see Fig. 16 and 17). 2. Level the optical tube: Remove the eyepiece and drop in the Compass/Bubble Level into the eyepiece holder. Move the tube up or down until the bubble is in the center circle of the compass. North Alternate method: Level the optical tube: Line up 0° on the Altitude setting circle (Fig. 17) with the triangular pointer. 3. Tighten the Altitude lock (Fig.
IMPORTANT NOTE: Autostar requests the Zip Code or Country/State, City, and Telescope Model information only the first time Autostar is activated. If you wish to change this information, use the "Site" and "Telescope Model" options in the Setup menu. See pages 27 and 26 for more information. IMPORTANT NOTE: While performing the automatic tracking procedure, only use the Arrow keys to move the telescope.
How to Easy Align Your Telescope If you have just applied power to Autostar, perform steps 1 through 3. If you have already performed the initialization procedure, go to step 4. 1. Sun Warning - Press the key prompted by Autostar to accept. 2. Getting Started - Press ENTER to continue. 3. Daylight Savings - Select “Yes” or “No,” then press ENTER. 4. Alignment Option Screen - “Setup: Align” displays. Press ENTER. 5. Select Alignment - “Align: Easy” displays. Press ENTER. 6.
Two-Star Alt/Az Alignment Two-Star Alignment requires some knowledge of the night sky. Two-Star Alignment is identical to Easy: Align (see EASY (TWO-STAR) ALIGN, above), except Autostar displays a database of bright stars and two stars are chosen by the observer from this database for alignment. It is recommended that you choose stars with which you are familiar from this database when first trying out this method or the One-Star Alignment method.
BASIC AUTOSTAR OPERATION SETUP MENU Quick, easy alignment permits all telescope operations with only a 2-minute setup. Select Item: Object Select Item: Setup MEADE UTILITIES MENU Calculate eyepiece magnifications; set timer alerts; create your own landmark survey. OBJECT MENU Want to see Mars? The Orion nebula? The Andromeda galaxy? Select from over 1400 database objects and press GO TO to move the telescope automatically to an object.
To Calculate Sunset time: 1. Press the MODE key several times, until “Select Item: Object” is displayed. 2. Press the Scroll Down key once to display the “Event” option in the “Select Item” menu. 3. Press the ENTER key to choose the "Event" option and move down a level. "Event: Sunrise" is displayed. 4. Press the Scroll Down key once to display the "Sunset" option in the Event menu. 5. Press the ENTER key to choose the "Sunset" option and move down another level. 6.
MENUS AND MENU OPTIONS Object Menu Almost all observing with Autostar is performed using the Object menu category. (NOTE: Exceptions include Guided Tour and Landmark Survey.) See GO TO SATURN, page 19, for an example of observing using the Object menu. Also see TAKE A GUIDED TOUR, page 19. Many Autostar menu categories contain databases. An Autostar database is a list of viewable objects, such as stars, planets, comets, nebulae, and so forth.
Landmarks stores the location of terrestrial points of interest in the permanent Autostar database. IMPORTANT NOTE: To use the Landmark function, the telescope must be located and aligned exactly as when the landmark was added to the database. Select: To select a Landmark already in the database (see ADD below), choose the "Select" option and scroll through the list. Press ENTER to select a Landmark, then press GO TO and the telescope slews to the object.
Glossary Menu The Glossary menu provides an alphabetical listing of definitions and descriptions for common astronomical terms and Autostar functions. Access directly through the Glossary menu or through hypertext words embedded in Autostar. A hypertext word is any word in [brackets], usually found when using the Autostar Help function or when reading a scrolling message such as a description of a planet or star.
Sun Warning: Turns the “Sun Warning” message on or off. Getting Started: Turns the “Getting Started” message on or off. Brightness Adj: Adjusts the brightness of the display using the Scroll keys. When complete, press ENTER. Contrast Adj: Adjusts the contrast of the display using the Scroll keys. When complete, press ENTER. NOTE: This feature is usually only required in very cold weather. Beep: Turns the beep on or off.
Train Drive: Trains the Altitude and Azimuth motors to locate objects with more precision. If you are experiencing any problems with pointing accuracy, follow the procedure described in APPENDIX D: TRAINING THE DRIVE, page 37, to insure accurate pointing and tracking. Tracking Rate: Changes the speed at which the telescope tracks targets in the sky. a.
NOTE: Autostar compensates for daylight savings time, if selected. See SETUP MENU: DAYLIGHT SAVING, page 26. Address: Use the Up and Down Arrow keys to enter your street address, city, state, and zip code. Press ENTER when the entry is complete. Download transfers information from a personal computer or another Autostar. During the operation, the warning “Downloading Do Not Turn Off” appears. NOTE: The Download function requires the optional #506 Astrofinder Software and Cable Connector Kit.
OPTIONAL ACCESSORIES A wide assortment of professional Meade accessories is available for the DS-2000 Series Telescopes. The premium quality of these accessories is well-suited to the quality of the instrument itself. Consult the Meade General Catalog or meade.com for complete details on these and other accessories. Eyepieces: For higher and lower magnifications, Meade Series 4000 Super Plössl (SP) yield high-resolution imaging with all DS2000 telescope models.
CARING FOR YOUR TELESCOPE Your DS-2000 telescope is a precision optical instrument designed to yield a lifetime of rewarding observations. Given the care and respect due any precision instrument, your telescope will rarely, if ever, require factory servicing. Maintenance guidelines include: a. Avoid cleaning the telescope’s optics: a little dust on the front surface of the telescope’s correcting lens causes virtually no degradation of image quality and should not be considered reason to clean the lens. b.
4 3 1 2 5 6 Fig. 23. 3 2 2 1 2 3 Fig. 25. Fig. 24. 1 2 2 3 4 1 5 Fig. 26. Fig. 27. 1 1 2 2 Fig. 28. 4 3 3 Fig. 29. Looking at or near the Sun will cause irreversable damage to your eye. Do not point this telescope at or near the Sun. Do not look through the telescope as it is moving.
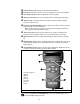
thread inward one of the adjustment/lock knobs (1, Fig. 24) while unthreading another of these knobs. Only make adjustments to two knobs at a time until the secondary mirror appears as in Fig. 28. 3. Secondary mirror-holder adjustments: If the secondary mirror (1, Fig. 28) is centered in the focuser drawtube (2, Fig. 28), but the primary mirror is only partially visible in the reflection (3, Fig. 28), the three “+” (Phillips head) secondary mirror-tilt screws (2, Fig.
SPECIFICATIONS DS-2090MAK Optical design . . . . . . . . . . . . . . . . . . . . Maksutov-Cassegrain Diameter . . . . . . . . . . . . . . . . . . . . . . . . . . . . . . . . 90mm (3.5”) Focal length . . . . . . . . . . . . . . . . . . . . . . . . . . . . . . . . 1250mm Focal ratio (photographic speed). . . . . . . . . . . . . . . . . . . f/13.8 Near focus (approx) . . . . . . . . . . . . . . . . . . . . . . 11.5 ft (3.5m) Resolving power . . . . . . . . . . . . . . . . . . . . . . . . . . 1.
DSX-2102MAK Optical design . . . . . . . . . . . . . . . . . . . . Maksutov-Cassegrain Diameter . . . . . . . . . . . . . . . . . . . . . . . . . . . . . . 102mm (4.13”) Focal length . . . . . . . . . . . . . . . . . . . . . . . . . . . . . . . . 1356mm Focal ratio (photographic speed). . . . . . . . . . . . . . . . . . . f/13.3 Near focus (approx) . . . . . . . . . . . . . . . . . . . . . . 11.5 ft (3.5m) Resolving power . . . . . . . . . . . . . . . . . . . . . . . . . . 1.3 arc secs Multi-coated optics .
APPENDIX A Celestial Coordinates It is helpful to understand how to locate celestial objects as they move across the sky. +90 Dec. Star 1 17 18 19 16 15 14 13 12 11 ation clin De A celestial coordinate system was created that maps an imaginary sphere surrounding the Earth upon which all stars appear to be placed. This mapping system is similar to the system of latitude and longitude on Earth surface maps.
APPENDIX B Using Autostar to Find Objects Not in the Database TIP: Entering R.A. and Dec. Coordinates of an object without using the menus: If you do not wish to navigate through the menus, a more direct way to enter coordinates is to press and hold MODE for two seconds or more. R.A. and Dec. coordinates display. Press GO TO. "Object Position" and a set of coordinates displays. Enter the R.A. and Dec.
APPENDIX C Observing Satellites In this procedure, you will prepare your telescope to observe a satellite pass. 1. Go to the "Object: Satellite" menu option and press ENTER. 2. Use the Scroll keys to scroll through the list of satellites. 3. Select a satellite from the list and press ENTER. 4. "Calculating...." and then "Tracking..." displays. If the satellite is going to make a pass, "Located" displays. 5.
APPENDIX D Training the Drive Train the telescope motors using Autostar. Perform this procedure if you are experiencing any pointing accuracy problems. Fig. 32 depicts the complete Drive Training procedure. NOTE: Use a terrestrial object, such as a telephone pole or lamp post, to train the drive. Complete this exercise once every 3 to 6 months to maintain the highest level of telescope pointing accuracy. 1 2 Verify that AUTOSTAR INITIALIZATION is complete. Press MODE until Select Item is displayed.
APPENDIX E Batteries Replace the red dot Viewfinder’s battery with a CR2032 lithium battery. The battery is located on the bottom of the red dot viewfinder. You may need to slide your fingernail or a screwdriver blade underneath the battery and then slide it out. Replace the internal clock’s battery with a CR2023 lithium battery. This battery is located in the battery compartment. Both batteries are available from Meade, photographic supply houses or any place lithium batteries are sold.
APPENDIX G Fast Medium Moderate Slow Fig. 33: Electronic Controller. (1) Arrow Keys; (2) Indicator Lights; (3) SPEED Key; (4) Coil Cord; (5) MODE Key; (6) OUT Key; (7) IN Key. Electronic Controller (DS-2000EC Users Only) DS-2000 "EC" models come equipped with an Electronic Controller handbox, rather than the Autostar Handbox. The Electronic Controller provides you with the means to control the telescope motors from a compact handbox. The Electronic Controller (Fig.
Slew Speeds The Electronic Controller has four slew speeds that are directly proportional to the sidereal rate (see page 15 for more information). Press the Speed key to change the slew speed. Note each slew speed corresponds to one of the four LED's of the Electronic Controller. Light 1 (top LED): The fastest speed. Use to move the telescope quickly from one point in the sky to another. Light 2: Best for centering an object in the viewfinder.
BASIC ASTRONOMY In the early 17th century Italian Scientist Galileo, using a telescope smaller than your DS-2000 model, turned it skyward instead of looking at the distant trees and mountains. What he saw, and what he realized about what he saw, has forever changed the way mankind thinks about the universe.
Planets Planets change positions in the sky as they orbit around the Sun. To locate the planets on a given day or month, consult a monthly astronomy magazine, such as Sky and Telescope or Astronomy. You can also consult Autostar for information about planets. Scroll to the "Object: Solar System" menu and scroll through the lists of planets. When a planet you are interested in displays, press ENTER.
MEADE LIMITED WARRANTY Every Meade telescope, spotting scope, and telescope accessory is warranted by Meade Instruments Corporation (“Meade”) to be free of defects in materials and workmanship for a period of ONE YEAR from the date of original purchase in the U.S.A. and Canada. Meade will repair or replace a product, or part thereof, found by Meade to be defective, provided the defective part is returned to Meade, freight-prepaid, with proof of purchase.