
User Manual


8
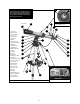
R Accessory Tray Attachment Bolts - Attach to wing nuts to fasten tray to the tripod. See
page 11 for more information.
Note: It is not necessary to remove the tray each time you collapse the tripod. The
tray is designed to be collapsed with the legs.
S Accessory Tray - Conveniently holds extra eyepieces, Autostar handbox, and other acces-
sories.
V Tripod Lock Knob - Tighten to a firm feel to secure tripod legs.
Caution: Loosen the tripod lock knob before collapsing tripod at the end of a view-
ing session.
V Tripod Legs Locks (3) - Lift the lock up to loosen inner section of a tripod leg and extend
the inner leg to desired height. Press the lock down to lock the leg in place.
V Tripod Legs - Spread the legs out as far as they will open for a secure viewing platform.
V Tripod Base - Holds the mounting arm assembly (16, Fig. 1) in place.
V Azim
uth Setting Circle -
Displa
ys Azimuth (horizontal) coordinates.
V Battery Compartment - Install eight user-supplied AA batteries in this compartment. See
page 12 for more information.
V Base Lock Knob (not visible in photo) - Attaches mounting arm assembly to tripod base.
Loosen before moving the optical tube on the horizontal axis. See page 11 for more infor-
mation.
V Inner Support Struts (3) - Make the tripod more secure and stable.
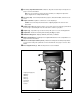
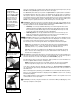
Fig.
2: #494 Autostar Handbox.
20
22
23
21
24
25
26
27
1.
Liquid Cr
ystal Displa
y (LCD)
2. ENTER Key
3.
MODE K
e
y
4. GOTO Key
5. Arrow Keys
6, 7. Scroll Keys
8.
Speed/? Key
9.
Coil Cord
j