Instruction Manual DS-114AT Reflecting Telescope Meade Instruments Corporation
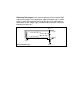
Reflecting Telescopes use a concave primary mirror to collect light and form an image. In the Newtonian type of reflector, light is reflected by a small, flat secondary mirror to the side of the main tube for observation of the image. Light is collected by a concave mirror and brought to a focus at F.
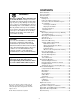
CONTENTS Quick-Start Guide .......................................................... 4 Telescope Features ...................................................... 7 Autostar Features .......................................................... 8 Getting Started ..............................................................10 Packing List ..............................................................10 How to Assemble Your Telescope ............................10 Some Notes About the Dual-Motor System .........
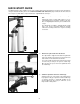
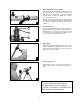
QUICK-START GUIDE This Quick Start procedure explains how to set up your DS-114AT for manual viewing. If you wish to make observations using the Autostar handbox, please turn to HOW TO ASSEMBLE YOUR TELESCOPE, page 10 and take the time and care necessary to assemble all the components that are supplied with this telescope. 1. Remove the optical tube and tripod from the giftbox. Perform this setup on a flat, stable surface.
4. Attach and balance the optical tube. Turn the optical tube around and replace it into the cradle rings. Fasten the cradle rings lock knobs so that they only hold the optical tube loosely; do not tighten the lock knobs yet. Note the optical tube's and the yoke's orientation in photo. Slide the tube back and forth until you find a position where the tube remains horizontal (i.e., without tipping up or down). Then tighten the cradle rings lock knobs to a firm feel. 4 5. B Insert the eyepiece.
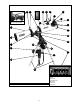
10 7 9 6 4 5 3 3 Fig. 1c: Cradle Rings Lock Knobs (on opposite side). 2 8 1 11 23 22 12 21 13 19 14 18 20 17 15 16 A B C D E F Fig. 1b (Inset): Computer Control Panel. (A) LED (B) 12V Port (C) Handbox Port (D) AZ Port (E) ALT Port (F) AUX Port Fig. 1: DS-114AT Series Telescope.
TELESCOPE FEATURES The DS-114AT telescope has a variety of useful features. Be sure to become acquainted with all of these controls before you begin making observations through the telescope. Want to learn more about the viewfinder? See pages 10 through 12. Focus Knobs: Move the telescope’s focus drawtube in a finely-controlled motion to achieve precise image focus. Eyepiece Holder: Holds the eyepiece in place. Eyepiece Holder Thumbscrews (2): Tighten the eyepiece in place.
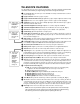
AUTOSTAR FEATURES Control of the DS-114AT Series Telescopes is through the operation of the #494 Autostar handbox. Nearly all functions of the telescope can be operated with just a few pushes of Autostar’s buttons. Some of the major features of Autostar are: ■ Automatically move the telescope to any of the 1400 objects stored in the database or manually enter the astronomical coordinates of any celestial object. ■ Take a guided tour of the best celestial objects to view on any given night of the year.
Want to learn more about slew speeds? See page 14. Arrow Keys: Move the telescope in a specific direction (up, down, left, and right), at any one of nine different slew speeds. The Arrow Keys can also be used to scroll through the letters of the alphabet and numerical digits. The Down Arrow key starts with the letter "A" and the Up Arrow key starts with the digit "9." The Left and Right Arrow keys moves the cursor left and right across the LCD display.
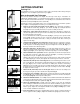
GETTING STARTED Packing List Assembling the telescope for the first time requires only a few minutes. When first opening the packing box, note carefully the parts listed on your giftbox. How to Assemble Your Telescope The telescope attaches directly to the tripod. The telescope in this way is "mounted" in an “Altazimuth” (“Altitude-Azimuth,” or “vertical-horizontal”) format.
12. Connect Autostar: Plug the coil cord of the Autostar Controller into the HBX port (C, Fig.1b) of the computer control panel. WARNING: Make sure you plug in Autostar before you plug in the battery pack. NOTE: Autostar does not require batteries; the telescope’s batteries supply power to Autostar. 13. Insert batteries: Install 10 AA user-supplied batteries into the battery pack (Fig.12), oriented as shown on the diagram on the battery slots of the battery holder. Fig. 8: Attach Alt motor.
Viewfinder Telescope Eyepiece Aligning the Viewfinder: It is recommended that you perform steps 1 through 4 of this procedure during the daytime and step 5 at night. 1. A. Not aligned B. Aligned 2. 3. 4. Fig. 13: Aligning the viewfinder. Note that objects appear upside-down and reversed left-for-right when observed in the viewfinder. 5. Loosen the Az lock (19, Fig. 1) and the Alt lock (22, Fig.
OBSERVING Observing by Moving the Telescope Manually NEVER point the telescope directly at or near the Sun at any time! Observing the Sun, even for the smallest fraction of a second, will result in instant and irreversible eye damage, as well as physical damage to the telescope itself. If you wish to observe a distant land object, such as a mountain top or a bird, you can observe by merely pointing the telescope and looking through the eyepiece. 1. Loosen the telescope’s Az lock (19, Fig.
5. 6. The Arrow keys are now activated. Press the Arrow keys (5, Fig. 2) to slew (move) the telescope up, down, right, or left. Press the SPEED/? key (8, Fig. 2) to change the telescope’s slew speed. See SLEW SPEEDS, below, for more information. 7. Use the viewfinder (5, Fig. 1) to locate an object and practice using the Autostar’s Arrow keys to center the object in the telescope eyepiece's field of view. 8. Use the telescope’s focus knob (1, Fig. 1) to bring the object into focus.
The "Alt/Az" Home Position 1. Loosen the telescope’s Alt lock (Fig. 19). 2. Level the optical tube and tripod base. 3. Tighten the Alt lock (Fig. 19) to a firm feel only. 4. Fig. 19: The Alt lock (motor attached). Loosen the Az lock (Fig. 20) and turn the telescope horizontally until it points North. See LOCATING THE CELESTIAL POLE, page 32 for more information. 5. Tighten the Az lock. Press ENTER.
10. Select City: The next screen asks for the city closest to the observing site. Use the Scroll keys to cycle through the database of cities (listed alphabetically). Press ENTER when the correct city appears on screen. 11. Select Model Number: The next screen asks for the telescope model. Use the scroll keys to locate your telescope model number. Press ENTER when your model number displays. 12. Initialization Complete: System initialization is complete and the screen reads "Align: Easy.
IMPORTANT NOTE: Autostar requests the Country/State, City, and Telescope Model information only the first time Autostar is activated. If you wish to change this information, use the "Site" and "Telescope Model" options in the Setup menu. See page 26 for more information. IMPORTANT NOTE: While performing the automatic tracking procedure, use ONLY the Arrow keys to move the telescope. Once the telescope has been set in the Alt/Az home position, do not loosen the az and alt locks (19 and 22, Fig.
5. Daylight Savings - Select “Yes” or “No,” then press ENTER. 6. Alignment Option Screen - “Setup: Align” displays. Press ENTER. 7. Select Alignment - “Align: Easy” displays. Press ENTER. 8. Set Alt/Az Home Position - Autostar then prompts you to set the telescope in the Alt/Az Alignment home position. To set your telescope in the "Alt/Az" home position (Fig. 18): • • • • • Loosen the telescope’s Alt lock (22, Fig. 1). Level the tripod base and the optical tube. Tighten the Alt lock (22, Fig.
Go To Saturn After performing the Easy Align procedure, the motor drive begins operating and the telescope is aligned for a night of viewing. Objects in the eyepiece should maintain their position even though the Earth is rotating beneath the stars. IMPORTANT NOTE: Once aligned, only use GO TO or the Arrow keys to move the telescope. Do not loosen the Alt and Az locks (22 and 19, Fig. 1), or move the base manually, or alignment will be lost. Fig. 21: One of the most beautiful celestial sights, Saturn.
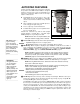
BASIC AUTOSTAR OPERATION SETUP MENU Quick, easy alignment permits all telescope operations with only a 2-minute setup. Select Item: Object Select Item: Setup MEADE UTILITIES MENU Calculate eyepiece magnifications; set timer alerts; create your own landmark survey. OBJECT MENU Want to see Mars? The Orion nebula? The Andromeda galaxy? Select from over 1400 database objects and press GO TO to move the telescope automatically to an object.
To Calculate Sunset time: 1. Press the MODE key several times, until “Select Item: Object” is displayed. 2. Press the Scroll Down key once to display the “Event” option in the “Select Item” menu. 3. Press the ENTER key to choose the "Event" option and move down a level. "Event: Sunrise" is displayed. 4. Press the Scroll Down key once to display the "Sunset" option in the Event menu. 5. Press the ENTER key to choose the "Sunset" option and move down another level. 6.
MENUS AND MENU OPTIONS Object Menu Almost all observing with Autostar is performed using the Object menu category. (NOTE: Exceptions include Guided Tour and Landmark Survey.) See GO TO SATURN, page 19, for an example of observing using the Object menu. Also see USING THE GUIDED TOUR, page 19. Many Autostar menu categories contain databases. An Autostar database is a list of viewable objects, such as stars, planets, comets, nebulae, and so forth.
Landmarks stores the location of terrestrial points of interest in the permanent Autostar database. IMPORTANT NOTE: To use the Landmark function, the telescope must be located and aligned exactly as when the landmark was added to the database. ■ Select: To select a Landmark already in the database (see ADD below), choose the "Select" option and scroll through the list. Press ENTER to select a Landmark, then press GO TO and the telescope slews to the object.
Solar Eclipse lists upcoming Solar Eclipses, including the date and type (total, annular, or partial) of eclipse, and the location and time of the first and last contacts of the Moon's shadow. Use the Scroll Up and Down keys to display the available data. Remember, never use a telescope to look at the Sun! See “WARNING!” on page 23. Lunar Eclipse lists upcoming Lunar Eclipses, including the date and type (total, partial, penumbral) of eclipse. Use the Scroll Up and Down keys to display the available data.
Display Options enables or disables Autostar’s two initial displays. If both displays are disabled, Autostar begins with the Date display. ■ Sun Warning: Turns the “Sun Warning” message on or off. ■ Getting Started: Turns the “Getting Started” message on or off. Brightness Adj: Adjusts the brightness of the display using the Scroll keys. When complete, press ENTER. Contrast Adj: Adjusts the contrast of the display using the Scroll keys. When complete, press ENTER.
Telescope accesses the several options, including: ■ Model: Allows you to select the telescope model connected to Autostar. ■ Focal Length: Displays the focal length of the selected telescope. ■ Az Ratio and Alt Ratio: The Az (Azimuth) ratio and Alt (Altitude) ratio refers to the gears of the telescope's motors. Do not alter these numbers. ■ Az Percent: The Az (Azimuth) Percent allows you to change the azimuth backlash, i.e.
Time Zone Atlantic Eastern Central Mountain Pacific Hawaii Shift -4 Hours -5 Hours -6 Hours -7 Hours -8 Hours -10 Hours Table 1: Time Zone shift. ■ Edit: Edits a selected site, including: the name, latitude, longitude, and time zone. Time Zone refers to the Greenwich Mean Time (GMT) time zone shift. Users West of Greenwich, England use “-” hours, East of Greenwich use “+” hours. For the United States, look up the time zone shift in Table 1.
CARING FOR YOUR TELESCOPE Your DS-114AT telescope is a precision optical instrument designed to yield a lifetime of rewarding observations. Given the care and respect due any precision instrument, your telescope will rarely, if ever, require factory servicing. Maintenance guidelines include: a. Avoid cleaning the telescope’s optics: a little dust on the front surface of the telescope’s correcting lens causes virtually no degradation of image quality and should not be considered reason to clean the lens.
4 3 1 2 5 6 Fig. 26. 3 2 2 1 2 3 Fig. 28. Fig. 27. 1 2 2 3 4 1 5 Fig. 29. Fig. 30. 1 1 2 2 Fig. 31. 4 3 3 Fig. 32.
3. Secondary mirror-holder adjustments: If the secondary mirror (1, Fig. 31) is centered in the focuser drawtube (2, Fig. 31), but the primary mirror is only partially visible in the reflection (3, Fig. 31), the three “+” (Phillips head) secondary mirror-tilt screws (2, Fig. 27) should be slightly unthreaded to the point where the secondary mirror-holder (3, Fig. 27) can rotate about its axis parallel to the main tube.
OPTIONAL ACCESSORIES A wide assortment of professional Meade accessories is available for the DS-114AT Telescopes. The premium quality of these accessories is well-suited to the quality of the instrument itself. Consult the Meade General Catalog for complete details on these and other accessories. Eyepieces (1.
APPENDIX A Locating the Celestial Pole To get basic bearings at an observing location, take note of where the Sun rises (East) and sets (West) each day. After the site is dark, face North by pointing your left shoulder toward where the Sun set. To precisely point at the pole, find the North Star (Polaris) by using the Big Dipper as a guide (Fig. 33). IMPORTANT NOTE: For almost all astronomical observing requirements, approximate settings are acceptable.
APPENDIX B TIP: Entering R.A. and Dec. Coordinates of an object without using the menus: If you do not wish to navigate through the menus, a more direct way to enter coordinates is to press and hold MODE for two seconds or more. R.A. and Dec. coordinates display. Press GO TO. "Object Position" and a set of coordinates displays. Enter the R.A. and Dec. coordinates of any celestial object using the Up and Down Arrow keys, overwriting the coordinates currently displayed.
APPENDIX C Observing Satellites In this procedure, you will prepare your telescope to observe a satellite pass. 1. Go to the "Object: Satellite" menu option and press ENTER. 2. Use the Scroll keys to scroll through the list of satellites. 3. Select a satellite from the list and press ENTER. 4. "Calculating...." and then "Tracking..." displays. If the satellite is going to make a pass, "Located" displays. 5.
BASIC ASTRONOMY In the early 17th century Italian Scientist Galileo, using a telescope smaller than your DS-114AT model, turned it skyward instead of looking at the distant trees and mountains. What he saw, and what he realized about what he saw, has forever changed the way mankind thinks about the universe.
Access directly through the Glossary menu or through hypertext words embedded in Autostar. See “GLOSSARY MENU," page 24, for more information. Objects in Space Listed below are some of the many astronomical objects that can be seen with the DS-114AT Series Telescope: The Moon The Moon is, on average, a distance of 239,000 miles (380,000km) from Earth and is best observed during its crescent or half phase when Sunlight strikes the Moon’s surface at an angle.
MEADE LIMITED WARRANTY Every Meade telescope, spotting scope, and telescope accessory is warranted by Meade Instruments Corporation (“Meade”) to be free of defects in materials and workmanship for a period of ONE YEAR from the date of original purchase in the U.S.A. and Canada. Meade will repair or replace a product, or part thereof, found by Meade to be defective, provided the defective part is returned to Meade, freight-prepaid, with proof of purchase.