
Manual

INDEX
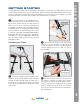
Mounting the Telescope
Take the LS Telescope from its packaging and
place the entire telescope onto the top of the tripod
head. Rotate the telescope head slowly until you feel
the scope register on the center hub of the tripod head.
Carefully screw the three attachment thumb-screws
on the bottom of the plate to the base of the tripod.
Hand tighten the screws so the telescope cannot spin
or wobble on the tripod head.
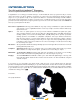
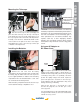
Installing the Batteries
Remove the end cover from the battery
compartment exposing the battery tray. Carefully slide
the battery tray out until it reaches its end stop. Insert
8 (user supplied) Alkaline “C” batteries into the battery
compartment. Take care that the batteries + and - ends
are as indicated in the battery holder.
Slide the battery compartment back into the telescope
and re-attach the battery compartment cover.
CAUTION: Use care to install batteries as indicated by
the battery compartment. Follow battery manufacturer’s
precautions. Do not install batteries backwards or mix
new and used batteries. Do not mix battery types. If
these precautions are not followed, batteries may
explode, catch fi re, or leak. Improperly installed
batteries void your Meade warranty. Always remove
the batteries if they will not be used for a long period
of time.
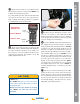
Using an AC Adapter or
DC Power Cord
Use only the optional Meade Universal AC Power
Adapter (part number 07584 for North America or
07584F for 220v foreign) with your LS telescope when
connecting to AC power. It is specifi cally selected to
provide the quality voltage and current required to
power and protect the electronics in the telescope.
Power adapters from other manufactures may cause
damage and void your warranty.
Plug the AC plug into a household AC socket
and the DC plug into the 12v DC jack on the
telescope panel.
For external DC power use the optional #607 DC Power
Cord (part number 07043) to connect to an automotive
12v DC accessory socket.
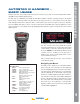
Power
Port
GETTING STARTED
Thumb-Screw
Center Hub
6
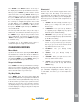
Follow the battery
polarity (orientation)
as indicated by
molded icons