
Operating Instructions and Installation Instructions

I
C
B
F
A
E
H
L
D
G
M
22
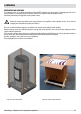
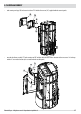
5-CLADDING ASSEMBLY
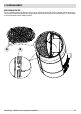
On delivery, the Curve stove has no ceramic cladding, as shown in the image below. The xing brackets are in part already mounted on the
structure and in part on the ceramics (see explanations below).
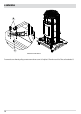
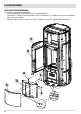
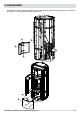
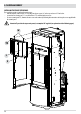
Take the box with the ceramics (gure below) and prepare them for installation. The ceramic surfaces are to be assembled to the structure
in accordance with the indications on the following
pages.
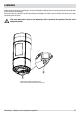
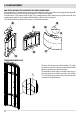
Live electrical parts: only
power the product after
completing assembly.
The ceramics are delicate, therefore handle
with care.
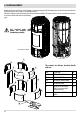
POS. DESCRIPTION No.
A-E-H BOTTOM CERAMIC PANELS 3
B-C-F-I TOP CERAMIC PANEL 4
D-G SIDE CENTRAL CERAMIC PANEL 2
L BOTTOM REAR PANEL 1
k SCREWS TO FIX THE CERAMIC
PANELS (not reported in the
drawing to the side)
40
M TEMPLATE TO FIX THE CERAMIC
PANELS
1
STOVE WITHOUT CLADDING