
Specifications


Using the thumbnail and audio graph
The thumbnail and audio graph is an advanced navigation tool of VideoReDo.
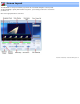
There are four parts to the thumbnail window. Starting from the top:
1. Cut Line: The thin red and green line at the top indicates which frames will appear in the saved output file.
Red indicates the frames will be cut, while green indicates the frame will be included.
2. Thumbnails: The thumbnails will span the width of the application. The center thumbnail, surrounded by a
green frame corresponds to the currently displayed frame in the main video window.
3. Audio graph: The audio graph displays the relative volume levels of the audio stream. The graph is auto-
scaling based on the displayed data and does not represent absolute audio levels. Therefore we do not
recommend using the graph to compare levels between programs or different sections of the same program. If
the audio is AC3 and contains both 2.0 and 5.1, the audio will display in different colors (see above) which can
be customized using the
Thumbnail Options screen.
Note: For performance reasons, the audio graph is only displayed for thumbnail intervals of 2 seconds or less.
4. Time code: The time code line shows the timecode for each frame. A "P" suffix next to the time code
indicates that this is a "Pseudo Frame", created for display purposes only for 3:2 pulldown material. Edits cannot
be performed on these frames as they are generated for playback only.
Note: The audio graph and time code sections are optional and can be disabled using the
Thumbnail
Options screen.
Activating the thumbnail window:
The thumbnail can be displayed or removed either by pressing the F11 key or clicking on View >
Show Thumbnails.
Changing the thumbnail interval: One of the most powerful features of the thumbnail window is the ability
to change the interval between each thumbnail from single frame to multiple seconds. There are 10
different interval presets which can be customized using the
Thumbnail Options screen. To change the interval
use one of the following methods:
1. Use the + or - keys to increase or decrease the interval by one step.
2. Double-click the mouse on the center thumbnail to decrease the interval by one step.
3. Press Ctrl+<number key> (e.g. Ctrl+0) to switch the interval to a specific step.
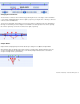
4. Right-click on the thumbnail window to display a menu from which you can select a thumbnail interval:
Navigating using the thumbnail window: The the thumbnail window can be used as a navigation tool
as well.
1. Clicking on a thumbnail will cause the video to jump to that frame. If you double-click on a thumbnail
frame, VideoReDo will jump to that frame and change the display to the next lower interval.
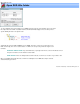
2. Press one of the number keys to jump to specific frame. The center frame with the green
surround corresponds to the number '5'. The frame immediately to the left is '4' the frame to the right is '6'.
Likewise two frames to the left and right are the keys '3' and '7'. You can only use the keyboard to jump the
5 frames to the left of the current frame or 4 frames to the right of the current frame.