
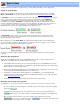
Specifications
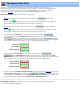


Bookmark: The location of the bookmark is highlighted by the triangle symbol: . To set the bookmark,
press the "B" key or right-click to display the
context-menu. You can jump to the bookmark by pressing the "J"
key or from an option on the edit- or
context-menus.
The current position of the start and end selection markers,
and are also shown. Please see
Managing Selections for additional information on setting the selection markers.
Navigating with the keyboard:
Many users prefer to navigate using the keyboard instead of the mouse. One benefit of navigating with
the keyboard is that when a key is held down it automatically repeats. This can make scanning the
program, forward or backward, at high speed a painless process. Please see the section on
keyboard
substitutes for more detail.
Timeline Zoom:
Zoom mode is used to magnify a section of the navigation bar to better see cut points and scene markers. Its
useful when editing long programs where the markers may be too close together to be distinguished from
one another.
The "Z" key will toggle zoom on and off. You can also press the "F7" and "F8" keys to decrease or increase
the level of magnification. These same options are available on the View menu as well.
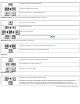
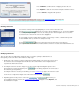
Standard view:
Zoomed view: Note that the navigation bar only shows the zoomed or magnified area. The lower slider has
been replaced with the a graphic highlighting the zoomed area within the entire timeline.
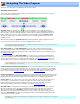
Changing the zoomed area:
You can increase or decrease the zoomed area by positioning the mouse on the edges of the zoom window
( see #1 below ) and dragging them to the left or right. If you prefer, pressing the "F7" or "F8" keys to decrease
or increase the zoom window size.
To move the zoom window, click inside the zoom area in zoom bar (see #2 below). The cursor will change to
the image of a hand and you can then drag the zoom window to the desired position. You can also pressing
the comma or period keys to move the zoom area left or right, respectively.
s