
Specifications


Navigating The Video Program
VideoReDo offers many ways of navigating through the video program.
Navigating with the mouse:
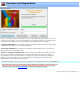
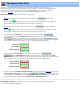
All of the VideoReDo navigation functions can be completed using the mouse. Click on any of the controls in
the picture below to view its function.
Program cursor: The program cursor is the primary navigation tool for moving quickly through
large sections of the program. Simply place the mouse cursor anywhere on the navigation bar and click the
left mouse button. The cursor and video will jump to the desired location. While still holding down the mouse
button, drag the slider to the left or right to zip through the video. Navigating using the program cursor
will always position the video to the nearest I-Frame. For finer movements, you will need to use the other
navigation controls.
When the video is playing, the program cursor will automatically advance with the program time. As the
cursor passes over a selected area, the selection is highlighted in the Cut List box.
Note: Double clicking on the program cursor, while it is in within a selected area, will move the start and
end markers to surround the selection.
Fine tuning slider: Use the fine tuning slider to move the video forward or backward in smaller
increments. Click and drag the slider to the right to advance the program, to the left to move it backwards.
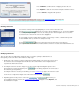
By default, the slider will move the program up to 120 seconds in either direction. You can change this value on
the
Navigation options page.
You can temporarily make the fine tuning slider less sensitive (i.e. more accurate) by holding down the
control and or shift buttons while moving the slider. The control and shift buttons will reduce the range of the
slider in proportion to their value. For example, if the shift multiplier on the
Navigation options page is 2 and
the slider range is ±120 seconds, then holding down the shift button will reduce the range to ± 60 seconds.
Note: Dragging the fine tuning slider with the right mouse button will give you very fine control by limiting the
range of movement to +/- one second.
Forward and Backward Movement Buttons: The three forward and backward movement buttons will
move the program ahead or backward by single frames, 30, and 120 seconds respectively. You can hold down
the shift and/or control keys to increase the amount of movement. Once again, you can set the time increments
for these controls from the
Navigation options page. There are also keyboard substitutes for these controls.
Pause / Play button: Press this button to toggle between pausing and playing. When the button background
is yellow, the program is paused, when green the program is playing. You can also toggle between pause and
play by clicking the left mouse button anywhere on the video picture itself, or simply press the space bar.
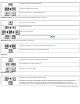
Cursor clock: The cursor clock, in the center of the screen, indicates the position of the program cursor in
hours, minutes, seconds and frame count. This is a display-only control. The two other clocks, without
backgrounds just below the navigation bar, display the current position of the start- and end-selection
markers. Double-clicking on the cursor clock will let you position by
entering a time code.
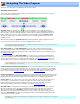
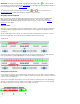
Navigation Bar: The navigation bar is a display-only control depicting a graphical view of your selections.
Where the background is green, program material will be transferred to the output file, where red, it won't.
When you open a video file in Cut mode, the background of the navigation bar will be entirely green
indicating that the entire program will be written unless you make selection cuts. Likewise, when you open a
video file in Scene mode, the background of navigation bar will be red indicating that nothing will be output
until you identify selections to include.
Note: When you switch into Preview Mode, the navigation bar turns purple to indicate you are no longer in
an editing mode.