
Specifications


Managing Selections
Selections are the fundamental building blocks of the VideoReDo editing process. With selections, you
indicate which portions of the source video program you wish to include or exclude from the edited output. There
is no limit to the number of selections you can create during the editing process. You can also save your
selections to a
project file so that they may be retrieved for additional editing in the future.
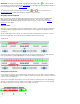
Creating selections: Creating selections is a three step process:
1.
Navigate the video to the desired start of the selection, and press the button. The start
selection marker,
will appear at the current cursor position. If the new selection is to the right of end
selection marker, the end selection marker will be moved to the end of the file.
2.
Navigate the video to the desired end of selection, and press the button. The end selection
marker,
will appear at the current cursor position. If the new selection end is to the left of the current
start selection marker, the start selection marker will be moved to the start of the file.
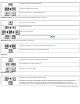
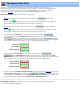
3. If you are operating in Cut Mode, you create the cut selections by pressing the
or
buttons. The Cut Selection button will mark the area between the selection markers as
the selection and add that selection to the list of cuts on the right of the screen. Trim Unselect will add the
areas outside the selection markers to the cut list creating two new selections. A portion of the background
on the navigator bar will be red to signify the sections of the video program that will be cut.
Before Cut:
Cut Selection:
Trim Unselected:
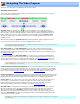
If you are operating in Scene Mode, scene selections are added using the
and
buttons. Add Selection will add the area between the selection markers, while Add
Unselect will add the areas outside the selection markers. A portion of the navigator bar background will be
green to signify the sections of the video program that will be included in the output program.
Before Adding :
Add Selection :
Add Unselected :
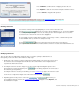
4. If you have the optional Enable One-Click Selection checked on the
General Parameters options page,
the Sel. Start and Sel. End buttons will be labeled,
and . They function the same
as described above except that when you press Mark Out the selection is automatically Cut or Added. This
will save you time by not having to press the Cut Selection or Add Selection buttons.
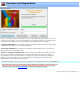
Overlapping selections: If you attempt to create a cut or scene that overlaps a previous selected cut or
scene, the following dialog box will appear.