
Specifications


color sample.
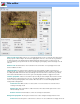
Graphic / Select Image: Select "Graphic" and press "Select Image" to copy any recognized graphic file (.
bmp, .jpg, .gif, .png, etc), to the menu background. Graphic files are stretched to fit the actual dimensions of
the menu, which are 720x480 for NTSC and 720x576 for PAL.
If there is a graphic object on the system clipboard, for example a frame capture, you can paste the graphic
using the Edit menu at the top of this dialog.
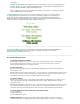
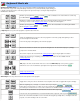
Text Properties: The controls are used to set how text is displayed. If a text box is selected changes to
the settings will affect the selected text box. If no text box is selected then changes to the Text properties
become the style when adding new text box. The text property box is divided into three sub-frames: Font,
Outline and Shadow. The following graphic shows examples of different text effects. Outlining and shadowing
can be very effective for making text visible against a graphical background.
File menu: In addition to saving and storing title pages, with Load Template and Save Template, the
Save as Default Template saves the current title as a template for all new titles. This includes,
background, text boxes and the text box style.
More about editing text boxes:
To edit the contents of a text box:
Select the text box by click on it once, or use the tab key to cycle through the text boxes. Then using the
mouse, double click again on the text box to select its text. You can then replace the text or use the
arrows, backspace and delete key to modify its contents.
To move a text box:
With the mouse: Click anywhere inside the box, and while holding down the left mouse button drag the text
box around the screen.
With the keyboard: Select a text box with the mouse, or use the Tab key to cycle through all the text boxes one at
a time. Then, use the four arrow keys (left, right, up, and down) to move the text box one pixel at a time. If you
hold down the ctrl key at the same time, movement will be in 5 pixel increments.
To resize a text box:
With the mouse: Select a text box so that it draws it outline with the 8 resizing handles. Press and click on one
of the resizing handles. Then while still holding down the left mouse button, drag the handle to expand or
contract the text box.
With the keyboard: Select a text box with the mouse, or use the Tab key to cycle through all the text boxes one at
a time. While holding down the shift key, use the four arrow keys to expand or contract the size of the text box
one pixel at a time. If you hold down the ctrl key at the same time, movement will be in 5 pixel increments.
To create multiple text boxes of the same size and text style:
1) Select a text box.
2) Click on Edit > Copy.
3) Click on Edit > Paste, repeat.
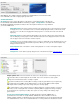
Aligning text boxes: This is generally best done with the keyboard. When a text box is selected, its
location and dimensions are displayed just underneath the template sample. You can then use they board