VideoReDo TVSuite Overview Learn how to use VideoReDo TVSuite: ● ● ● ● ● ● ● ● ● ● ● ● Screen Layout - An overview of the VideoReDo screen. Getting Started - How open open files, navigate, create selections, and save your work. Using Preview Mode. Using the thumbnail and audio graph. Using Ad-Detective - How to setup and run VideoReDo's computer assisted commercial detection. Importing Video from a DVD. Creating a Video Title using the Title Editor. Authoring and Burning a DVD.
Screen Layout The VideoReDo screen layout is intuitive yet powerful. Its customizable navigation controls provide speed and flexibility to quickly find material in long videos, yet accurately position to the exact frames you want to cut. Click on the appropriate label to learn more. VideoReDo TVSuite Help - © 2003-2007 DRDSystems, Inc.
Getting Started Overview: Editing MPEG video is a snap with VideoReDo. This section will take you through the basic features and capabilities of the program. VideoReDo works directly with compressed digital video, specifically MPEG1 and MPEG2. It allows you to remove unwanted scenes from a video program (cutting) and piece together scenes from multiple programs into one seamless file (joining).
Using Preview Mode VideoReDo has two modes, Edit Mode and Preview Mode. Edit mode is the default when a file is opened and is the mode in which cuts are marked and manipulated. Preview mode gives you an opportunity to preview your work before saving. In edit mode, the navigation bar shows the entire original program and is colored red and green to indicates where in the original program the marked cuts and scenes are. When you switch to preview mode, the navigation bar switches to a purple color.
Changing the zoomed area: You can increase or decrease the zoomed area by positioning the mouse on the edges of the zoom window ( see #1 below ) and dragging them to the left or right. If you prefer, pressing the "F7" or "F8" keys to decrease or increase the zoom window size. To move the zoom window, click inside the zoom area in zoom bar (see #2 below). The cursor will change to the image of a hand and you can then drag the zoom window to the desired position.
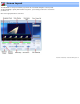
Using the thumbnail and audio graph The thumbnail and audio graph is an advanced navigation tool of VideoReDo. There are four parts to the thumbnail window. Starting from the top: 1. Cut Line: The thin red and green line at the top indicates which frames will appear in the saved output file. Red indicates the frames will be cut, while green indicates the frame will be included. 2. Thumbnails: The thumbnails will span the width of the application.
Thumbnails in preview mode: The thumbnail window operates the same in preview mode with two exceptions: (1) The background color of the thumbnail window changes and (2) the Cut Line bar is not displayed. You can customize the background color of the thumbnail window for both edit and preview modes using the Thumbnail Options screen. VideoReDo TVSuite Help - © 2003-2007 DRDSystems, Inc.
Using Ad-Detective Ad-Detective is the VideoReDo capability to detect, mark and cut commercials. Depending upon your preferred method of working, it can be used interactively or in a batch oriented mode. In an interactive mode, Ad-Detective is used to augment the manual search and editing process, while in a batch oriented mode, the entire program is first scanned, marked for possible commercials with the results saved as a VideoReDo project file.
VideoReDo TVSuite Help - © 2003-2007 DRDSystems, Inc.
Open DVD title folder Open DVD title folder To open a DVD title either from a DVD or from a VIDEO_TS folder copied to your hard drive, click on the menu File > Open Title from a DVD. A standard folder broswer window will be displayed. You can either point to a specific VIDEO_TS folder or the parent folder. VideoReDo will search the IFO and VOB files in the VIDEO_TS folder to create a list of all the titles on the DVD.
Title editor Show TV safe area: Many television sets, especially CRT-based ones do not show the entire video picture, but clip a portion of all the margins. The amount of clipping differs from set to set, but all sets are guaranteed to show at least 80% of the broadcast picture. When placing titles and other text in on a menu screen, its is recommend that you keep them in the safe area. Checking this option displays a dashed rectangle of the TV safe area.
color sample. Graphic / Select Image: Select "Graphic" and press "Select Image" to copy any recognized graphic file (. bmp, .jpg, .gif, .png, etc), to the menu background. Graphic files are stretched to fit the actual dimensions of the menu, which are 720x480 for NTSC and 720x576 for PAL. If there is a graphic object on the system clipboard, for example a frame capture, you can paste the graphic using the Edit menu at the top of this dialog.
sizing commands to match vertical and horizontal positions and sizes. Copying text styles between text boxes: Text styles can be easily copied from one text box to another. 1) Select a text box. 2) Click on Edit > Copy 3) To copy the text style to all text boxes, click on Edit > Paste Style All. 4) To copy to another text box, select the destination text box and click on Edit > Paste Style. To auto fit text to an existing text box: 1) Select a text box. 2) Click on Edit > Auto fit text.
Create DVD project DVD Folder and Burn Options: The parameters in this frame control the names and locations of the DVD output process. VIDEO_TS location: All DVD contain a folder called VIDEO_TS which contains the program material (. VOB files) and control files (.IFO and .BUP) . During the authoring process VideoReDo builds a copy of the VIDEO_TS file on your hard drive which will be eventually burned to the DVD.
Menu Options: The settings in this box determine if your DVD will have a menu and how it will look. VideoReDo can create a single paged, top-level menu. Create DVD menu: No menu: Select one of these two options. If "No menu" is selected the first title on the disc will be automatically started with the DVD is inserted into your player. If Loop titles is checked then the title will be automatically repeated over and over. The other options in this box are only enabled if you create a DVD menu.
and DVB. If this option is checked the VideoReDo authoring engine will use your source video directly without recoding. This will significantly speed up the authoring process. Non-compliant videos are still limited to SD material so if your source material is hi-definition it will be grayed out. Change output options: While VideoReDo attempts to automatically determine an optimal set of output settings, you can change these settings by clicking here.
Reference Please click on the topic below for additional information: ● Context and Edit Menu Options available from the edit and context menu. ● Joiner Editing How to add, remove or change the sequence of joined program material. ● Keyboard Shortcuts Complete list of keyboard shortcuts for VideoReDo ● MPEG Program Information Dialog box which displays the internal formats of the MPEG2 Program headers ● Create Trimmed File Copy How to copy a portion of your raw input file.
● General Parameters Description of parameters which affect the behavior of VideoReDo. ● Navigation How to change the behavior of the navigation buttons, sliders, and keyboard commands. ● Stream Parameters Options to change the format of the output video stream. ● File Types How to make VideoReDo the default program for opening MPEG files. ● Playback Devices How to tailor VideoReDo to make optimal use of your sound card and video adapter.
Keyboard Shortcuts Relative movement keys: These keys move the program forward or backward by the specified interval. When held down, as opposed to being immediately released, these keys will automatically repeat allowing you to quickly zoom through sections of the video program. The repeat rate may be set using the keyboard option in the Windows Control Panel. Simulates pressing the back , or forward 120 second buttons. The exact number of seconds may be modified with the Navigation options dialog.
In Cut mode, this key will include the unselected material from output file, causing the selected material to be deleted. Same as pressing: In Scene mode, this key will add the selected material to the scene list. Same as pressing: Toggles between edit and preview mode. Same as pressing: M, by itsself, toggles the audio mute. Same as pressing the speaker icon: Shift+M and Ctrl+M raise or lower the volume. Closes the current file.
Toggle the display of the thumbnail window. Display the thumbnail options dialog. Increase (+) or decrease (-) the thumbnail interval. Ad-Detective keys : These keys control the behavior of Ad-Detective and Scene markers. Set or Remove a Scene marker. Start Ad-Detective Scan Remove all scene markers. Go to previous or next scene marker. Same as the red arrow: Appearance keys: These keys affect appearance of VideoReDo Toggles the display between standard size and maximized (full screen).
Purchase and Registration You can use this dialog to purchase a perpetual license to use VideoReDo. When you purchase such a license, you will be asked to supply a user name. Upon validation of your payment you will receive, generally via email, a registration key which will remove the expiration and other trial copy limitations of the program.
Technical Support Technical support for VideoReDo is provided, without charge, through the links at our website. Here you will find multiple resources to assist you in solving problems with VideoReDo and to take maximum advantage of the program's features. Support Forum: http://forums.VideoReDo.com This community of VideoReDo developers and users is the primary place to get your questions answered quickly and learn more about the product. Email: support@VideoReDo.
Adjust Audio Levels You can adjust the playback volume using the slider in the lower left of the screen. You can also mute audio by clicking on the speaker symbol (or pressing the "M" key). The volume can be raised or lowered by pressing the Shft+M to raise the volume and Ctrl+M to lower it. VideoReDo TVSuite Help - © 2003-2007 DRDSystems, Inc.
Managing Selections Selections are the fundamental building blocks of the VideoReDo editing process. With selections, you indicate which portions of the source video program you wish to include or exclude from the edited output. There is no limit to the number of selections you can create during the editing process. You can also save your selections to a project file so that they may be retrieved for additional editing in the future. Creating selections: Creating selections is a three step process: 1.
Press Combine to combine the two overlapping selections into one. Press Replace to delete the old selection and replace it with the new one. or, Press Cancel to simply abort this operation. Note: If you have the Auto Replace Overlapping Cuts selected on the General Parameters options page, the new cut or scene will automatically replace the previous overlapped one. Deleting selections: You can delete existing selections by highlighting one or more entries in the list box and pressing .
Navigating The Video Program VideoReDo offers many ways of navigating through the video program. Navigating with the mouse: All of the VideoReDo navigation functions can be completed using the mouse. Click on any of the controls in the picture below to view its function. Program cursor: The program cursor is the primary navigation tool for moving quickly through large sections of the program. Simply place the mouse cursor anywhere on the navigation bar and click the left mouse button.
Bookmark: The location of the bookmark is highlighted by the triangle symbol: . To set the bookmark, press the "B" key or right-click to display the context-menu. You can jump to the bookmark by pressing the "J" key or from an option on the edit- or context-menus. and are also shown. Please see The current position of the start and end selection markers, Managing Selections for additional information on setting the selection markers.
VideoReDo TVSuite Help - © 2003-2007 DRDSystems, Inc.
Quick Start This page will lead you through the most basic steps of opening, editing and saving your video program files. Setting the program mode: Before you start editing your video program, you need to decide whether VideoReDo should be run in Cut Mode or Scene Mode. The mode is selected via a selection box on the General Parameters option dialog. In Cut Mode the scenes you select will be removed or cut from the output video.
There are many ways to navigate around your programs and we suggest you read the navigation page for additional details. However, the simplest way to move through your program is to drag the upper slider close to the desired point. Then use the lower slider to fine tune the selection point. Saving the edited program: You can save the edited program by selecting "Save Video As..." from the file menu or pressing the button. VideoReDo TVSuite Help - © 2003-2007 DRDSystems, Inc.
Joining Programs Joining is used to concatenate multiple video files into a single file. MPEG program stream files are structured with a number of internal time stamps. The VideoReDo joiner realigns these time stamps as it puts your selection of files together into one file. The joiner is used by adding project or MPEG files to the joiner list. To add a project, open an MPEG file or an existing VideoReDo project.
VideoReDo TVSuite Help - © 2003-2007 DRDSystems, Inc.
Getting Help VideoReDo offers many options for getting help. You can invoke help at any time by pressing the F1 key or selecting the "Contents" option from the help menu. When a dialog box is displayed and you press F1, the help system will automatically jump to the help text appropriate for that dialog. If you need support, please email our support staff at: support@VideReDo.com or visit our forum at http:// forums.videoredo.com.
General Parameters Play Video When Opened: Check this option to automatically start playing the video when you open an MPEG file. Preferred audio: If a video file contains multiple audio streams of different codecs, this parameter is used to determine which stream will be defaulted to. If 'Auto' is selected, the first audio stream found is used and also results in the fastest file open.
Save on close options: This option affects what happens when you open a new video program or try to exit the program and have unsaved edits. The unsaved edit status is cleared when you save your video or perform a project save. Please choose from one of the following three options: ❍ ❍ ❍ Warn if unsaved edits - If you have not saved your latest edits as either a project or new video program you will be asked to confirm your action.
Thumbnail Options Thumbnails are an optional feature of VideoReDo. If enabled from the View menu (or F11 key) they will appear just below the video display. This dialog page is used to configure operations and look of the thumbnail display: Thumbnail Interval Seconds: The ten edit boxes in this section specify the number of seconds between each thumbnail image. For single frame intervals, use '0'. Decimal values are allowed, for example using 0.50 seconds to display thumbnails at 1/2 second intervals.
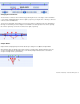
and contains both 2.0 and 5.1,) Axis color and scaling options. The default waveform display is linear, that is a sound that is recorded at twice the level of another will be twice as high on the graph display. The Log scale option changes the scale to a logarithmic scale, which corresponds to how people perceive the relative difference in volumes. In general, a linear scale (Log scale not selected) will make it easier to view where quiet passages are in the audio waveform.
Ad-Detective Common Parameters The Common Parameters dialog is used to control the behavior the scene detection methods: Scanning Behavior: Pause Scan At Beginning of Block: When checked, an interactive Ad-Detective scan will pause at the start of each commerical block. The start of a commerical block is identified as the first scene transition with Maximum Block Length Seconds. Pause Scan At End of Block: When checked, an interactive Ad-Detective scan will pause at the end of each commerical block.
DVD: Edit menu template Show TV safe area: Many television sets, especially CRT-based ones do not show the entire video picture, but clip a portion of all the margins. The amount of clipping differs from set to set, but all sets are guaranteed to show at least 80% of the broadcast picture. When placing titles and other text in on a menu screen, its is recommend that you keep them in the safe area. Checking this option displays a dashed rectangle of the TV safe area.
If there is a graphic object on the system clipboard, for example a frame capture, you can paste the graphic using the Edit menu at the top of this dialog. Text Properties: The controls are used to set how text is displayed. If a text box is selected changes to the settings will affect the selected text box. If no text box is selected then changes to the Text properties become the style when adding new text box. The text property box is divided into three sub-frames: Font, Outline and Shadow.
More about editing text boxes: To edit the contents of a text box: Select the text box by click on it once, or use the tab key to cycle through the text boxes. Then using the mouse, double click again on the text box to select its text. You can then replace the text or use the arrows, backspace and delete key to modify its contents. To move a text box: With the mouse: Click anywhere inside the box, and while holding down the left mouse button drag the text box around the screen.
VideoReDo TVSuite Help - © 2003-2007 DRDSystems, Inc.
DVD: Customize menu text Menu customization: This dialog is used to change text placeholders in the menu template. There are three different recognized of menu place holders allowed in a menu template: Name Disc title Disc description Title 1 to Title 12 Placeholder tag {DiscTitle} {DiscDesc} {Title} Maximum number 1 1 number of actual titles, limited to 12. Templates can be edited and created using the template editor.
to display all the entered text. However text will not be reduced lower than 12 points as smaller fonts become unreadable when displayed on a TV screen. If VideoReDo needs to shrink the font size in one title text box, the font sizes for all the other title boxes will be changed to match. This is done to preserve a consistent look and feel to the menu. Preview DVD buttons: When pressed, the selected title highlight is drawn around each of the title text frames.
DVD output: Video options Aspect Ratio: Use this option to change the aspect ratio bits in the MPEG2 sequence header. Changing these bits does not affect the actual video stream nor will it convert video from one format to another. It is used when the actual aspect ratio recorded by the capture card is incorrect. Force 4:3 to pillar box When the aspect ratio is set to 16:9, this prompt will appear. Checking it will reencode 4:3 material to be recoded to a pillar box format.
Max GOP Length: This parameter is used to specify the maximum GOP length for all videos on the DVD. For compliant a compliant video, the maximum GOP length is 15 frames for PAL and 18 frames for NTSC material. However, most DVD players will accept GOPs much longer than that. If you are recoding your video, then we recommend leaving this at the default value to create a compliant DVD. The VideoReDo authoring engine can only accept GOPs of up to 35 frames.
DVD output: Cropping and resizing Cropping and Resizing: You can use this dialog to invoke cropping and resizing of your video prior to recoding. Cropping and resizing parameters apply to all the video on your DVD. The slider control can be used to choose a sample frame to display since the currently selected frame may not be a good sample to show when resizing (i.e. a black frame). The displayed frame always comes from the currently open video regardless if its on the DVD or not.
DVD output: Audio options Audio Properties Encoding: Use this option to specify the audio stream type of the output file. Options are: No Change, MPEG audio, or LPCM/WAV audio Bit Rate: This option is used to change the bit rate of the MPEG audio stream. Changing this field affects the output audio stream. LPCM audio is uncompressed and does not have a bitrate option. Language: Each audio track on a DVD carries its own language code. Use this field to specify the language code for this audio track..
Context Menu You can display the context menu by clicking on the right-mouse button. It is used as a shortcut for common program operations. All of the functions on this menu have equivalent keyboard shortcuts. Set Select Start Set Selection End These functions can be used to reset the current selection start and end points and are the same as clicking on the or buttons.
Joiner Editing You can use the Joiner Selections dialog box to change the order of video sections when the joiner is used to output the video. The buttons on the right are enabled only when an entry in the dialog is selected. Up | Down Move the selected entry up or down in the list. These buttons are used to change the order of scenes that will be output. Remove Removes the selection from the list of scenes that will be output Descripiton.Changes the description associated with the selected scene(s).
Program Information Program Information This dialog displays information from the MPEG sequence headers about the format of the data in your program file. This window can be accessed using the keyboard shortcut Ctrl+L or from the menu: Tools>Show Video Program Info Press the 'Copy to Clipboard' button to save this information on the Windows clipboard in text format. This capability is useful when information is needed by customer support and can be pasted directly into an email response.
Create Trimmed File Copy This dialog is used to make byte-for-byte copies of portions of the original program file. Its primary use is for you to create small copies of files that can be uploaded to the VideoReDo support team. Source File: If you started this dialog after a video has been opened, the Source File will be filled in with the name of the currently open video program file. Otherwise, click on the "..." button to select a source file.
Output Processing Complete This dialog is displayed when VideoReDo has finished creating the output file. Items displayed in red are warnings which may indicate possible problems with the input or output file. The data from this dialog is always written to the log file. Output Statistics: Video output frames: Number of video frames output. Audio output frames: Number of audio frames written to the output file. Processed frames/sec: Number of video frames per second processed.
All audio frames start with a 32-bit header. An audio frame error occurs when the editor does not find the expected header where it thinks an audio frame should start. Audio frame errors are usually caused by dropped frames in the input file and if not too frequent are generally recoverable without a problem. * Audio frame errors: However, Audio Frame Errors can also occur if the audio characteristics such as bit rate or sampling rate change in the middle of a program.
Overlapping selections This dialog is displayed when you try to create a selection that overlaps a previous one. You will need to select one of the options listed: Press Combine to combine the two overlapping selections into one. Press Replace to delete the old selection and replace it with the new one. or, Press Cancel to simply abort this operation. You can disable this dialog by selecting "Auto Replace Overlapping Cuts" in the General Parameters options dialog.
QuickStream Fix This dialog is used to re-multiplex an MPEG2 program stream. It will copy the input file to the output file through the VideoReDo stream processing routines. This means that all the time stamps in the output file, such as PTS and GOP headers, will be re-calculated. In addition, all the processing parameters as specified on the Advanced Stream Dialog will be honored as well. In other words the output file will be MPEG2 compliant file.
Frame Capture Frame capture will copy the currently displayed video frame to a bitmap file or the windows clipboard. This dialog is used to determine the frame capturing options. The current video image can be captured to either the Windows Clipboard or a bitmap file (.bmp). You also have the option to save the file as a JPG, TIF, or PNG file. To initiate a Frame Capture, select Capture Frame from the Edit menu or simply type Ctrl+C.
Stream Selection If your stream contains multiple video and/or audio streams, this dialog can be used to choose which stream combination to edit. By default, VideoReDo will edit the first set of streams in finds in your file. When you select a different stream, your current edits will be lost and the file re-opened. Keyboard users will notice that allowable selection is preceded by a number. Simply type that number to move the selection bar to the appropriate entry.
Display Adjustment This dialog is used to adjust the brightness and contrast of the VideoReDo display. It does not, in any way, affect the appearance of the your edited file. To use keyboard commands with this dialog, click on Alt+B to set keyboard focus to the brightness slider, or Alt +C to set the focus to the contrast slider. Then use the left and right arrow keys to move the slider. You may also use the Tab key to cycle through each of the controls on this dialog.
Ad-Detective Parameters Ad-Detective parameters VideoReDo TVSuite Help - © 2003-2007 DRDSystems, Inc.
Batch Builder The VideoReDo Batch Builder is used to process multiple edit project files (*.VPrj) at one time. This way you can perform your edits quickly using the interactive portions of VideoReDo and then have the VideoReDo Batch Builder handle the more time consuming output tasks at a more convenient time. The Batch Builder relies upon VideoReDo project files. Project files are short files which contain the information needed to edit your files.
c:\temp\fb1. d:\edits mpg VRD_ d:\edits\VRD_001_fb1.mpg c:\temp\fb1. d:\edits mpg -VRD d:\edits\fb1-VRD.mpg c:\temp\fb1. d:\edits mpg -VRD_ d:\edits\fb1-VRD_001.mpg For example: You input file is c:\source\fb1.mpg, the destination folder is d:\edits and the destination modifier is "Cuts_". Then your proposed destination filename will be d:\edits\Cuts_fb1.mpg.
Output File Options Output Options This dialog is displayed by pressing the "Options" button in the File Save As dialog box. Video Properties Aspect Ratio: Use this option to change the aspect ratio bits in the MPEG2 sequence header. Changing these bits does not affect the actual video stream nor will it convert video from one format to another. It is used when the actual aspect ratio recorded by the capture card is incorrect.
CRID File Dialog Box Once you select Open CRID File from the File menu, you will be presented with the above box. If you don't see this option on the main File menu, then CRID processing hasn't yet been enabled on the Enhance Plus Features option page. Change Folder: Click this button to change the default CRID folder location. Open Selection: Opens the selected file for editing in VideoReDo Changing the sort order: The sort order can be changed by clicking on either the Filename or Date column header.
VideoReDo TVSuite Help - © 2003-2007 DRDSystems, Inc.
COM Interface The VideoReDo COM interface lets another COM enabled application invoke and control many aspects of VideoReDo's behavior. In fact the VideoReDo's own batch manager uses the COM interface to create command files that process your edit commands. The samples shown use the Windows Scripting interface which is available on all Windows systems which run VideoReDo. VideoReDo COM Interface: Methods: AbortOutput Aborts the current file- or joiner-save that is in progress.
SetQuietMode Sets VideoReDo to run with a minimal screen interface StartAdScan Starts commercial detection of the currently open file. (Plus only) WriteProjectFile Saves the current project file to disk. Sample Script Properties:: AudioAlert Sets or gets the audio alert status OpenedFilename Gets the currently opened filename OutputPercentComplete Estimate of output percent complete PlotMask Sets or gets the size of the plot mask. PreviewMode Enable or disabled the preview mode.
Return Values: Function returns non-zero (TRUE) if successful, otherwise zero (FALSE) Description: This command will add a scene marker to the timeline. If an existing scene marker exists within 1 second of the specified time, then the new marker will NOT be added. BOOL AddFileToJoiner( const char *filename ) AddFileToJoiner( filename as string) as Integer Parameters: filename Character string containing a VideoReDo project file or MPEG program file.
Function returns non-zero (TRUE) if successful, otherwise zero (FALSE) Description: This command will clear all selections from the cut or scene list. BOOL ClearJoinerList( ) Close( ) as Integer Parameters none Return Values: Function returns non-zero (TRUE) if the joiner list was not empty before this call was made, otherwise zero (FALSE) Description: Clears all items from the joiner list.
BOOL FileOpen( const char *filename ) FileOpen( filename as string) as Integer Parameters: filename Character string containing a VideoReDo project file or MPEG program file. Return Values: Function returns non-zero (TRUE) if successful, otherwise zero (FALSE) Description: This command will open a VideoReDo project file or an MPEG video file.
Function returns non-zero (TRUE) if successful, otherwise zero (FALSE) Description: This command will save your current project to the specified file. BOOL FileSaveAsElemStreams( const char *filename ) FileSaveAsElemStreams( filename as string) as Integer Parameters: filename Character string containing a MPEG program file. Return Values: Function returns non-zero (TRUE) if successful, otherwise zero (FALSE) Description: This command will save your current project to a pair of elementary streams.
Returns non-zero (TRUE) if VideoReDo is running cut mode. Returns zero (FALSE) if running scene mode... Description: This command may be run before before a file has been opened. short GetCutSceneListCount( ) GetCutSceneListCount() as Integer Parameters: none Return Values: Returns the number of items presently in the cut / scene list. Description: If a video file is not yet open, 0 will be returned.
double GetProgramDuration( ) GetProgramDuration( ) as Double Parameters: none Return Values: The length, in seconds, of the currently loaded program. Description: Returns a floating point number with the total number of seconds in the program. long GetSceneMarkMsec( int sceneIndex ) GetSceneMarkMsec( sceneIndex as Integer ) as integer Parameters: sceneIndex Scene marker number, with a range of 1 to N. Calling with sceneIndex of 0 will return the number of scenes markers set.
Pause() as Integer Parameters: none Return Values: Function returns non-zero (TRUE) if successful, otherwise zero (FALSE) Description: This command will cause VideoReDo to pause a currently playing video. If the video is already paused, it will be ignored. BOOL Play( ) Play() as Integer Parameters: none Return Values: Function returns non-zero (TRUE) if successful, otherwise zero (FALSE) Description: This command will cause VideoReDo to start playing a previous paused video.
Function returns non-zero (TRUE) if successful, otherwise zero (FALSE) Description: Use this command to save your current joiner command to the specified output file. BOOL SaveJoinerAsEx( const char *filename, short outputType ) SaveJoinerAsEx( filename as string, outputType as integer ) as Integer Parameters: filename Character string containing a MPEG program file.
audioCodec Audio Output Codec: 0 = audioCodecNotSpecified, Use the default output codec. 1 = audioCodecLPCM, Output audio as WAV (LPCM). 2 = audioCodecMPEGL2, Output audio as MPEG1 Layer 2. 3 = audioCodecAC3, Output audio as AC3 (not yet supported). bitRateKbps samplingK Output bitrate in KBps. Not used for LPCM. (e.g. 224 = 224,000 bps ). Output sampling rate in thousands (i.e. 48 = 48,000 samples / second). NOTE: This parameter is ignored and is intended for future support.
quietMode TRUE (or 1 ) to have VideoReDo run in quiet mode, FALSE (or 0 ) otherwise. Return Values: Function returns non-zero (TRUE) if successful, otherwise zero (FALSE) Description: When quiet mode is set, VideoReDo will completely hide itself during output. BOOL StartAdScan( long FastSearch, long AutoCut, long DisableDisplay ) StartAdScan( FastSearch as integer, AutoCut as integer, DisableDisplay as integer ) as Integer Parameters: FastSearch TRUE or (1) to run Ad-Detective in fast search mode.
This property is read-only. To Get: BSTR sd = VideoReDo.OpenedFilename; Returns the currently open filename. If a project is opened, the video files specified in the project file will be returned. If the open video is a .Vlst, the .VLst filename is returned. OutputPercentComplete To Set: This property is read-only. To Get: double d = VideoReDo.OutputPercentComplete; This property only applies while output is in progress and returns a value from 0 to 99.
SelectionStartMsec SelectionEndMsec To Set: unsigned long msec = 5000; VideoReDo.SelectionEndMsec = msec; // Position the end selection marker to 5 seconds. To Get: long msec = VideoReDo.SelectionEndMsec; These two properties can be used to read or set the start and end selection markers. If both markers are to be set, it is recommended that the SelectScene() method be used. ThumbnailDisplay To Set: BOOL bThumbnailOn = 1; VideoReDo.ThumbnailDisplay = bThumbnailOn; // Turn on thumbnails.
2. 2. 1. 460 - Mar 24 2006 Sample script: set Args = Wscript.Arguments 'Wcript to do some joins and edits. Set VideoReDo = WScript.CreateObject( "VideoReDo.Application" ) Wscript.echo( VideoReDo.VersionNumber) VideoReDo.SetQuietMode( true ) ' Save without any display openFlag = VideoReDo.FileOpen( args(0) ) if openFlag = false then Wscript.echo( "? Unable to open file/project: " + args(0) ) Wscript.Quit 3 end if VideoReDo.SetCutMode( false ) Wscript.echo( VideoReDo.GetFrameRate() ) Wscript.echo( VideoReDo.
Navigation Options Button movements: The values in these boxes indicate the number of seconds to move the program forward or backward. A value of zero seconds indicates single frame movement. The Shift- and Ctrl-Multipliers permit you to move the program at an accelerated rate by holding them down prior to pressing the desired button. Default: single frame (0 seconds). Pressing the up and down arrow keys will also simulate pressing these buttons. Please see Keyboard Shortcuts for more detail.
Stream Parameters Stream Parameters Detect / Resync Missing Frames: VideoReDo continually checks for missing or corrupt audio and video frames. These frames may be a short and temporary annoyance when the program is played on back in VideoReDo or other PC-based software players. However, many DVD authoring programs do not handle these frames gracefully and they will create very noticeable audio and video synchronization problems on the newly authored DVD.
streams will trigger an error. Discontinuity Checkpoints: This number represents how thorough a check VideoReDo does of the input file to adjust for non-sequential time stamps. When a file is opened, VideoReDo checks the file, at evenly spaced intervals, to see if the time stamps are sequential. If the timestamps are not sequential, then VideoReDo automatically builds an internal table to compensate. The higher this value, the more sections of the are checked, but the slower the file will open.
● ● The bit rate for the file is reported on the Tools>Show Program Info dialog and may be changed using the Output Options dialog. Medium: At medium, the quality / bit rate is 2/3rds of the MPEG header bit rate. Low: At low, the quality / bit rate is 1/2 of the MPEG header bit rate. Output Stream Parameters:The following options deal with how video packets are packetized to form a program stream.
File Types File Types This dialog lets you setup and maintain the relationship between file types and VideoReDo. File types are defined as the text that appears after the period in a filename. For example, MPEG program streams usually have a file type of ".mpg" or ".mpeg". When a file type is associated with a program, Windows will let you automatically open the file by double-clicking or right-clicking on the filename in the file explorer.
Playback Devices This dialog is used to optimize the playback of your videos program while editing. It does not affect, in any way, the format or quality of your saved edits. Video Display Options: Deinterlace On: If checked, VideoReDo will de-interlace the video display. Interlaced video can cause lines to appear on screen, especially during scenes with lots of fast moving action. Deinterlacing removes these artifacts with a very slight (usually un-noticeable) loss of display quality.
VideoDriver: This drop down box lets you select which software driver VideoReDo should use to display the main video window while editing. This parameter does NOT affect the output video in any way. The VMR7 or VMR9 drivers should be used if your system has multiple attached monitors. ● ● ● ● DirectX - The DirectX driver relies on DirectDraw7 and should provide excellent performance on most single monitor machines and should have the highest level of compatability especially on older systems.
Start Up Start Up This dialog is to control the behavior of VideoReDo each time it starts. Check For Updated Version At Startup: If checked, VideoReDo will poll the VideoReDo web site to determine if there is a later version of the software available and inform you when there is one. Days Between Checks: VideoReDo will check the web site for a new version at most once per day. You can increase the time between checks by setting this field to a higher number of days.
Chapter Marks VideoReDo has the capability of creating chapter files suitable for import directly into DVD authoring programs. A chapter file can created either by clicking on File > Save Chapter File, or automatically everytime a file is saved. The parameters on this options page control the format and types of chapter marks created. For user who are authoring directly in VideoReDo TVSuite, there is no need to export a chapter file.
Template: Chapter file name: %F_chapter.txt myVideo_chapter.txt Line Format: This text box contains the template this is used to format each line in the chapter file. There are three substitution strings: %T - substitutes the time code. The Timecode format is determined by the selection box below. %N - Frame number. Please note that the frame number is the displayed frame number and not the input frame number. The displayed frame number can be different when the program employes 3:2 pulldown material.
Audio Alerts This options dialog is used to set the sound that VideoReDo when it has completed outputting your edits. Upon Output Completion Play Sound: This selection box lets you specify when a sound should be played. Options are: Never: Interactive Only: Interactive and Batch: Don't play audio when output is complete. Only play audio on output complete only when VideoReDo is running in an interactive mode. Play a sound whenever an output file is created.
Enhanced features The parameters on this options page control the some of the unique features now available in VideoReDo TVSuite. Combining: Combining is the ability of VideoReDo to logically merge multiple files into single large file while editing. This feature is useful for situations where a single program file is split into multiple storage segments. For example, the VOB files on a DVD are limited, by the DVD specification, to a maximum of 1 GByte per file.
VOB files named: VTS_01_01.VOB VTS_01_02.VOB VTS_01_03.VOB etc. When Auto combine is checked, VideoRedo Plus will see that each of this VOBs are part of the same set and load all three of them, as one long file, whenever you open any of them. Note: When working with VOB files, the filename VTS_??_00.VOB always contains menu and background images. VideoReDo Plus knows not to include this VOB file name in the Auto Combine set.
However, using combining on files that do not come from a single source is not recommended. In this case you should use the joiner to ensure proper attention is paid to audio and video alignments. Note: Combining does minimal error checking on each component file. For example combining different file types, such as program and transport streams may result in unpredictable results or even program failure. Joining does not have this limitation as each file is opened and processed independently.
Transport Stream Output This options page controls the behavior of VideoReDo Plus' build-in transport stream multiplexor Output PAT and PMT Packets: A transport stream is made up of two kinds of data, program content (i. e. audio and video), and program specific information (PSI) data. VideoReDo will output the two required PSI data packets: Program Access Table (PAT) and Program Map Table (PMT). Pat/PMT Interval (msec): Set to the number of milliseconds, in the output file, between successive PSI packets.
Mbps: Fill in a manual mux rate in Mbps. Decimal values are allowed (e.g. 19.2 Mbps). Omit Null Packets: Compliant transport streams are always constant bit rate files. Empty space in the file is full with Null packets to insure that the bit rate remains constant. This can cause very large files to be created if the multiplex rate is significantly higher than that required by the audio and video streams. When this option is checked, Null packets will be not be output.
Topfield Rec This option page is used to set the metadata and output characteristics of Topfield .REC files created by VideoReDo. Topfield Type: ● ● Topfield PVR 5000 - Select this option if the intended destination is a Topfield 5000. Topfield PVR 5800 - Select this option if the intended destination is a Topfield 5800. Event Text Override Templates: These three fields are used to update the Event Name and short description in the output .rec file.
DVR-MS Output This option page is used to set the metadata and output characteristics of DVR-MS files created by VideoReDo. Preserve Closed Captions: When checked, closed captions in the original stream are preserved through the editing process. Closed captions are normally stored as user data in the video stream and should not be confused with subtitles. In DVR-MS files, closed captions are treated as a seperate stream.
prevent MCE from setting the edited file as another copy of the source file. Example: ● ● To change the title from "Jag" to "Jag Edited", put '{ORIG} Edited' in the Title field. To change the subtitle from "Drop Zone" to "Drop Zone edited at 9:00 AM" put "{ORIG} edited at {TIME}" in the subtitle field. VideoReDo TVSuite Help - © 2003-2007 DRDSystems, Inc.
Titling Parameters . This dialog is used to set the durations for the titling features. VideoReDo titles are typically inserted at the beginning of an output video, or between titles if using the joiner. For more about titling, please see the Title Editor. Fade-in: The number of seconds to fade in the titles. If this value is non-zero, the title begins as a black screen and gradually transitions to full intensity over the specified period. Title duration: Number of seconds to display the title.
DVD Settings Temporary File Area: To author a DVD VideoReDo needs to process your source files into a temporary area on one of your hard drives. The files in this temporary area are actually elementary stream files with edits and recodings applied. The size of the temporary area needs to be at least as large as the DVD you creating. For example a single layer DVD will require a 4.7GB or larger temporary area.
Maximum burn speed: The burner will attempt to determine the maximum burn speed based on the speed of the media used as well as the maximum drive speed. Many users have found that burning at less than the maximum media speed is more reliable. Pad short VIDEO_TS folders during burn : Checking this option will create fully compliant DVDs if the total folder size is less than 1GB. VideoReDo TVSuite Help - © 2003-2007 DRDSystems, Inc.
Enter TimeCode This dialog will let you jump to a specific time code in your video by entering the appropriate time into the edit boxes. This dialog can be displayed either by double-clicking on the Cursor Time window: pressing Ctrl+T. or VideoReDo TVSuite Help - © 2003-2007 DRDSystems, Inc.
License Agreement SOFTWARE LICENSE AGREEMENT IMPORTANT - PLEASE READ THE TERMS AND CONDITIONS OF THIS SOFTWARE LICENSE AGREEMENT BEFORE ATTEMPTING TO INSTALL “VIDEOREDO™”, “VIDEOREDO Plus™” or “VIDEOREDO TVSuite™" ("VIDEOREDO”). DRD SYSTEMS, INC. (“DRD”) IS WILLING TO LICENSE VIDEOREDO™ SOFTWARE TO YOU AS THE INDIVIDUAL WHO WILL BE USING THE SOFTWARE (“YOU”) ONLY ON THE CONDITION THAT YOU ACCEPT ALL THE TERMS OF THIS LICENSE AGREEMENT. THIS IS A LEGAL AND ENFORCEABLE CONTRACT BETWEEN YOU AND DRD.
7. General Provisions. This Agreement and its license shall automatically terminate upon failure by you to comply with any of its terms. Following any such termination, you shall immediately destroy all Software and registration keys in your possession. This Agreement will be governed by the laws in force in the state of New Jersey , excluding its conflict of law rules, and exclusive venue for any litigation shall be in New Jersey .
Loading and saving projects Projects are the internal list of edit selections. When you open a video file, the internal project is empty as there are no selections. Each time you add or change a selection the internal project is updated. You can save the internal project file to disk using the "Save Project File As..." from the file menu. The currently active project can be saved by selecting the "Save Project" option or by simply pressing Ctrl+P. You can open a previously saved project from the same menu.
Audio Synchromization and Output Volume Audio Synchronization and Output Volume You can use this dialog to alter the synchronization between audio and video streams. This might be necessary if the original program is out of sync. You can also adjust the volume of the output file. This is different from the audio level adjustment in the main display which only affects playback volume. Any volume adjustment is heard during playback and will be adjusted in the output file.
QuickStream Fix Filter If your video file contains video with multiple dimensions, VideoReDo will not be able to edit it. This dialog, which is enabled via QuickStream Fix, will let you limit the QuickStream Fix operation to video frames of a particular dimension. Video Dimension Filter: This drop down box displays all the video dimensions that VideoReDo has encountered in this file. The list is created by scanning the file at equal intervals and looking at 4 second chunks of the file at each interval.