
Install Instructions


7
a.
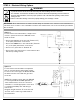
B e f ore filling the system, t u r n on the electric power to the
b o i l e r.
The low water cut-off's green "Power On" LED
should be illuminated. With the room thermostat set on
"heat", confirm that the burner will not operate without
water in the system. The low water cut-off's red LED
should be illuminated.
NOTE: The burner will come on briefly (1 second or less)
and then shut off to verify proper operation.
b. Fill the system with water. The low water cut-off's red LED
should shut off. Confirm that the burner and room thermo-
stat are operating properly.
c. Check for proper operation of all of the limit and operating
controls, before leaving the site.
d. Check the threaded connection of the low water cut-off fo r
l e a k a g e. Tighten, if necessary.
STEP 4 - Testing
I N S TA L L ATION COMPLETE
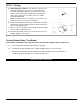
Testing Control Using “Test Button”
Pressing the “Test Button” interrupts the probe circuit which simulates water off the probe.
a. Press and hold “test button” while burner is running.
b. The burner should turn OFF and red light turn ON if burner is wired correctly.
c. Release the test button and the red light should turn off and the boiler should turn on
provided that the boiler water is in contact with the probe.