Operator′s manual M105-97F M125-97FH Please read the operator’s manual carefully and make sure you understand the instructions before using the machine.
CONTENTS Contents CONTENTS Contents ...................................................................... INTRODUCTION Dear Customer, ............................................................ Driving and transport on public roads .......................... Towing .......................................................................... Use .............................................................................. Good service ................................................................
INTRODUCTION Dear Customer, Thank you for choosing a McCulloch Front mower. McCulloch M105-97F and M125-97FH are built to a unique design with a frontmounted cutting unit. The machine is built to give maximum efficiency even in small and confined areas. This operator’s manual is a valuable document. By following its instructions (on operation, service, maintenance, etc.) you will significantly extend the life of the machine and even its second-hand value.
Service journal Pre-delivery service 1 Charge the battery for 4 hours at max. 3 amp. 2 Attach the cutting unit to the machine, see Attaching the cutting unit. 3 Fit steering wheel, seat and any optional equipment. See instructions under the heading Assembly. 4 Check and adjust tyre pressure. See instructions under the heading Technical data. 5 Check that the right amount of oil is in the engine. See instructions under the heading Technical data. 6 Connect battery.
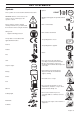
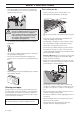
KEY TO SYMBOLS Symbols Ignition These symbols are on the machine and in the instructions. START WARNING! Careless or incorrect use can result in serious or fatal injury to the operator or others. Warning: rotating parts. Keep hands and feet clear. Please read the operator’s manual carefully and make sure you understand the instructions before using the machine.
KEY TO SYMBOLS Drive very slowly if no cutting unit is fitted Cutting deck must be fitted before driving at full speed.
SAFETY INSTRUCTIONS Safety instructions • Never carry passengers. The machine is only intended to be used by one person. • Always look downwards and backwards before and while reversing. Keep watch for both large and small obstacles. • Slow before cornering. • Switch off the blades when you are not mowing. • Take care when rounding a fixed object, so that the blades do not hit it. Never run the machine over foreign objects. These instructions are for your safety. Read them carefully.
SAFETY INSTRUCTIONS • Never allow children or other persons not trained in the use of the machine to use or service it. Local laws may regulate the age of the user. ! • WARNING! You must use approved personal protective equipment whenever you use the machine. Personal protective equipment cannot eliminate the risk of injury but it will reduce the degree of injury if an accident does happen. Ask your dealer for help in choosing the right equipment.
SAFETY INSTRUCTIONS Children • Serious accidents may occur if you fail to be on your guard for children in the vicinity of the machine. Children are often attracted to the machine and mowing. Never assume that children will remain where you last saw them. • Keep children away from the area to be mowed and under close supervision by another adult. • Keep an eye out and shut off the machine if children enter the work area.
SAFETY INSTRUCTIONS • Observe the risk of injury caused by moving or hot parts if the engine is started with the engine cover open or protective cowlings removed. • Do not change the setting of governors. If you run too fast, you risk damaging the machine components. • Never use the machine indoors or in spaces lacking proper ventilation. Exhaust fumes contain carbon monoxide, an odourless, poisonous and highly dangerous gas. • Stop and inspect the equipment if you run over or into anything.
WHAT IS WHAT? 1 3 4 5 6 2 7 10 8 12 11 9 15 14 13 17 21 20 19 18 16 Location of the controls 1 Side ejection 11 M125-97FH: Lever to disengage the drive 2 Mulching plug 12 Battery 3 M125-97FH: Speed limiter for driving forward M105-97F: Clutch pedal, neutral and parking brake 13 Dipstick 4 M105-97F: Lock button for parking brake 5 M125-97FH: Speed limiter pedal reverse 6 Ignition lock 7 M105-97F: Gear shift lever 8 M125-97FH: Parking brake 9 Seat adjustment.
PRESENTATION Presentation Parking brake M125-97FH Congratulations on your choice of an excellent quality product that will give you great pleasure for many years. The parking brake is applied as follows: McCulloch M105-97F has a gearbox of "inline" type with 3 forward gears and 1 backward gear. On McCulloch M125-97FH, the power transmission is handled by a hydrostatic gearbox which allows variable variation of the speed. 1 Slide the parking brake lever forward.
PRESENTATION Cutting unit Move the lever back and lock it to stop the blades from rotating. The machines are equipped with a 2-blade Mulching cutting deck. The machines can also be used with side ejection by fitting the side ejector on the cutting cover. See instructions under the heading Assembly. Lifting pedal for cutting deck The lifting pedal is used to put the cutting deck in either the transport or mowing positions. If the pedal is pressed down, the cutting deck is raised to the transport position.
PRESENTATION Fueling The engine runs on unleaded petrol with a minimum octane rating of 85 (not mixed with oil). We recommend the use of biodegradable alkylate petrol. Allways use fresh and clean, unleaded petrol. Do not use petrol that contains methanol. Do not fill the tank completely, leave an expansion area of at least 2.5 cm (1“). ! WARNING! Petrol is highly inflammable. Exercise care and refuel outdoors (see safety instructions). IMPORTANT! Do not use the fuel tank as a support area.
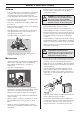
ASSEMBLY Assembly 3 Check that the lever for setting the cutting height is in the S position. 4 Fit the cutting deck's pipe together with the deck frame's pipe. 5 Push the cutting deck in and make sure the guide bolts fit into the grooves on the deck frame, one on each side. 6 Grab the pipes and push the deck in. Push the deck until you feel the pipes touch bottom. Lock the equipment frame using the pin. The ride-on mower must first be assembled before it can be used.
ASSEMBLY 8 Tension the belt with the belt adjuster. 4 Lower the cutting deck to the mowing position. 9 Fit the front cover. 5 Remove the front cover. 6 Disengage the spring for the drive belt tensioning wheel. 7 Remove the pin in the equipment frame. Grab the upper pipe construction of the deck and pull it out. 10 Set the cutting deck height control in any of the positions 1-5. Removing the cutting unit The cutting deck can be removed in order to facilitate cleaning and servicing.
ASSEMBLY Fitting the side discharge. 1 Loosen the mulching plug. 2 1 1 2 Fit the spring to the side discharge. Fit the side discharge between the cutting deck brackets. 3 Slide the round pin (1) through the side discharge and the spring. Lock the pin in place with the lockwasher (2). 2 1 Charge the battery The battery must be charged with max. 3 Amp for 4 hours before using the lawnmower for the first time. See the battery charger instructions on how to connect the battery charger.
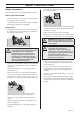
Driving Before starting 3 Activate the parking brake. This is done as follows: M105-97F IMPORTANT! The air intake grille in the engine cover behind the driver’s seat must not be blocked by, for example, clothing, leaves, grass or dirt. 2 Impaired cooling of the engine. Risk of major engine damage. 1 - Press down the parking brake pedal (1). - Press in the lock button (2) on the steering column. - Release the brake pedal while holding the button pressed.
Driving With a cold engine: 5 Move the throttle to position 3 (choke position). In this position the engine is fed with a richer mixture, which means the engine is easier to start. 3 Starting the engine with a weak battery If the battery is too weak to start the engine, it should be recharged. Charge the battery for 4 hours at max. 3 amp. When jump leads are used for emergency starting, follow the procedure below: ! IMPORTANT INFORMATION Your mower is equipped with a 12-volt system with negative earth.
Driving Driving the Front mower 1 Release the parking brake. IMPORTANT! Gear changes between forward gears must not be made while the machine is moving. The engine must be disengaged during each gear change. M105-97F Release the parking brake by first pressing down the parking brake pedal and then releasing it. Stop the machine before changing between forward and reverse gears, otherwise this may result in damage to the gearbox. Never use force to engage a gear.
Driving Cutting tips Stop the engine Preferably allow the engine to idle for a minute to obtain normal working temperature before stopping it if it has been working hard. Avoid idling the engine for long periods, as there is a risk of carbon build-up on the spark plugs. ! Disengaging the blades. 2 Lift up the cutting deck by stepping on the lifting pedal and pressing in the lock button. 3 M105-97F Pull back the throttle and move the gear shift lever to ”N" – neutral position.
Maintenance Maintenance schedule The following is a list of the maintenance which should be conducted on the machine. For those points not described in this manual, visit an authorised service workshop.
Maintenance Cleaning Removing of the machine hoods Clean the machine directly after use. It is much easier to wash off grass cuttings before they dry. Engine cover The engine becomes accessible for service when the engine cover is opened. Fold the seat forward, loosen the screw under the seat and push the cover backwards. Oily dirt can be removed using a cold degreasing agent. Spray on a thin layer. Rinse at normal water pressure. Do not use a high pressure washer to clean the machine.
Maintenance Lubrication of drive chain M105-97F Replacing the air filter 1 If the engine seems to lack power or does not run smoothly this may be because the air filter is clogged. It is therefore important to replace the air filter at regular intervals (see Maintenance/Maintenance Schedule for the correct service interval). Remove the service hatch. 1 2 Replace the air filter as follows: 2 3 1 Open the engine cover. 2 Loosen the knobs holding the filter cover in place and remove it.
Maintenance Checking the tyre pressure Fuses The tyre pressure should be 1 bar / 100 kPa / 14,5 PSI for all wheels The main fuse is placed in a detachable holder behind the battery under the protective cover. Type: Flat pin, 15 A. IMPORTANT INFORMATION Different tyre pressures on the front tyres will result in the blades cutting the grass at different heights. Ignition system The engine is equipped with an electronic ignition system. Only the spark plug requires maintenance.
Maintenance Checking the engine’s cooling air intake Clean the air intake grille in the engine cover behind the driver’s seat. Checking the blades To achieve the best mowing results it is important that the blades are undamaged and well-sharpened. Check that the blades’ attachment screws are tight. • Remove the cutting deck. See the "Removing the Cutting Deck” section. Open the engine cover.
Lubrication Checking the engine’s oil level. Replacing the engine oil Check the oil level in the engine when the Front mower stands horizontal with the engine switched off. The engine oil should be changed the first time after 8 hours running time. It should then be changed after every 50 hours of running time. Open the engine cover. Loosen the dipstick, pull it up and wipe it off. When operating with a heavy load or at high ambient temperatures, replace every 25 hours.
Troubleshooting schedule Problem Cause Engine does not start There is no fuel in the fuel tank Spark plug defective See the “Checking the Safety System” section if the controls are in the wrong position. Faulty spark plug connections or interchanged cables Dirt in the carburettor or fuel line Starter motor does not turn over the engine Dirt, water or stale fuel in the tank.
Storage Winter storage Guard At the end of the season, or if the machine is going to stand idle for more than 30 days, it should immediately be made ready for storage. Fuel which is left to stand for long periods (30 days or more) can leave tacky deposits which can block the carburettor and interfere with the engine. There is a cover to protect your machine during storage or transport.
TECHNICAL DATA Dimensions Length without cutting unit, mm/ft Length with cutting unit, mm/ft Width without cutting unit, mm/ft Width with cutting unit, mm/ft Height, mm/ft Operating weight with cutting deck, kg/lb Wheel base, mm/ft Tyre size, front Tyre size, back Air pressure, rear - front, kPa / bar / PSI Engine Brand / Model Nominal engine output, kW (see note 1) Displacement, cm3/cu.in Max.
TECHNICAL DATA IMPORTANT INFORMATION When the service life of this product has been served and it is no longer used it should be returned to the dealer or to an applicable station for recycling. IMPORTANT INFORMATION We reserve the right to change specifications and designs without prior notice so as to implement improvements. Note that no legal claims are valid on the basis of information in this manual. Use only genuine parts for repairs. The warranty is not valid if non genuine parts are used.
Original instructions 1154558-26 ´®z+VWr¶6-¨ ´®z+VWr¶6-¨ 2012-06-07