Exterity avediaCentre Installation Guide
___________________________________________________1 Notices © Exterity Limited 2003-2006 This document contains information that is protected by copyright. Reproduction, adaptation, or translation without prior permission is prohibited, except as under the copyright laws. Document Reference 1300-1001-0001 Edition 1.1.0.61, November 2006 Printed in UK Exterity Limited Ridge Way Hillend Industrial Park Dalgety Bay Fife, KY11 9JD Scotland, UK http://www.exterity.co.
___________________________________________________1 Contents 1 2 3 Introduction ...............................................................................................2 1.1 Purpose .............................................................................................2 1.2 Document Usage ...............................................................................2 1.3 Scope.................................................................................................
___________________________________________________2 1 Introduction 1.1 Purpose This document describes information to assist a user when installing the Exterity avediaCentre software to ensure that the installation itself runs smoothly. 1.2 Document Usage Integrators and resellers should use this document to understand the information that is required from the customer in order to perform an installation.
___________________________________________________3 2 Getting Started The Exterity avediaCentre is a TV and radio playback and recording application for the PC. To use the Exterity avediaCentre it must first be installed on your PC. The installation of the Exterity avediaCentre has three stages 1) Install MPEG 2 codecs – these decode the TV and radio for avediaCentre to play/record. This must be done before avediaCentre can be used successfully. See the Installing MPEG 2 Codecs section below.
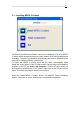
___________________________________________________4 2.1 Installing MPEG 2 Codecs The Exterity avediaCentre software requires the installation of a set of MPEG 2 codecs which decode the incoming video streams for Exterity avediaCentre to display. These are not installed automatically and must be installed by the user prior to installing Exterity avediaCentre. To install the MPEG 2 codecs insert the CD which automatically starts Setup.exe shown above. If the CD fails to start, find the Setup.
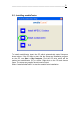
___________________________________________________5 2.2 Installing avediaCentre To install avediaCentre insert the CD which automatically starts Setup.exe shown above. If the CD fails to start, find the Setup.exe installation program on the CD, use Start -> My Computer. Find the CD drive which will be marked as avediaCentre (D:) or similar. Right-click on the CD and choose Open. The setup.exe program should now be listed. Select “Install avediaCentre” to start the avediaCentre installation.
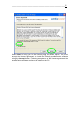
___________________________________________________6 Select Next to bring you to the license page as shown above. You must accept the license agreement to install the Exterity avediaCentre software using the Accept button. Following acceptance of the license agreement the avediaCentre software continues to install on the PC.
___________________________________________________7 The installation finishes by asking the user to reboot the PC. It is essential that the PC is rebooted before running the Exterity avediaCentre software. Select Finish allowing the installation to reboot the PC.
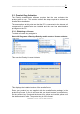
___________________________________________________8 2.3 Product Key Activation The Exterity avediaCentre software requires that the user activates the product prior to use. This section outlines the steps required to activate an avediaCentre installation. The assumptions at this point are that the PC is connected to the internet, all components of avediaCentre are installed and the user has administrative privileges on the PC. 2.3.
___________________________________________________9 Once all fields are populated, hit the Activate button. This will gather the required information necessary for the license, contact the Exterity License Server and if successful, download your license to the PC. On successful license download the above dialog is shown. Close the dialog to complete the license activation. If an error occurs during activation a detailed error message is displayed in internet explorer.
___________________________________________________10 Troubleshooting 3.1 Starting avediaCentre without a license If the user has no license installed the following error is displayed. On exit the license activator starts, follow the instructions in the Product Key Activation section above to activate avediaCentre.
___________________________________________________11 3.2 Starting avediaCentre with an invalid license If the user has a license which is invalid the following error is displayed. On exit the license activator starts, follow the instructions in the Product Key Activation section above to activate avediaCentre.
___________________________________________________12 3.3 MPEG 2 Codecs not installed If the MPEG 2 codecs are not installed the above error is seen. Follow the instructions in the Installing MPEG 2 Codecs section above.
___________________________________________________13 3.4 No channel names shown in the channel list If no channels are shown in the channel list as above, this is likely to be a problem regarding the firewall installed on the PC. To view the channel list avediaCentre requires that a single port be opened in the firewall to allow the channels to announce themselves.
___________________________________________________14 3.5 I am using the Windows firewall but there are still no channels in the channel list If you are using the windows firewall and you are not seeing any channels, verify that the firewall is correctly configured. The windows firewall can be found at Start->Control Panel->Security Center->Windows Firewall. The Windows firewall has several settings as shown above.
___________________________________________________15 On the Exceptions tab there should be an entry called SAP. If there is not, use the Add Port… button and enter the details as shown below.
___________________________________________________16 3.6 My firewall has opened up the correct port but I still see no channel list The firewall is correctly configured there is another error in the system. Please contact your network administrator or distributor to sort the problem.
___________________________________________________17 3.7 Channels do not play from channel list To view video from the channels the avediaCentre application requires access to the video streamed to it over the network interface. If no video is seen on any of the channels as shown above it is likely that the firewall installed on the PC is preventing avediaCentre from receiving this data over the network interface.
___________________________________________________18 The windows firewall can be found at Start->Control Panel->Security Center->Windows Firewall->. The Windows firewall has several settings as shown above. You should configure the General tab as shown above with the On checked and Don’t allow exceptions unchecked.
___________________________________________________19 To add the Exterity avediaCentre select the Add Program… button. This will display another window.
___________________________________________________20 Use the Browse… button to locate the avediaCentre executable, avediaCentre. By default this is installed to c:\Program files\Exterity\avedia centre. Select OK, avediaCentre is now shown on the list of exceptions. Close avediaCentre and restart. Select a channel from the channel list and verify that you can see/hear video/audio.
___________________________________________________21 Appendix A ZoneAlarm Firewall A.1 Permitting avediaCentre and components On installing avediaCentre, ZoneAlarm should prompt you to allow the avediaChannelListener to accept connections. You should choose Allow, making sure to check Remember this setting (see below). On starting avediaCentre, you will be prompted to allow avediaCentre to accept connections. Again, you should Allow and choose to Remember this setting.
___________________________________________________22 A.2 Troubleshooting In some circumstances, the avediaChannelListener security alert does not occur on installation. The symptom of this is that no channels are present in the avediaCentre channels list. In this situation, the following steps must be taken. Bring up the Service Manager as follows: • Click Start. • Choose Control Panel. • Choose Performance and Maintenance. • Choose Administrative Tools. • Choose Services.
___________________________________________________23 Double-click to bring up the dialog shown above, set the Startup type to Manual as shown and click OK. This means that the avediaChannelListener will not start automatically when your PC starts up.
___________________________________________________24 Next, reboot your PC. Once restarted, start the avedia channel listener service manually using Start -> All Programs -> Exterity -> Exterity avedia channel listener -> Start avedia channel listener as shown above. This should cause the security alert pop-up and should be handled as described previously, allowing the list of channels to be built.
___________________________________________________25 Appendix B Mcafee Personal Firewall When using avediaCentre with Mcafee Personal Firewall, users can experience problems receiving TV and radio channels. avediaCentre can play back TV and radio channels but after approximately five minutes the TV picture freezes and the channels list disappears. Mcafee have so far been unable to provide a satisfactory solution for this problem.
___________________________________________________26 B.1 Add IGMP querier to trusted IP address list You will require the IP address of the IGMP querier on your network. Contact your IT department for this information. To open the trusted IP address list, choose Options from the Personal Firewall section of the McAfee Security Center as shown above.
___________________________________________________27 Next choose Trusted and Banned IPs as shown above.
___________________________________________________28 Next choose Add as shown above.
___________________________________________________29 Now add the IGMP querier IP address as supplied by your IT department in the A Single IP Address section in the dialog shown above. Click OK to this and previous dialogs to return you to the Personal Firewall Plus options page. You may need to restart your computer before all avediaCentre components will work.
___________________________________________________30 B.2 Disable Mcafee Personal Firewall If you do not have the IP address of the IGMP querier, the only way to get avediaCentre to work is to disable the Mcafee Personal Firewall and enable the Windows Firewall instead. B.2.1 Disabling Mcafee Personal Firewall To disable the Mcafee Personal Firewall, do the following.
___________________________________________________31 Next, choose personal firewall plus from the options on the left hand side, and click to disable the firewall as shown above.
___________________________________________________32 The Mcafee security center should now display the above, signifying that the firewall is off:
___________________________________________________33 B.2.2 Enable Windows Firewall To ensure that your computer is still protected, ensure that the Windows Firewall is enabled as follows by opening the Windows Security Center from the Control Panel and choosing Windows Firewall at the bottom of the page. Ensure the settings are as follows. B.2.3 Restart To ensure the above changes take effect, restart your PC. avediaCentre should now be able to view TV and radio channels.
___________________________________________________34 B.3 Technical Information The avedia IPTV solution uses multicast IP traffic to transmit both audio/video data and channel announcements. Multicast traffic is controlled by IGMP messages between the network switches and the attached devices (e.g. your PC), and it is essential that these IGMP messages are successfully transmitted and received whilst viewing a channel.