
Owner's manual


- 7 -
SERVICE
Assembly and disassembly should be performed by a
service technician who has been factory trained on MBW
equipment. The unit should be clean and free of debris.
Pressure washing before disassembly is recommended.
• Prior to assembly, wash all parts in a suitable cleaner or
solvent.
• Check moving parts for wear and failure. Refer to the
Replacement section in this manual for tolerance and
replacement cycles.
• All shafts and housings should be oiled prior to pressing
bearings. Also, ensure that the bearings are pressed
square and are seated properly.
• All bearings should be replaced when rebuilding any
exciter or gearbox.
• All gaskets and seals should be replaced after any
disassembly.
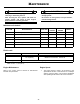
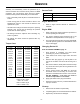
Torque Chart
Service Tools
Engine Maintenance
1. Refer to engine Owner’s Manual for maintenance
schedule.
Engine RPM
1. Refer to the engine Owner’s Manual for procedure to
set the operating and idle speed.
2. The engine operating speed should be set to the
RPM listed in the Specifications section (Page 3).
3. The engine idle speed should not exceed 1800 RPM.
If the idle speed is greater than 1800 RPM the clutch
may not disengage.
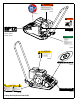
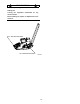
Changing Exciter Oil
Refer to EXCITER ASSEMBLY, page 12.
1. Allow machine to completely cool down before
performing any service or maintenance.
2. Clean debris from exciter, engine deck and base
plate.
3. Remove drain plug (Figure 3), and tilt plate to the
right so the oil drains from the exciter housing into a
pan.
4. After the oil is drained, tilt the plate to the left and wipe
any excess oil from the plate. Do not get debris in the
exciter drain hole.
5. Fill the exciter housing with MBW Inc. Grounder
Pounder® exciter oil according to the fluid level
specified in the Maintenance section of this manual.
DO NOT OVERFILL - over filling can result in
excessive temperatures in the exciter.
6. Apply pipe sealant to the plug and reinstall.
7. Discard the used oil and any contaminated debris in
a proper container.
Cleanup
1. Remove dirt and debris from plate daily.
2. If repainting plate, be sure that all decals are masked.
3. Replace any decals that are damaged.
SIZE GRADE 2 GRADE 5 GRADE 8
1/4-20 49 in
•lbs 76 in•lbs 9 ft•lbs
1/4-28 56 in
•lbs 87 in•lbs 10 ft•lbs
5/16-18 8 ft
•lbs 13 ft•lbs 18 ft•lbs
5/16-24 9 ft
•lbs 14 ft•lbs 20 ft•lbs
3/8-16 15 ft
•lbs 23 ft•lbs 33 ft•lbs
3/8-24 17 ft
•lbs 26 ft•lbs 37 ft•lbs
7/16-14 24 ft
•lbs 37 ft•lbs 52 ft•lbs
7/16-20 27 ft
•lbs 41 ft•lbs 58 ft•lbs
1/2-13 37 ft
•lbs 57 ft•lbs 80 ft•lbs
1/2-20 41 ft
•lbs 64 ft•lbs 90 ft•lbs
9/16-12 53 ft
•lbs 82 ft•lbs 115 ft•lbs
5/8-11 73 ft
•lbs 112 ft•lbs 159 ft•lbs
5/8-18 83 ft
•lbs 112 ft•lbs 180 ft•lbs
M 6 3 ft
•lbs 4 ft•lbs 7 ft•lbs
M 8 6 ft
•lbs 10 ft•lbs 18 ft•lbs
M 10 10 ft
•lbs 20 ft•lbs 30 ft•lbs
CONVERSIONS
in
•lbs x 0.083 = ft•lbs
ft
•lbs x 12 = in•lbs
ft
•lbs x 0.1383 = kg•m
ft
•lbs x 1.3558 = N•m
Part No. Description
01629 Test Mat
12100 Decal Set