
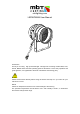
User guide


3
Function Introduction
1. DMX Mode;
2. Master- slave mode
3. Auto mode;
4. Sound mode;
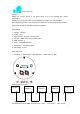
Operation Instruction:
1 2 3 4 5 6 7 8 9 10 OFF ON
Dipswitch instruction
As above figure of dipswitch showed, 1 is “on”and other is “OFF”. “#1”~“#10”stand
for “dipswitch1” ~“dipswitch10”. “1”means “on”and “0”means “off”and “*”means “on”or
“off” is ok( there is no function for dipswitch). X means it can set to 1 or 0 according to
designing needs.
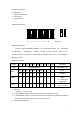
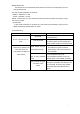
Brief function chart
Mode
#1
#2
#3
#4
#5
#6
#7
#8
#9
#10
Description
DMX
Set DMX address
0
Enter DMX mode
S0
S0
S0
S0
S0
S0
S0
0
0
1
Strobe
Auto
S0
S0
S0
S0
S0
S0
S0
1
1
1
Gradation
Manual
C
C
C
C
S1
S1
S1
1
0
1
“S1”select speed of
strobe
“C”select color
brightness
Sound
*
*
*
*
*
*
M
0
1
1
“M=0”mode 1
“M=1”mode 2
NOTE!Important
1. Sound:
①no FADE;②run to sound;
2. Connect DMX controller with the fixture through 3-pin XLR signal cord。
3. In master/slave mode, one of them was set to Auto mode or sound mode and others
was set to submachine, so fixtures can run at same time.
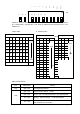
4. DMX address settings :