LEDPAR64PRO USER MANUAL
LEDPAR64PRO Table of Content Part I General Information--------------------------------------------------------------------------------3 1.1 Introduction----------------------------------------------------------------------------------------3 1.2 Safety Information-------------------------------------------------------------------------------3 1.3 Unpacking-----------------------------------------------------------------------------------------4 1.
LEDPAR64PRO Part I General Information 1.1 Introduction You have purchased the LEDPAR64PRO, High Power LED Par Lamp series product. To assure reliable performance, please read the instructions in this manual thoroughly and carefully before operating. 1.2 Safety Information The following definitions of identifying the severity of the hazards associated with the products are used: “DANGER” Imminently hazardous situation which, if not avoided, will cause death or serious injury.
LEDPAR64PRO PART I General Information (continued) 1.3 Unpacking The LEDPAR64PRO has been thoroughly tested and shipped in perfect operating condition. Check the shipping carton carefully for damage that may have occurred during shipping. If the carton appears to be damaged, carefully inspect your fixture for damage and be sure all accessories necessary to operate the fixture have arrived intact. In case damage has been found or parts are missing, please contact sales person for further instructions.
LEDPAR64PRO Part II Installation and Operation 2.
LEDPAR64PRO PART II Installation and Operation (continued) 2.2 AC Power The fixture’s mains lead may require a grounding-type plug connector that fits your power distribution cable or outlet. Consult a qualified electrician if you have any doubts about proper installation. WARNING: For protection from dangerous electric shock, the fixture must be grounded (earthed). The AC mains power supply should have overload and ground-fault protection.
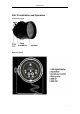
LEDPAR64PRO PART II Installation and Operation (continued) D. DMX addressing All fixtures should be given a DMX starting address when using a DMX controller, so the correct fixture responds to the correct control signal. This digital starting address is the channel number from which the fixture starts to "listen" to the DMX control information sent out from the DMX controller. The allocation of this starting DMX address is achieved by combining various dipswitches.
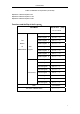
LEDPAR64PRO PART II Installation and Operation (continued) Dipswitch 7 address equals to 64 Dipswitch 8 address equals to 128 Dipswitch 9 address equals to 256 Functions and the Dip of the 2nd group: Dip of the 2nd group Work Mode 12345678 Auto Program 1 0000***0 Auto Program 2 0100***0 The Auto Program 3 0010***0 Master Auto Program 4 0110***0 Of Auto Auto Program Master/Slave Program Sound Active 5 0001***0 Auto Program 6 0101***0 Auto Program 7 0011***0 Auto Program 8 011
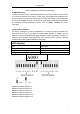
LEDPAR64PRO PART II Installation and Operation (continued) A. DMX mode: To have the fixture working in DMX mode, please toggle on the dipswitch #10 of Group1 as illustrates in below figure: 1. DMX channels 1,2,3,5 functions are determined by the current settings of channel 4. For example, while channel 4 is set between 0 and 28, Channel 1 will control the Red LEDs, Channel 2 will control the Green LEDs, Channel 3 will control the Blue LEDs.
LEDPAR64PRO PART II Installation and Operation (continued) C. Select auto programs To select auto programs, turn the dipswitch #1 of the 2nd group dipswitches off and dipswitch# 8 off.
LEDPAR64PRO Part III Maintenance and Cleaning Please refer to the following points during the normal inspection: Warning: Make certain all screws and fasteners are securely tightened at all times. Loosened screws may cause unexpected damage or injury. Warning: Do not use this product if the power cables are damaged. CAUTION: Make sure that the power cord of the unit is disconnected from the mains before performing the following operation to avoid shock hazard! 3.
LEDPAR64PRO PART III Maintenance and Cleaning (continued) 3.3 Troubleshooting Trouble Cause Remedy No power supply Check the mains power switch and the cables. Fuse burned Disconnect the power and replace the fuse with the same specification. If the fuse is burned again, the problem should be cause by the circuit. Please consult the local service agency. Fixtures do not responds. data errors The reset is normal.
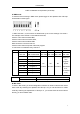
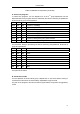
LEDPAR64PRO DMX Address Quick Reference Chart Dip Switch Position DMX DIP SWITCH SET #9 0 0 0 0 0 0 0 0 1 1 1 1 1 1 1 1 0=OFF #8 0 0 0 0 1 1 1 1 0 0 0 0 1 1 1 1 1=ON #7 0 0 1 1 0 0 1 1 0 0 1 1 0 0 1 1 X=OFF or ON #6 0 1 0 1 0 1 0 1 0 1 0 1 0 1 0 1 32 64 96 128 160 192 224 256 288 320 352 384 416 448 480 #1 #2 0 #3 0 #4 #5 0 0 0 1 0 0 0 0 1 33 65 97 129 161 193 225 257 289 321 353 385 417 449 48